HS50_advance_level 2.pdf - 第293页
Stud ent Gu ide HS-5 0 Adva nced II 07/2 002 Ed ition 9 Z-Axis 33 0HDVXUH PHQW6HWXS IRU$ [LV$ GMXVWPHQW V ready for operat ion enable outp ut stage effecti ve current lim it error tac ho P-gain axis 0 axis 1 ax…
07/2002 Edition Student Guide HS-50 Advanced II
9 Z-Axis
32
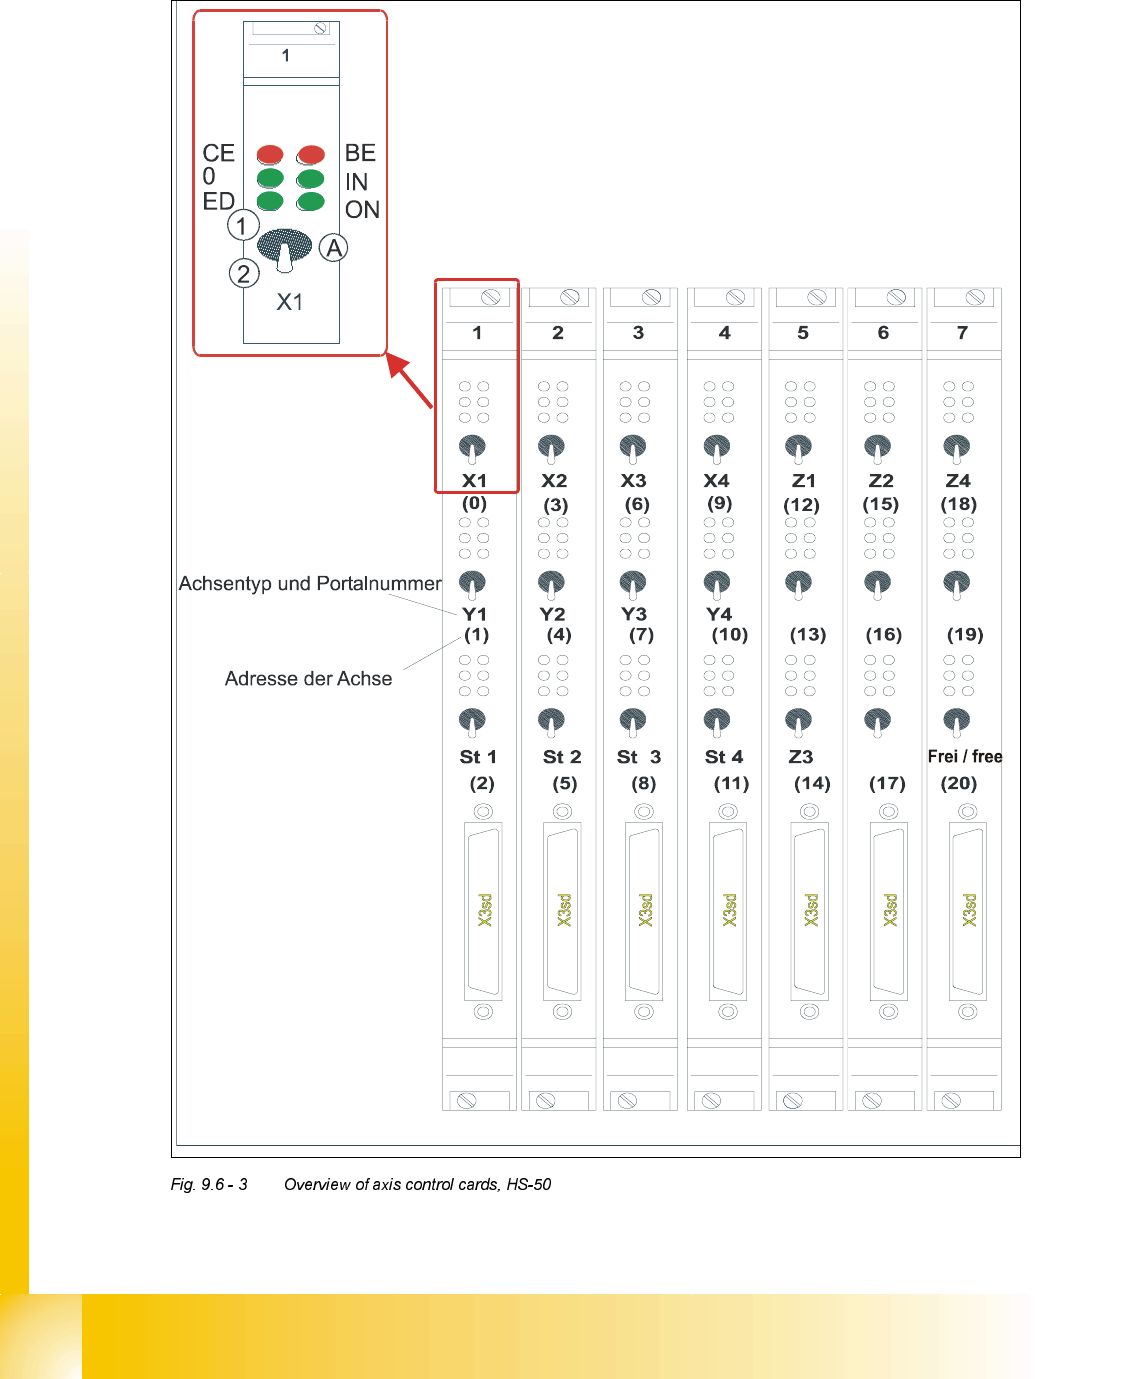
2YHUYLHZRI$[HV&RQWURO&DUGV+6
type of axis and gantry number
adress of axis
'3 '3
'3
'3
CE = Counting error
0 = Zero pulse
ED = End signal
BE = General error, module error
IN = Initialized
ON = Servo ON
(A) Axis enable switch
(1) Servo ON
(2) Servo OFF
Student Guide HS-50 Advanced II 07/2002 Edition
9 Z-Axis
33
0HDVXUHPHQW6HWXSIRU$[LV$GMXVWPHQWV
ready for operation
enable output stage
effective current limit
error
tacho
P-gain
axis 0
axis 1
axis 2
measuring current of star - axis
changeover switch pressed down
end signal axis 0
end signal axis 1
end signal axis 2
interface
test adapter
axis test box
actual current
with RC - filter
current measuring of dp - axis and z-axis only
interface axis control card
interface axis tes
t box
track A track B zero pulse Vnom force end signal deviat. of pos.
dgt
zero pulse
end signal
axis 0
axis 1
axis 2
OFF
ON
Vnominal
d
e
v
i
a
t
i
o
n
o
f
p
o
s
i
t
i
o
n
c
u
r
r
e
n
t
v
a
l
u
e
e
n
d
s
i
g
n
a
l

07/2002 Edition Student Guide HS-50 Advanced II
9 Z-Axis
34
=$[LV
*HQHUDO3UHSDUDWLRQV
➠ Start SITEST.
➠ Turn on the compressed air supply.
➠ Prepare the measurement setup for the star-axis acoording to .
➠ Use standard nozzle 914.
➠ Set the oscilloscope according to the table below.
➠ Perform a head reference run.
NOTE
Use an RC - filter to record the current curve
In order to measure the actual current on the servo amplifier, connect only the actual current and
no *1'.
Measure the end signal on the measuring adapter of the axis control card, with the switch
activated.
$GMXVWPHQWRI7DFKRDQG3JDLQ
3UHSDUDWLRQ
➠ Positioning the gantries, position the z-axis into free space.
6,7(67
➠ Select "C&P heads" ==> "Select head" ==>
"Axis functions" ==> "Select z-axis" ==> "Tacho adjustment" ==>
"Edit and accept values: Start position = 0; target position = 685; positioning mode = absolute;
waiting time = 300".
➠ If necessary, press the START button.