ASM_MANUAL_TYPHOON_USC_en_100620_online.PDFA - 第31页
3 TYPHOON UNDER STENCIL CLEANER 3.7 REPLACEMENT PROCEDURES STANDALONE MANUAL TYPHOON UNDER STENCIL CLEANER 06/2020 31 3.7 REPLACEMENT PROCEDURES WAR N I N G S O LVE N T S P R A Y . T H E U N D E R S C R E E N C L E A N E…
3 TYPHOON UNDER STENCIL CLEANER
3.6 REPLENISHMENT PROCEDURES
30 STANDALONE MANUAL TYPHOON UNDER STENCIL CLEANER 06/2020
CAUTION
PRINT MEDIUM AND SOLVENTS. WHEN USING OR HANDLING ANY PRINT
MEDIUM OR SOLVENT FORMULATION THE MANUFACTURER’S SAFETY
DATA SHEETS MUST BE STRICTLY ADHERED TO.
The solvent for the under stencil cleaner is stored in the external solvent tank. The external solvent
tank is secured to the machine base frame and may be located on either side or the rear of the
machine.
The plastic tubing that transports the solvent from the solvent tank to the under stencil cleaner
head is designed to withstand most types of solvent. However, mixing of two different solvents can
cause a chemical reaction and seriously damage the plastic tubing. When changing to a different
type of solvent, the tubing must be replaced completely to prevent solvent leaks. To obtain new
tubing and replacement instructions, order Machine Performance Upgrade (MPU) 602287*2.
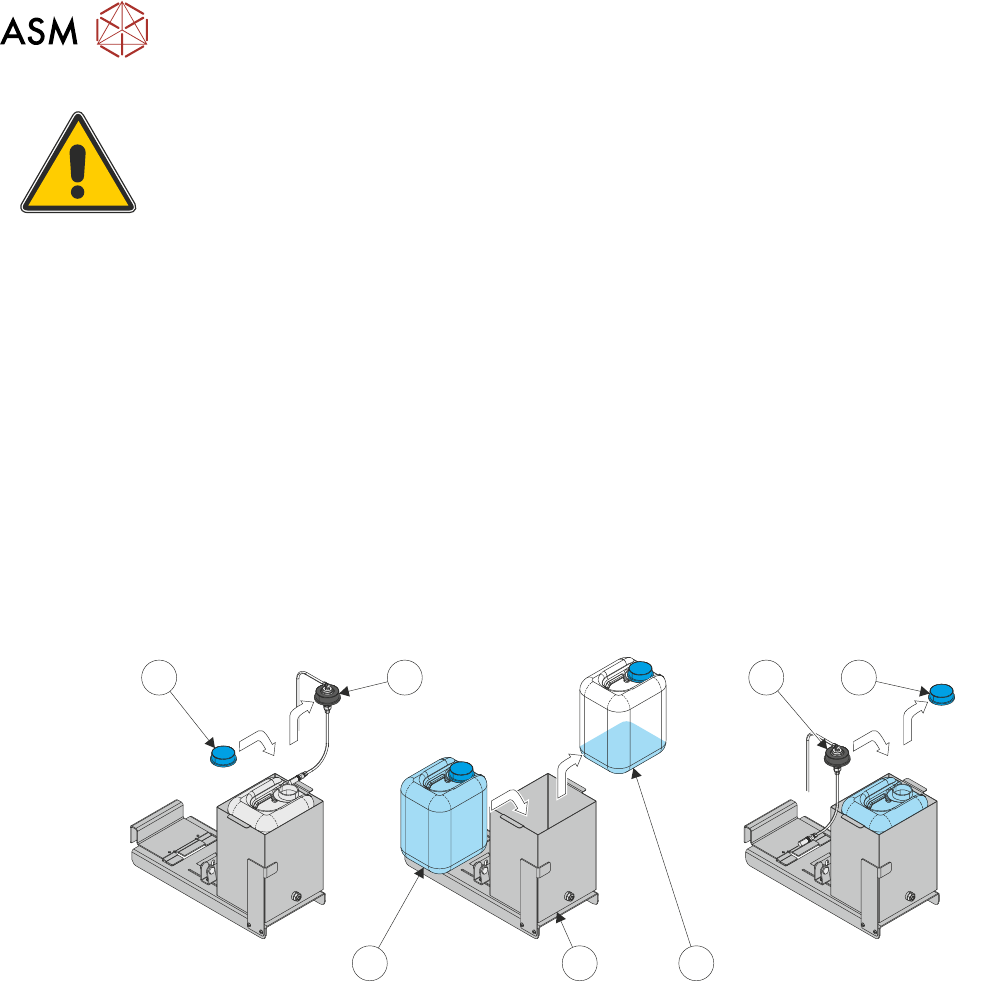
To replenish the solvent, use the following procedure:
1. If the machine is printing, select Stop.
NOTE
Do not replenish the solvent whilst the machine is running as an air lock may be created if a
cleaning cycle is performed whilst the lid of the solvent container is disconnected.
2. Remove the solvent lid (2) from the solvent container.
1 12
3
4
5
2
3. Refit the original container lid (1) to prevent spillage.
4. Remove the empty solvent container (5) from the external solvent tank (4).
5. Place the new solvent container (3) in to the external solvent tank (4).
6. Remove the new solvent container lid (1) and retain.
7. Refit the solvent lid (2) and tighten.
3 TYPHOON UNDER STENCIL CLEANER
3.7 REPLACEMENT PROCEDURES
STANDALONE MANUAL TYPHOON UNDER STENCIL CLEANER 06/2020 31
3.7 REPLACEMENT PROCEDURES
WARNING
SOLVENT SPRAY. THE UNDERSCREEN CLEANER SPRAYS A FINE JET OF
SOLVENT SOLUTION ON TO THE CLEANER. APPROVED PROTECTIVE
CLOTHING SHOULD BE WORN.
CAUTION
PRINT MEDIUM AND SOLVENTS. WHEN USING OR HANDLING ANY PRINT
MEDIUM OR SOLVENT FORMULATION THE MANUFACTURER’S SAFETY
DATA SHEETS MUST BE STRICTLY ADHERED TO.
MANDATORY
TOXIC SUBSTANCES MAY BE PRESENT. SAFETY GLOVES MUST BE WORN.
MANDATORY
TOXIC SUBSTANCES MAY BE PRESENT. EYE PROTECTION MUST BE WORN.
3.7.1 Plenum Chamber Insert
Plenum chamber inserts for the Typhoon USC are available in three variants, the following table
details the available widths:
Insert Variant Widths (mm)
300* 400* 460* 515* 620
Hard Top Y Y Y Y N
Poly Blade Y Y Y Y Y**
Duo Y Y Y Y N
* 300, 400, 460 and 515mm widths are interchangeable on the standard USC.
** 620mm width are for use on the long board USC. Only the Poly Blade insert variant is available.
To remove a chamber insert for cleaning, or to change variant and/or width to suit a different sten-
cil/product, complete the following remove and replace procedures:
NOTE
As the Long Board (620mm) USC only has one width of chamber insert available, the following pro-
cedure only applies to the standard USC.
3.7.1.1 Plenum Chamber Insert Removal
To remove the plenum chamber insert, carry out the following:
1. Power down the machine.
2. Remove the stencil from the machine.
3. Open the front printhead cover.
4. If not already removed, remove the fabric feed roll and temporarily stow on top of the take-up
roll at the rear of the USC.
3 TYPHOON UNDER STENCIL CLEANER
3.7 REPLACEMENT PROCEDURES
32 STANDALONE MANUAL TYPHOON UNDER STENCIL CLEANER 06/2020
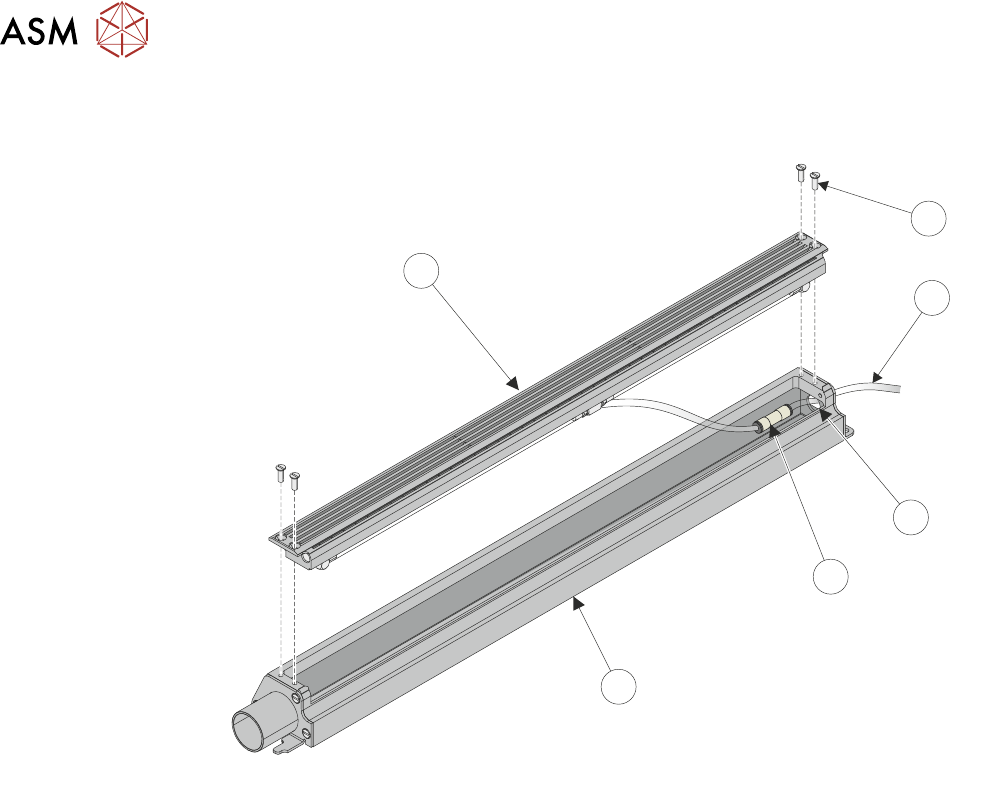
5. Remove and retain the four slot head screws (two per end) (1) fastening the plenum chamber
insert (6) to the plenum chamber (5).
2
1
3
4
5
6
6. Lift the plenum chamber insert (6) out of the plenum chamber (5) carefully, disconnect the
solvent inlet tube (2) from the connector (4) and remove through the plenum chamber inlet
hole (3).
NOTE
Blanking off end of solvent inlet tube may be required to prevent solvent leakage.
7. Remove the chamber insert from the machine.
3.7.1.2 Plenum Chamber Insert Replacement
To install/reinstall new plenum chamber insert, carry out the following:
1. Feed the solvent inlet tube through the plenum chamber's solvent inlet, and connect to the
plenum chamber solvent connector.
2. Place the plenum chamber insert into the top of the plenum chamber.
3. Secure the plenum chamber insert to the plenum chamber using the four slot head screws
(two per end) retained during 3.7.1.1 "Plenum Chamber Insert Removal" [}31].
4. Re-install fabric feed roll, stowed on top of take-up roll during 3.7.1.1 "Plenum Chamber Insert
Removal" [}31]..