ASM_MANUAL_TYPHOON_USC_en_100620_online.PDFA - 第46页
3 TYPHOON UNDER STENCIL CLEANER 3.8 ADJUSTMENTS AND SETTINGS 46 STANDALONE MANUAL TYPHOON UNDER STENCIL CLEANER 06/2020 17. Select Run Diagnost multiple times ensuring that the lift mechanism raises and lowers fully (wit…
3 TYPHOON UNDER STENCIL CLEANER
3.8 ADJUSTMENTS AND SETTINGS
STANDALONE MANUAL TYPHOON UNDER STENCIL CLEANER 06/2020 45
59. At the left hand home magnet, reconnect the home sensor (8SE10).
60. Close the printhead cover.
61. Select the System button.
62. Select Exit.
63. Select Back.
3.8.4 Lift Mechanism Air Flow Controller
Two in-line flow controllers restrict the air flow to the plenum chamber lift actuators to prevent the
USC from hitting the stencil with excessive speed.
The air flow should not need any adjustment unless replaced. Use the following procedure to adjust
the controller (a second person is required for this procedure):
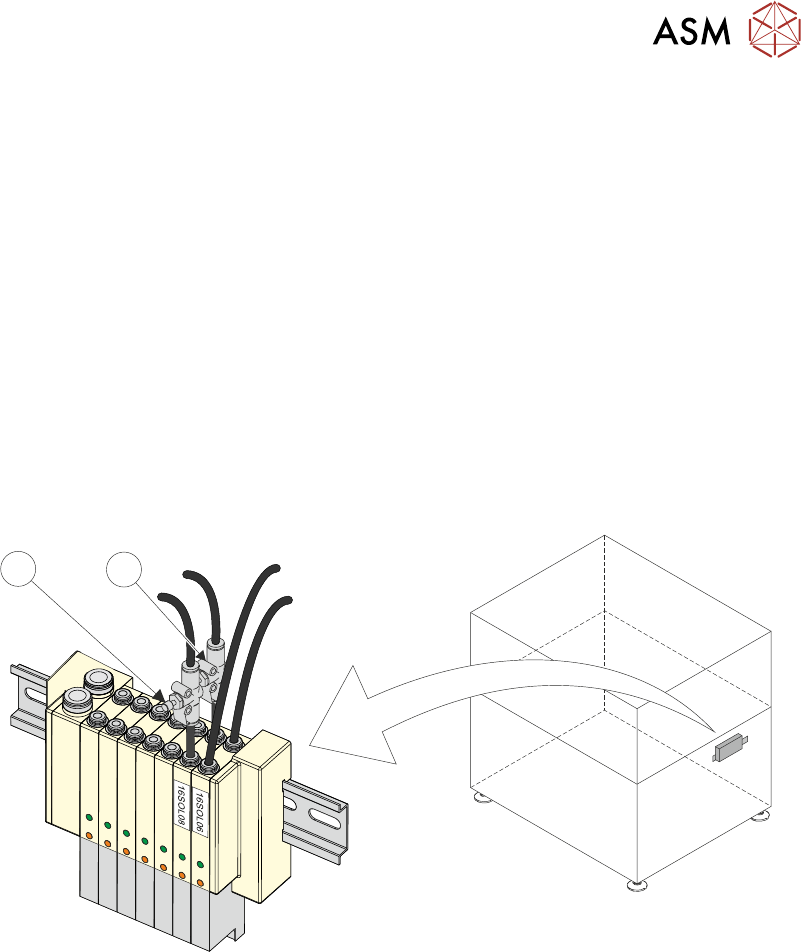
1. Remove machine front panel to gain access to the machine front pneumatic manifold.
NOTE
Some other machine variants have the pneumatic manifold mounted at the rear of the
machine, accessible by removing the rear lower panel.
1
2
2. Locate 16SOL08 with air flow controllers (USC Up (1) and USC Down (2)) fitted to the output
ports.
3. Turn the thumbscrews on the air flow controllers fully clockwise to shut off the air supply.
4. Select Load Screen.
5. Open the printhead cover.
6. Fit the calibration stencil into the machine.
7. Close the printhead cover.
8. Press System button.
9. Select Continue.
10. Select Maintenance.
11. Select Diagnostics.
12. Use Next or Previous to highlight Screen Cleaner.
13. Select Select Module.
14. Ensure Toggle Dry Wipe Blade is highlighted.
15. Select Run Diagnost to toggle the lift mechanism up and down.
16. Turn the thumbscrews on the lift mechanism air flow controllers anticlockwise to ensure
smooth, positive operation in both directions (up and down).

3 TYPHOON UNDER STENCIL CLEANER
3.8 ADJUSTMENTS AND SETTINGS
46 STANDALONE MANUAL TYPHOON UNDER STENCIL CLEANER 06/2020
17. Select Run Diagnost multiple times ensuring that the lift mechanism raises and lowers fully
(without struggling or slowing).
18. Select Exit.
19. Select Exit.
20. Select Back.
21. Refit machine front panel removed at Step 1.
3 TYPHOON UNDER STENCIL CLEANER
3.9 CALIBRATIONS
STANDALONE MANUAL TYPHOON UNDER STENCIL CLEANER 06/2020 47
3.9 CALIBRATIONS
WARNING
RECOMMENDED SOLVENTS. ANY SOLVENTS USED MUST COMPLY WITH
LOCAL ENVIRONMENTAL GUIDELINES. ASM RECOMMEND USING
SOLVENTS THAT ARE ENVIRONMENTALLY FRIENDLY, IE CFC FREE AND
WATER BASED. SOLVENTS USED MUST HAVE FAST EVAPORATION RATES
AND FLASHPOINT SPECIFICATIONS GREATER THAN 39°C.
CAUTION
PRINT MEDIUM AND SOLVENTS. WHEN USING OR HANDLING ANY PRINT
MEDIUM OR SOLVENT FORMULATION THE MANUFACTURER’S SAFETY
DATA SHEETS MUST BE STRICTLY ADHERED TO.
MANDATORY
TOXIC SUBSTANCES MAY BE PRESENT. SAFETY GLOVES MUST BE WORN.
MANDATORY
TOXIC SUBSTANCES MAY BE PRESENT. EYE PROTECTION MUST BE WORN.
3.9.1 External Solvent Tank
To enable the machine software to calculate when solvent is low, the weight of an "empty" solvent
container and a full solvent container need to be measured by the external solvent tank's load cell.
NOTE
To prevent air locks being created in the solvent tubing during an USC cleaning cycle, it is import-
ant that the solvent tank is never completely empty of solvent. For the purposes of this procedure
the "empty" solvent tank should contain a level of solvent that just covers the filter at the end of the
solvent tubing.
To calibrate the software carry out the following procedure:
1. Ensure that the external solvent tank is fitted with an "empty" 5 litre container.
2. Select Maintenance.
3. Select Calibrations.
4. Select Classic Calibrations.
5. Select Solvent.
6. Select Set Solv Empty.
7. Confirm by selecting Yes.
8. Replace the "empty" 5 litre container with a full 5 litre container of solvent to be used.
9. Select Set Solv Full and confirm by selecting Yes.
10. Select Exit.
11. Select Exit.
12. Select Back.
NOTE
Due to solvents having different densities, this calibration must be performed when changing
solvents.