PS288_OwnersMnl_PriorTo2009 - 第124页
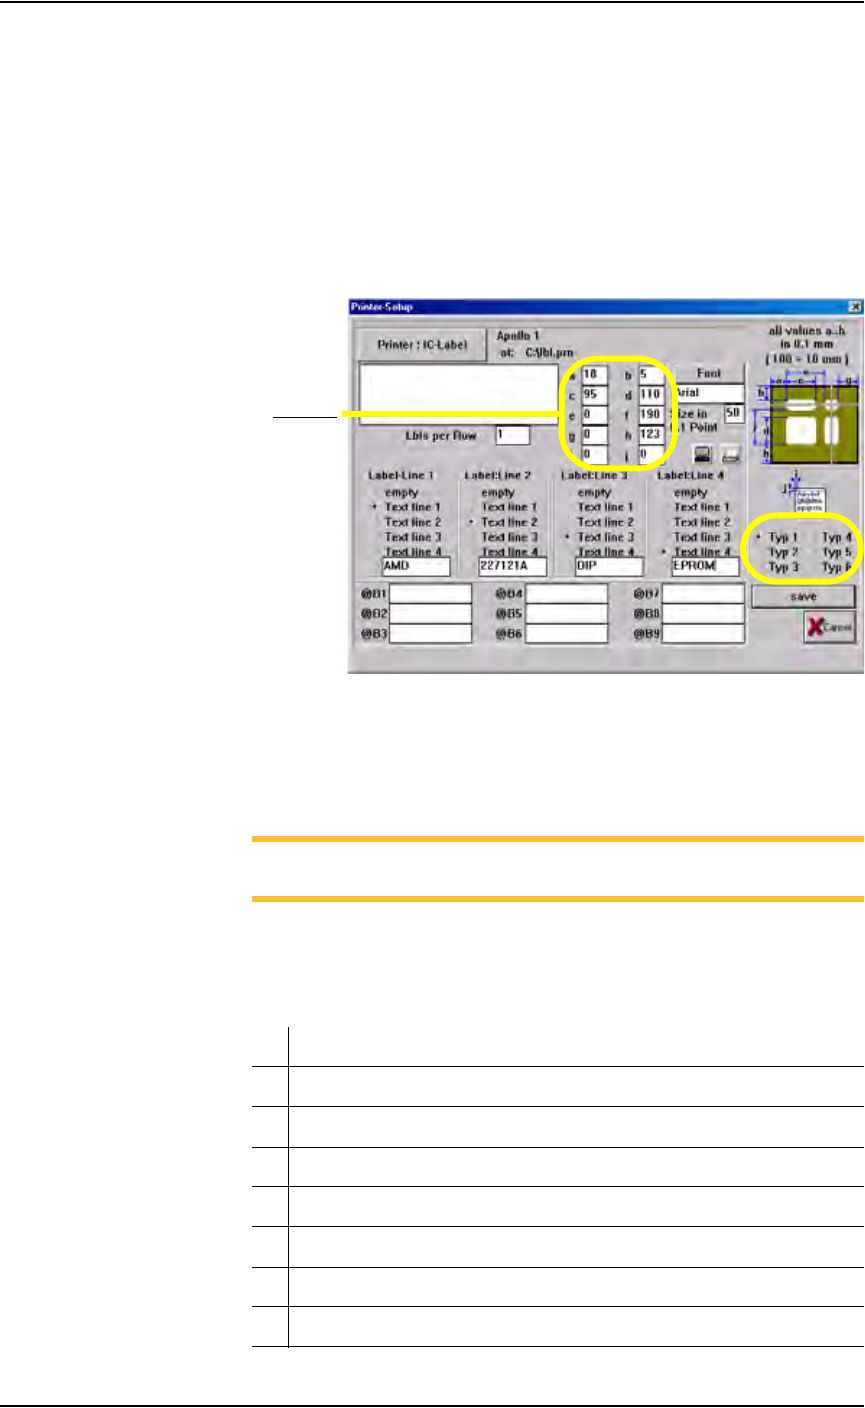
Operation • Administrato r Functions 3—64 PS288 Owner’s Manual Figur e 3-85—V alues for a to j 4. Set text lines— 4a) Select the correct box for each li ne of text for up to four lines. 4b) In the box, type the text to b…
Operation • Administrator Functions
PS288 Owner’s Manual 3—63
(Optional) Create a Label Printer File
If devices are to be labeled using the optional label printing system, a label
printer file must be created. Follow these steps to create a label printer file.
1. Prepare the system—
Open the label printing software by clicking the shortcut on the Han-
dler Computer desktop or by navigating to and double-clicking
MRPRT.exe. The Printer Setup displays label printing parameters. See
Figure 3-84.
Figure 3-84—Label printing parameters window
2. Select label type—
Select the label type to use when this job is run.The MRPRT software
allows up to six sizes of labels called “types.”
NOTE: Each label type has different values in a to j. All values are
in millimeters.
3. Set a to j values—
Enter the values for fields a to j. See Figure 3-85 for an explanation of
what each value represents.
Meaning/Description
a The offset in X (left to right) of the print from the edge of the label
b The offset in Y (top to bottom) of the print from the edge of the label
c The label size in the X
d The label size in the Y (must be less than value for f)
e This is not used on the PS288 and should be set to 0
f The distance from the front of the label to front edge of the next label
g Rotation (not yet implemented)
Fields a-j

Operation • Administrator Functions
3—64 PS288 Owner’s Manual
Figure 3-85—Values for a to j
4. Set text lines—
4a) Select the correct box for each line of text for up to four lines.
4b) In the box, type the text to be printed on label.
5. Set labels per roll—
Set “Labels per Roll” to 1.
6. Save printer file—
Click Save to save and exit the MRPRT software.
NOTE: For information on selecting label printing during Task
creation, see TaskLink online Help.
h Label advance. This is the distance to advance the label toward the
tamp applicator after printing. This only makes some small changes.
The Tamp head should be in the correct position first.
i Text centering in X direction. 0= Auto and 1= All the way to the left
of the label. Normally set to 0.
j Text centering in Y direction. 0= Auto and 1= All the way to the top
of the label. Normally set to 0.
PS288 Owner’s Manual 4—1
Chapter
4
4System Theory
The PS288 consists of various electrical and mechanical systems which pro-
vide facilities for—or perform a portion of—the overall operation of the
machine. Their operation and relationship with the other components of the
system are described in this chapter.
Main Power
System
The main power system provides primary and generated voltages for use
within the PS288. Input power is received from the input panel on the rear of
the machine. It is a 208–240 VAC, 50/60 Hz, 30A circuit.
Circuit Breakers
208–240 VAC is provided to the programmer power supplies, gantry servo
motor amplifiers, and the I/O Controller. The two circuit breakers on the
input panel provide circuit protection for the main power input and the gan-
try servo amplifiers.
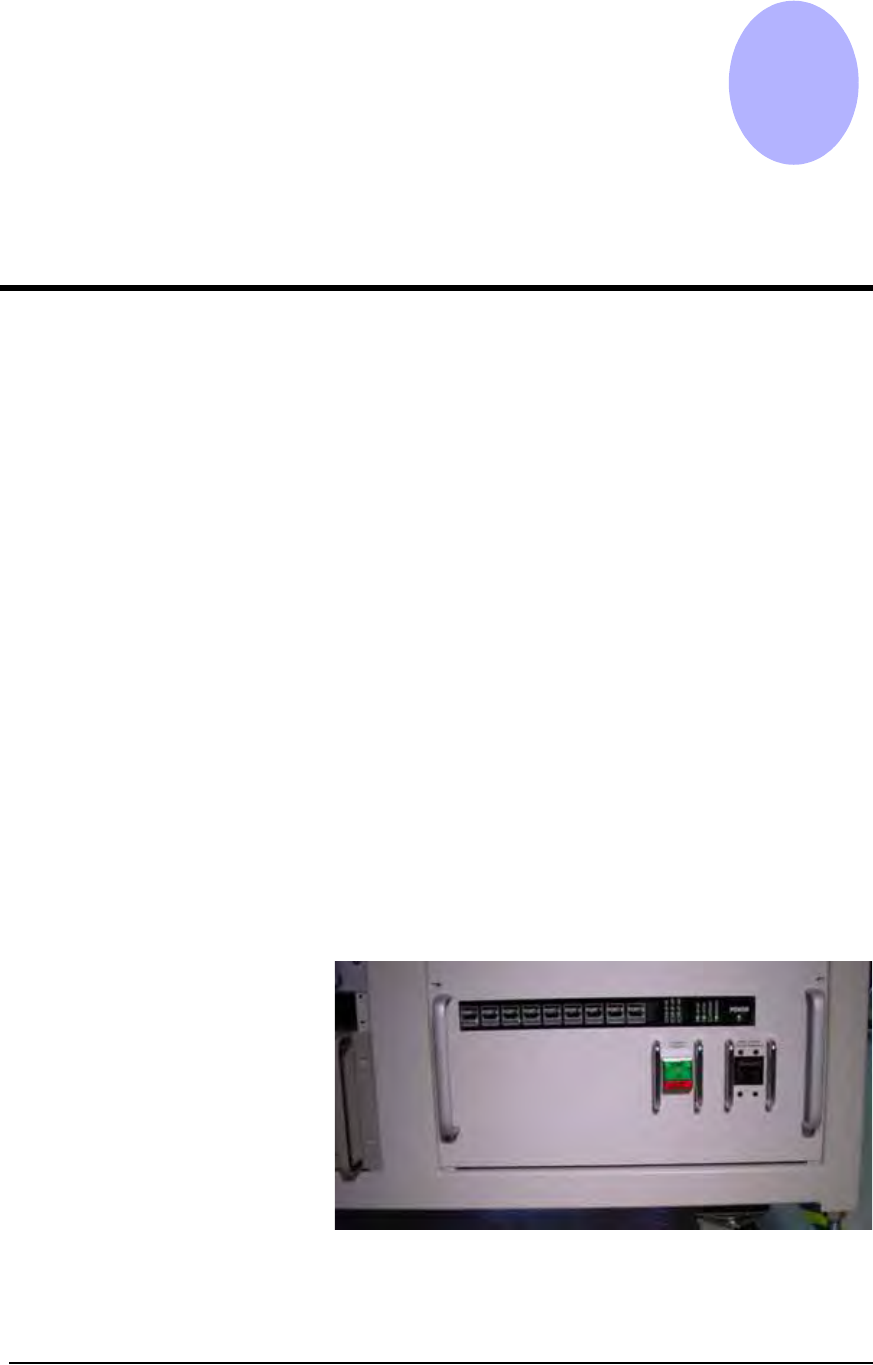
I/O Controller
The I/O Controller provides 115 VAC, 60 Hz, for all other systems in the
PS288 including, but not limited to, the Handler Computer, video monitor,
and programmer power supplies. Additionally, the I/O Controller provides a
power-on control signal to the servo motor power contactor, allowing the
208–240 VAC to be applied to the gantry’s X and Y servo motor amplifiers
and two low voltage systems used for sensor power and PNP head motor
drivers. See Figure 4-1.
Figure 4-1—I/O Controller