PS288_OwnersMnl_PriorTo2009 - 第164页
Maintenance • Laser Computer PS288 Owner’s Manual 5—29 DUT 2 G1 Vpp overcurrent is sensed at 57 mA. DUT 2 G2 Vpp overcurrent is sensed at 57 mA. DUT 2 G3 Vpp overcurrent is sensed at 57 mA. DUT 2 G4 Vpp overcurrent is se…

Maintenance • Preventive Maintenance
5—28 PS288 Owner’s Manual
1. Bus Test
2. Adapter ID Test
3. LED Driver Test
4. G Node Test
5. Vcc Overcurrent Test
6. Vpp Overcurrent Test
7. I2C Bus Test
8. DAC Calibration Test
9. Gslew Test
To run diagnostic tests on FlashCORE programmer(s):
1. Prepare the system—
1a) Turn the programmer circuit breaker on the rear panel to OFF (down
position).
WARNING: To prevent ESD shock, before you touch the Socket
Adapter, discharge static electricity from yourself by touching a
common ground or an unpainted metal surface. Always wear a
wrist strap containing a 1M-ohm (minimum value) to 10M-ohm
(maximum value) current limiting resistor. Connect the antistatic
wrist strap to the grounding socket on the front of the PS288.
1b) Remove the Socket Adapter and insert the Diagnostic Adapter Board in
the desired programmer, ensuring that it seats correctly on the adapter
pins.
1c) Turn the programmer circuit breaker on the rear panel to ON (up posi-
tion)
2. TaskLink—
2a) Start TaskLink and click the Tools menu.
2b) Under Tools, select "Run Programmer Diagnostics."
2c) On the Diagnostics window, select the programmer with the DAB
installed.
2d) Select Test All.
The pass/fail test results are displayed in TaskLink and are also written to
/fdrroot/system/diaglog.txt and /fdrroot/system/eventlog.txt files on the
PC card of the selected FlashCORE programmer. These files can be viewed
and saved from TaskLink and saved on the Handler Computer.
If any of the tests show Fail in the TaskLink display, contact your nearest
Data I/O Service Center for repair options. To help our service personal
diagnose your problem, please e-mail both the eventlog.txt and diaglog.txt
files.
A sample dialog.txt file is shown here:
Diagnostic Pass #1
Run Vpp Overcurrent test.
DUT 1 G1 Vpp overcurrent is sensed at 57 mA.
DUT 1 G2 Vpp overcurrent is sensed at 57 mA.
DUT 1 G3 Vpp overcurrent is sensed at 57 mA.
DUT 1 G4 Vpp overcurrent is sensed at 57 mA.
Maintenance • Laser Computer
PS288 Owner’s Manual 5—29
DUT 2 G1 Vpp overcurrent is sensed at 57 mA.
DUT 2 G2 Vpp overcurrent is sensed at 57 mA.
DUT 2 G3 Vpp overcurrent is sensed at 57 mA.
DUT 2 G4 Vpp overcurrent is sensed at 57 mA.
Error: DUT 3 G1 Vpp overcurrent is not sensed from 50 mA to 70 mA.
Error: DUT 3 G2 Vpp overcurrent is not sensed from 50 mA to 70 mA.
Error: DUT 3 G3 Vpp overcurrent is not sensed from 50 mA to 70 mA.
Error: DUT 3 G4 Vpp overcurrent is not sensed from 50 mA to 70 mA.
DUT 4 G1 Vpp overcurrent is sensed at 57 mA.
DUT 4 G2 Vpp overcurrent is sensed at 57 mA.
DUT 4 G3 Vpp overcurrent is sensed at 57 mA.
DUT 4 G4 Vpp overcurrent is sensed at 57 mA.
Diagnostics failed
Laser Computer
The Laser Computer is used to laser mark devices. Located in the Option
Bay, the Laser Computer requires no maintenance other than cleaning and
changing the filter. The filter on the Laser Computer should be cleaned every
month and changed every six months. See “Change the Laser Computer Air
Filter” on page 22.
Handler
Computer
Installing AH500 Updates
Periodically you will receive AH500 updates as changes and improvements
are made to the software.
NOTE: AH500 Updates are numbered AH500_XXYY, where XX =
the version number and YY = the minor release number.
To install new AH500 updates on your Handler Computer, insert the update
CD and follow instructions on the Readme.txt file.
Adjustments,
Calibrations,
and Functional
Tests
The PS288 requires periodic adjustments, calibrations, and functional tests
to maintain optimum performance of the sensors, the PNP head system, and
FlashCORE programmers.
WARNING: Blindness hazard! Always wear eye protection when
the laser safety shields are open, such as during service. Direct or
diffuse laser radiation can damage eyes. Goggles must block
10.6 µm, laser radiation. Goggles are designed to protect against
scattered energy, but not against direct viewing of the laser beam
or reflections from other surfaces.
WARNING: Serious burn hazard! Enclose the laser beam path
during service. Direct or diffuse laser radiation can seriously
burn.
Maintenance • Adjustments, Calibrations, and Functional Tests
5—30 PS288 Owner’s Manual
WARNING: Electrocution hazard! Turn off the main power
switch before removing any panels. Servicing the PS288 involves
a significant risk of electric shock.
WARNING: The high speed and force behind a moving gantry
can cause serious bodily injury to anyone working inside the work
envelope. Moving the PNP head must be the responsibility of only
one qualified individual. All other personnel near the system must
stay clear of the work envelope while the gantry is moving.
Adjusting the Vacuum Sensors
NOTE: If you notice consecutive picking errors while program-
ming, before adjusting vacuum sensors complete the Z-Axis adjust-
ment. For instructions on Z-Axis adjustment, see “Teach the
Package File” on page 3-33. If completing the Z-Axis adjustment
does not reduce or eliminate subsequent picking errors, complete
the vacuum sensor adjustments described here.
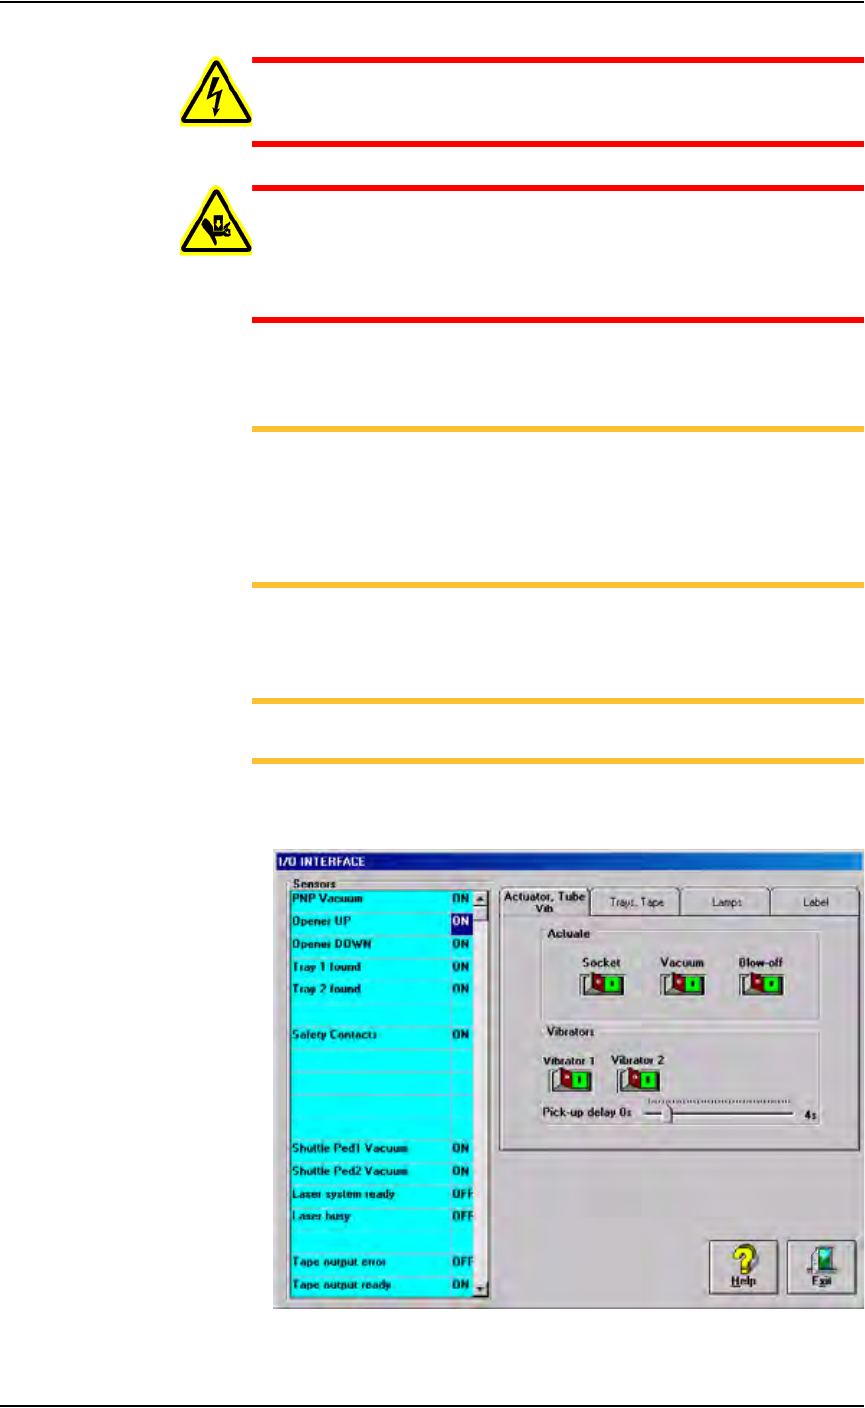
Vacuum sensors on the PS288 are adjustable. The I/O Interface window
displays a list of the sensors in the PS288 and the status of each sensor.
NOTE: The number of sensors on the PS288 depends on the
options installed.
To view the status of sensors in the system, on the AH500 main window
click System, and then click Misc. I/O to open the I/O Interface window.
Figure 5-29—I/O Interface window