PS288_OwnersMnl_PriorTo2009 - 第190页
Maintenance • Fixing Failures PS288 Owner’s Manual 5—55 5. Update firmware— The newly inst alled FlashCORE pr ogrammer assembl y must be "located" and assigned a site from T askLink. Once the site is assigned, …

Maintenance • Replacing Major Assemblies
5—54 PS288 Owner’s Manual
2. Disconnect cables—
Disconnect the power and communications cables from the Flash-
CORE Quad assembly.
NOTE: Each cable should be labelled (if not already) to facilitate
proper reinstallation when the FlashCORE Quad assembly is
replaced.
3. Remove FlashCORE Quad assembly—
3a) Remove the six hex screws that fasten the FlashCORE Quad assembly
to the work surface.
3b) Carefully lift the FlashCORE Quad assembly from the work surface,
ensuring that none of the circuit boards, cables, or other mechanical
assemblies catch during removal.
4. Replace—
Replace with new FlashCORE Quad assembly in reverse order.
5. Assign sites and update firmware—
Each of the four newly installed FlashCORE programmer assemblies
in the FlashCORE Quad must be "located" and assigned sites from
TaskLink. Once each site is assigned, firmware on the new FlashCORE
programmer assemblies must be updated from TaskLink.
See TaskLink online Help for information about updating firmware.
To replace an individual FlashCORE programmer assembly:
1. Prepare the system—
1a) Verify that the PS288 is shut down and the main power switch is in the
OFF position.
1b) Open the outer access panel closest to the defective FlashCORE pro-
grammer assembly.
2. Disconnect cables—
Disconnect the power and communications cables from the Flash-
CORE programmer assembly.
3. Remove FlashCORE programmer assembly—
3a) Remove the three mounting screws that hold the FlashCORE program-
mer assembly to the top plate.
3b) Carefully remove the defective FlashCORE programmer assembly.
4. Replace—
4a) If the defective board(s) in the removed FlashCORE programmer
assembly is known, it may be replaced as required. Otherwise, replace
the entire FlashCORE programmer assembly, including CPU, Wave-
form Board and Backplane Board.
4b) Replace FlashCORE programmer assembly in reverse order.

Maintenance • Fixing Failures
PS288 Owner’s Manual 5—55
5. Update firmware—
The newly installed FlashCORE programmer assembly must be
"located" and assigned a site from TaskLink. Once the site is assigned,
firmware on the new FlashCORE programmer assembly must be
updated from TaskLink.
See TaskLink online Help for information about updating firmware.
Fixing Failures
This section contains solutions to problems that may arise during operation
of the PS288. While this list is not a comprehensive compilation of all possi-
ble failures, it provides helpful troubleshooting tips for systems most likely
to cause problems.
Tube Input and Output Problems
Problem:
• The vibration controls are fully clockwise and neither of the tube plat-
forms vibrates.
Check this:
) Make sure that tube input or tube output has been selected on the Setup
window.
Problem:
• Only one tube platform vibrates.
Check this:
) Shut down the PS288 (see “Shut Down the System” on page 3-12) and
check the 2A 250V fuse above the three-wire connector on the back of
the I/O Controller. The input vibrating motor connector is labeled 9-1;
the output vibrating motor connector is labeled 9-2.
) Make sure that the power cable on the back of the I/O Controller is
fully connected.
) Check the 5A 250V fuse on the bottom of the vibration controller box
(behind the control knobs).
) Remove the controller and make sure that the on/off switch was left on
when it was last installed.
If the fuses are continually being blown, the vibration controller box may be
defective and must be replaced. You can switch the wire from the working
controller to the defective controller to determine if this is the case.
Problem:
• The PNP head will not center on the devices.
Check this:
) Adjust the X-, Y-, and Z-axis positions using the adjustment arrows on
the Gantry window. See “Teach the Package File” on page 33 for more
information.
Maintenance • Fixing Failures
5—56 PS288 Owner’s Manual
Problem:
• The PS288 is putting the wrong number of devices into the tubes.
Check this:
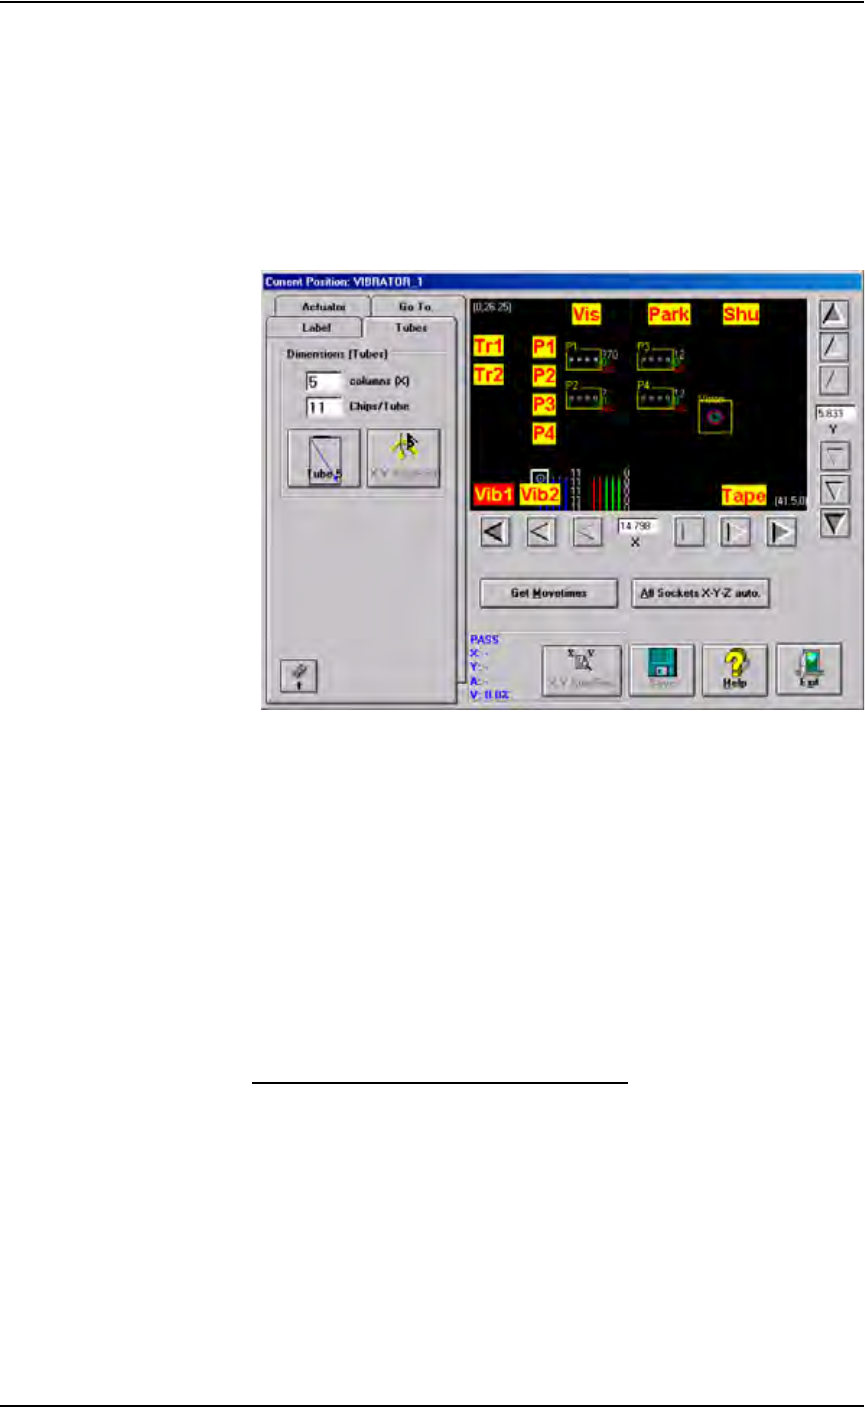
) From the Setup window, on the Options tab, ensure that Input and/or
Output options are set to tubes. Click the System icon, then click Gan-
try to open the Gantry window. Click the yellow Vib1 label to move
the PNP head to the first position of the input vibration controller.
Figure 5-67—Enter correct number of devices
) Click the Tubes tab, and then enter the correct number of devices per
tube in the Chips/Tube box.
) Click Save to store the new settings to the package file.
Programmer Errors
Programmer errors discussed:
• Clearing a Programmer Disabled Status
• Fixing Programmer Continuity Failures
• Fixing Programming Failures in All Programmers
• Disabling a Programmer that Fails Self-test
Clearing a Programmer Disabled Status
If the status indicator disappears from any of the programmer outlines, or the
PNP head skips a programmer, first try to clear the programmer disabled sta-
tus.
1. Prepare the system—
1a) On the Run window, click Pause, then click Exit.
1b) From the Setup window, select the Programmers tab.
1c) Note which programmers are disabled. In Figure 5-68 below, Program-
mer 1 and Programmer 4 are disabled.