PS288_OwnersMnl_PriorTo2009 - 第82页
Operation • Administrato r Functions 3—22 PS288 Owner’s Manual Figur e 3-26—Click Z AutoFind 3. Set R-axis rotation values NOTE: When a device is inserted in to a socket, pin 1 of the device must match pin 1 of the socke…

Operation • Administrator Functions
PS288 Owner’s Manual 3—21
• For more information on laser marking, see “(Optional) Create a Laser
Marking File” on page 3-55.
• For more information on label printing, see “(Optional) Create a Label
Printer File” on page 3-63.
Teach the Reference Vision File
The reference vision file contains all the vision system data required by the
PNP head to compensate for minor inaccuracies caused by mechanical varia-
tions in devices, minor errors in the placement of devices on the PNP head,
and other small inaccuracies.
During Task creation, you copied the Vision Template.prj file and renamed it
to the adapter used in the Job. This renamed reference vision file contains the
Vision Template values. Now it is necessary to teach the reference vision file
for the particular device being programmed.
To teach the reference vision file:
1. Prepare the system—
1a) Using TaskLink, load the Job containing the reference vision file you
want to teach.
1b) On the AH500 main window, click Start.
1c) On the Setup window, click System.
NOTE: You may be prompted to enter your Password.
1d) On the System window, click Gantry.
1e) Click the P1 yellow position label representative of Programmer 1. The
gantry will move the PNP head to the location specified.
1f) Adjust the location of the probe tip so that it is centered on the socket.
Use the up/down arrows for Y-axis adjustments and the left/right
arrows for X-axis adjustments. From the inside working outward, the
arrow buttons adjust the position ±0.001, 0.010, and 0.100 inches
respectively.
1g) Click Save.
1h) Click Park to move the PNP head to the Park location.
2. Teach Z drop and Z pick—
2a) Place a device in the socket in Programmer 1.
2b) Click P1 to move the PNP head back to the socket.
NOTE: Adjust the Socket Actuator ribs if required. See Step 4 on
page 3-35.
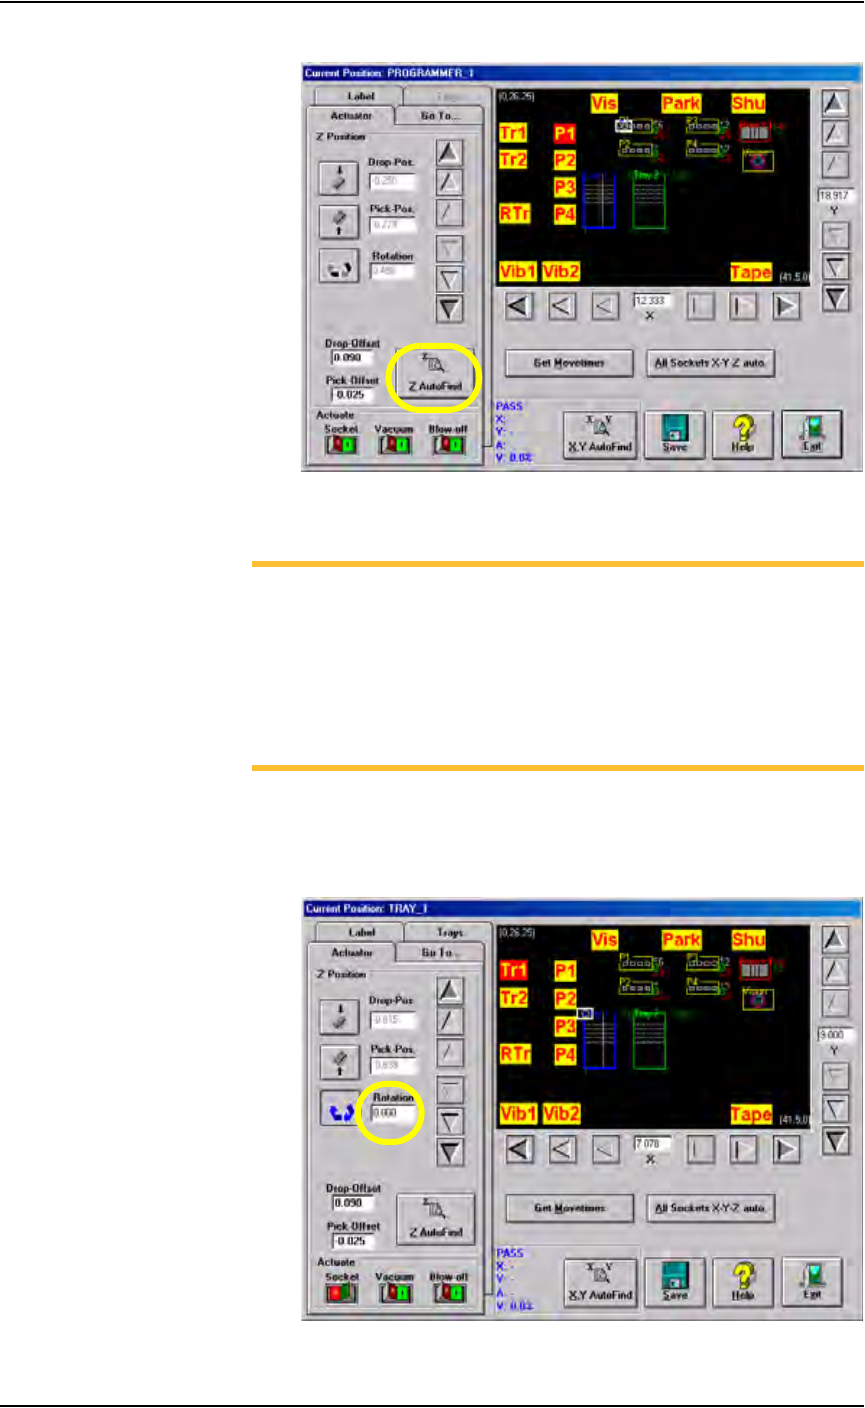
2c) Click Z AutoFind. See Figure 3-26. Ensure that the device is picked
up in the center.
Operation • Administrator Functions
3—22 PS288 Owner’s Manual
Figure 3-26—Click Z AutoFind
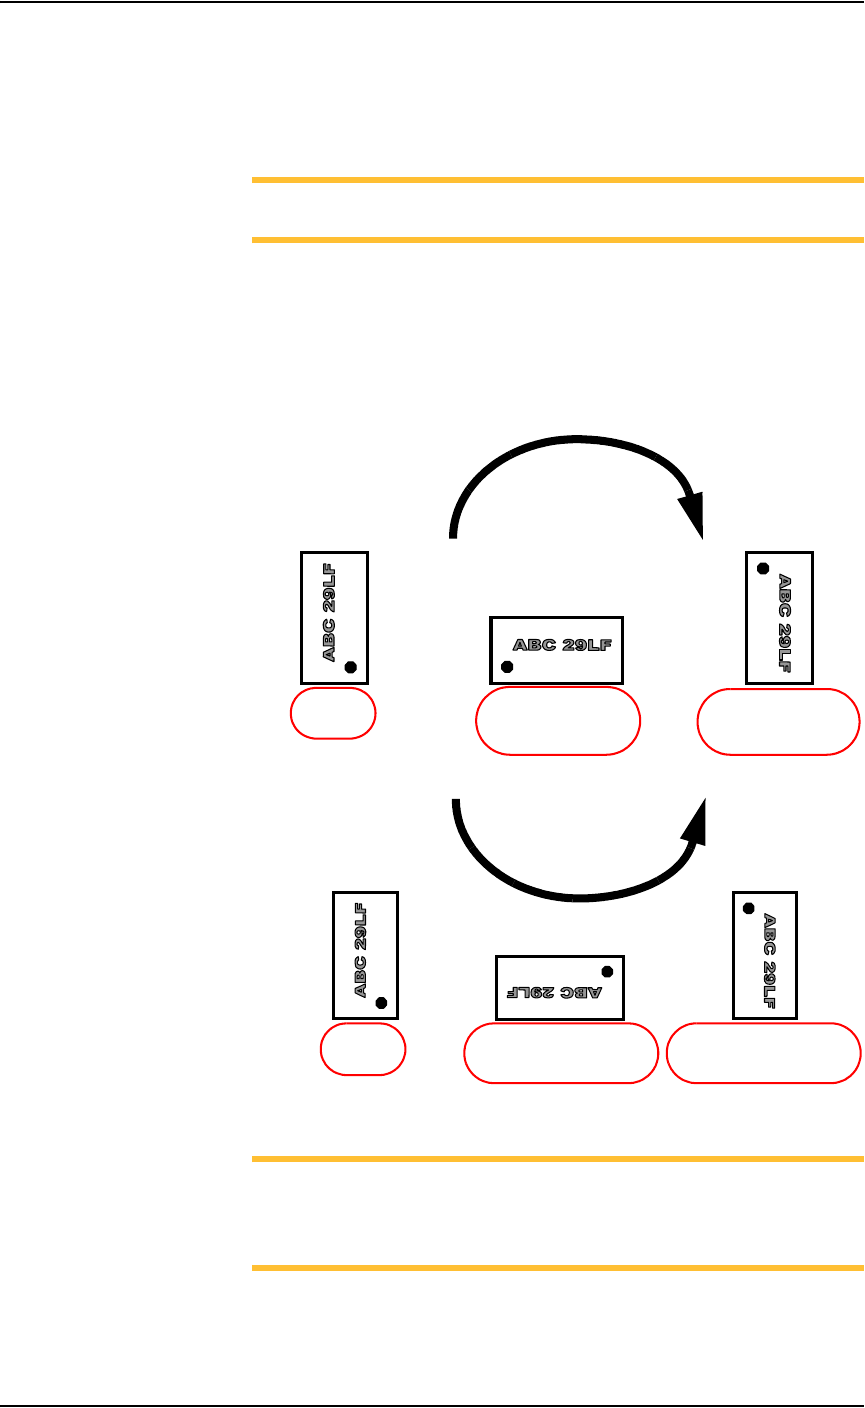
3. Set R-axis rotation values
NOTE: When a device is inserted into a socket, pin 1 of the device
must match pin 1 of the socket. For example, if pin 1 of the device
(in the input media) is the upper left corner, and pin 1 of the socket
is the upper left corner, no rotation is required. However, if pin 1 of
the device in the input media is not the same as pin 1 of the socket,
the PNP head must rotate the device. The R-axis value determines
how the PNP head rotates the device as it moves the device from the
input media to the socket or the Vision camera.
3a) Set R-axis of input media to 0.000:
•Click Tr1 to move the PNP head to the Tray 1 location.
• Click the Rotation icon.
• Enter the rotation value 0.000. See Figure 3-27.
Figure 3-27—Rotation set at 0.000 at Tr1
Operation • Administrator Functions
PS288 Owner’s Manual 3—23
• Press <Enter>.
•Click Save.
•Click Ye s to overwrite previous values.
• Repeat for ALL input media (tray, tape and tube).
NOTE: The R-axis rotation value at ALL input media must be
0.000.
3b) Set R-axis rotation at Vision and socket:
•Click Vis to move the PNP head to the vision location.
• Click the Rotation icon.
• Enter the R-axis rotation value required to rotate the device so that
pin 1 on the device matches pin 1 on the socket. See Figure 3-28:
Figure 3-28—R-axis values for rotation
NOTE: For example, if a device must be rotated a quarter turn in
the clockwise direction as it goes from the input media to the socket,
set the R-axis at the socket to -0.250. In this example, 0.250 is
entered. See Figure 3-29.
• Press <Enter>.
•Click Save.
R =
-
0.250
(quarter turn clockwise
with respect to Origin)
R =
-
0.500
(half turn clockwise
with respect to Origin)
R = 0.000
(at Origin)
CLOCKWISE
R = 0.250
(quarter turn counterclockwise
with respect to Origin)
R = 0.000
(at Origin)
R =
0.500
(half turn counterclockwise
with respect to Origin)
COUNTERCLOCKWISE