Apollo1_Operators_Manuel.pdf - 第71页
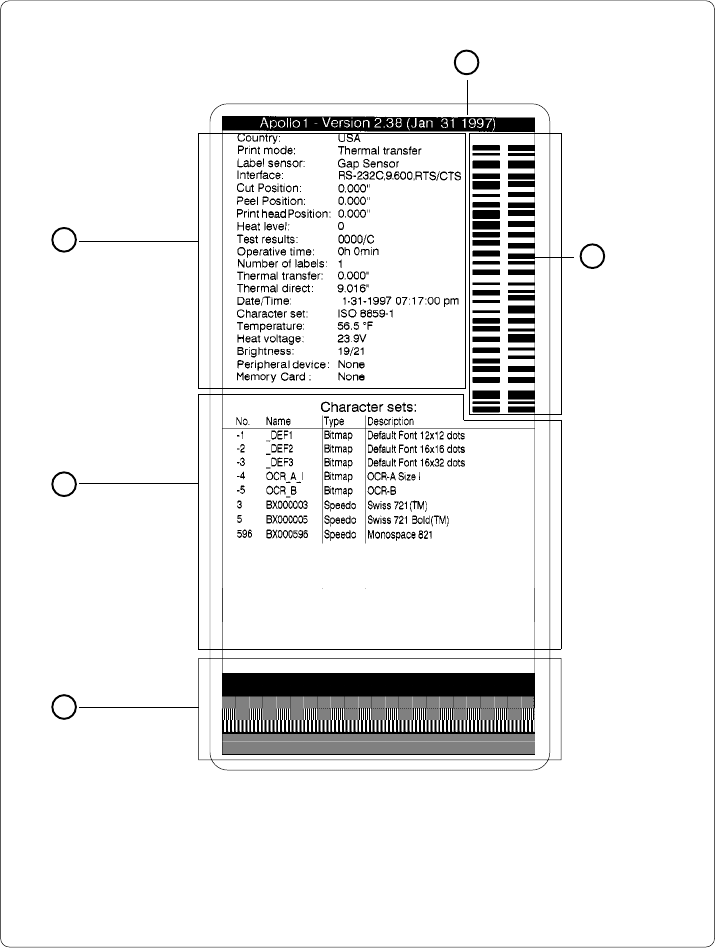
71 cab - Produkttechnik GmbH / Tharo Systems, Inc. Explanation of the Self T est Printout Fig. 10 Self test printout On the following pages you will find detailed information about the contents of the test printout. 1 2 …
70 cab - Produkttechnik GmbH / Tharo Systems, Inc.
10 Self Test / Test Print
Start of Test Print
To prepare a test print, load media (labels or continuous paper) which extends over
the entire print width of the Apollo.
If you want to perform the test print in thermal transfer mode, also use transfer
ribbon of the maximum width.
During test print, the Apollo will not sense any label gaps. The length of
the printout will be about 9 in (230 mm). Endless paper would suit best for
test prints, otherwise, a normal sheet of A4 paper which is cut to a width of
4.6 in (116 mm) can be used in thermal transfer mode.
To initiate a self test printout, press the key when switching on the printer
and keep it pressed down until the system test is completed.
The display shows "Test print", and the Apollo will print an internal test sample
which contains a variety of information about the configuration of the printer as
well as the results of the internal test.
The test printout can also include a range of hardware errors which have
occurred previously, even if they have disappeared again. This information is
important for service purposes and can only be deleted by Technical Support.
The information in the printout is also useful for checking the print quality, such
as differences in the blackness left/right, missing ink dots, etc. It is
recommended you carry out a print test immediately after receiving the printer.
After completing the test print, the Apollo will run the system test once again.
Then, the printer proceeds to ONLINE mode.
To cancel the test print press the key.
F
71cab - Produkttechnik GmbH / Tharo Systems, Inc.
Explanation of the Self Test Printout
Fig. 10 Self test printout
On the following pages you will find detailed information about the contents of the
test printout.
1
2
4
5
3
Firmware version
Setup and status
information
Existing
character sets
Test pattern
Bar code with
test information

72 cab - Produkttechnik GmbH / Tharo Systems, Inc.
1 Firmware Version
Type of device, part number, and date of the firmware version.
2 Setup and Status Information
Country : Setting of the "Country" parameter
Print mode : Setting of the "Transfer print" parameter
Label sensor : Setting of the "Label sensor" parameter
Interface : Setting of the "Interface" parameter
Cut Position : Setting of the "Cut position" parameter
Peel Position : Setting of the "Peel position" parameter
Printhead Pos. : Setting of the "Printhead position" parameter
Heat level : Setting of the "Heat level" parameter
Test result : Result of the system test. Any errors will be shown coded
as four digit hexadecimal numbers. (see Table 10)
(for fault correction see Appendix C)
/C shows when the setup has been altered from the
defaults. (Apollo 1 and Apollo 2 only)
For Apollo 3, the letter behind the "/" sign indicates the
state of modification of the hardware. (board)
Operative time : Cumulative operating time of the printer
Number of labels: Cumulative amount of printed labels
Thermal transfer: Cumulative length of printed material in thermal transfer
mode
Thermal direct : Cumulative length of printed material in direct thermal mode
Date/Time : Setting of system date and system time
Character set : Setting of the "Character set" parameter
Temperature : Printhead temperature
Heat voltage : Current value of heat voltage (approx. 24V)
Brightness : Service information on brightness used at gap sensor
Peripheral device: Type of device connected to peripheral port
Memory card : Type and capacity of memory card (PCMCIA/PC card)