Apollo1_Operators_Manuel.pdf - 第125页
D-125 cab - Produkttechnik GmbH / Tharo Systems, Inc. Cleaning the Printhead While operating, dirt such as paper dust or particles of ink or back coating from the ribbon may accumulate on the thermal printhead. This can …

D-124 cab - Produkttechnik GmbH / Tharo Systems, Inc.
Appendix D - Maintenance / Cleaning /
Adjustment of the Printhead
The printers of the Apollo series require only a minimum of maintenance.
It is most important to clean the printhead on a regular basis. This will guarantee a
permanent high quality of the print image. Moreover, it helps to prevent an early
wear of the printhead.
Apart from that, the servicing only requires you to clean the outside of the printer
occassionally.
Before starting any maintenance, switch the printer OFF and disconnect it
from the power supply !
General Cleaning
While operating, dust accumulates especially within the printer mechanism.
Remove dirt and dust regularly using a soft brush or a vacuum.
The cover of the Apollo may be cleaned using standard cleanser.
Do not use abrasive cleaning powders or solvents !
Cleaning the Media Feed Rollers
Accumulations of dirt on the media feed rollers or the guides may impair the media
transport and the print quality.
Clean the rollers as follows :
1. Lift the printhead.
2. Remove the label stock and transfer ribbon from the printer.
3. Remove all accumulations of dirt and dust with isopropyl alcohol and a soft
cloth.
F
F

D-125cab - Produkttechnik GmbH / Tharo Systems, Inc.
Cleaning the Printhead
While operating, dirt such as paper dust or particles of ink or back coating from the
ribbon may accumulate on the thermal printhead.
This can cause a deterioriation of the print quality. (e.g. different contrasts on the
label, appearance of light horizontal lines, etc.)
In that case, the printhead needs cleaning.
Recommended cleaning intervalls :
Direct Thermal Printing : at every 1,300 yd or 1,200 m
Thermal Transfer Printing : each time you change the ribbon
Do not use any sharp objects for cleaning the printhead !
Do not touch the protective glass layer of the printhead !
Clean the printhead as follows :
1. Lift the printhead.
2. Remove label material and transfer ribbon from the printer.
3. Clean the printhead surface with a special cleaning pen, or use a cotton swab
soaked with isopropyl alcohol.
4. Allow it to dry for about 2 to 3 minutes before restarting the printer.
F
D-126 cab - Produkttechnik GmbH / Tharo Systems, Inc.
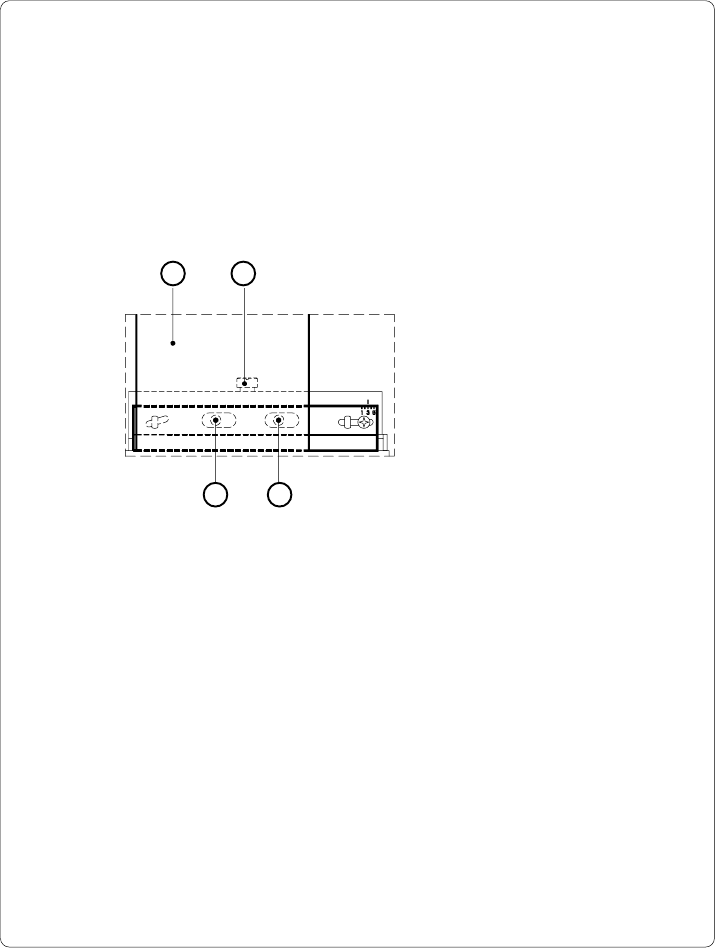
Adjustment of the Printhead
For optimum print quality, the line of heating elements on the printhead must be
parallel and aligned correctly to the print roller. This alignment has already been
performed in the factory. Nevertheless, it may become necessary to adjust it.
A misaligned printhead causes a poor print quality which appears as described
below :
- the print image looks generally light, spotted, and irregular; or
- the print image appears uneven from one side to the other.
1 2
3 3
Adjust the printhead as follows :
1. You may leave the transfer ribbon (1) inside the printer, and simply poke
through it with your hex wrench.
2. Loosen the locking screw (2) on the printhead by half a turn. This will allow for
the required horizontal adjustment of the printhead.
3. By turning the two screws underneath (3) you may shift the printhead as
follows :
- The overall distance for adjusting is .1 in or 2.5 mm.
- By turning the screws clockwise, the printhead will be shifted backwards.
(about .02 in or .5 mm per turn)
- Adjust in small steps ! (quarter turns only)
- First, turn both screws constantly until at least one side of the print image is
optimum.
Following, adjust the screw which is located at the side of the label where the
quality is still poor.
Fig. D Adjustment of the printhead