Apollo1_Operators_Manuel.pdf - 第94页
94 cab - Produkttechnik GmbH / Tharo Systems, Inc. Printing from a Memory Card Using a memory card provides the opportunity to print without a connection of the Apollo to a computer . Follow the instructions below , afte…

93
cab - Produkttechnik GmbH / Tharo Systems, Inc.
Formatting the Memory Card
For operation, the memory card first has to be structured internally in a certain
way. Normally, memory cards are already pre-formatted in a suitable manner.
If the card you are using is not formatted at all, the Apollo will bring up one of
the messages "Unknown card" or "Structural err." Then, you may format the
card using one of the following three methods :
1. Formatting the card using a PC card drive of a lap-top and the DOS
command "FORMAT".
2. Formatting the card using the Apollo setup command "Format card".
(see Chapter 9)
3. Formatting the card using the Apollo's interface and the printer command
"Mf;name CR".
Writing on the Memory Card
There are also different methods to write onto a memory card.
The easiest way is to copy label formats, graphics, or font files directly onto the
card using a PC card drive of a lap-top or another computer and the DOS
command "COPY".
Another way is to write on the card using the card drive of the Apollo and
transfer the data via interface.
For saving a label, you need to put the label design commands into "brackets"
consisting of "Ms"-commands :
Ms LBL;ABC Command to save a file called "ABC"
J|
H 100,0,T |
S l1;0,0,68,71,108 | Contents of the file "ABC"
T 10,10,0,3,pt15;Memory card |
A 1[NOPRINT] |
Ms LBL End of Save File command
After completing the commands the file "ABC" is stored on the card with all
commands from "J" to "A" which describe the label format.
The parameter [NOPRINT] used within the command A line will suppress the print
of the label while saving the file.
Whenever the file "ABC" is called up, exactly one label will be printed.
If you want to print the label in a variable quantity do not use the A command
within the label description.

94 cab - Produkttechnik GmbH / Tharo Systems, Inc.
Printing from a Memory Card
Using a memory card provides the opportunity to print without a
connection of the Apollo to a computer.
Follow the instructions below, after the card has been installed and the printer
has been switched ON :
1. Switch printer into OFFLINE mode by pressing the key.
2. After pressing the key, the file name of the first label saved on the
card will be shown.
3. Using the key and the key, you may scroll up and down the
contents of the card. Confirm the selection by pressing the key.
4. If you have chosen a label with a set number of labels to print, the Apollo
will instantly start printing.
5. For labels with a variable number of labels, the top line of the display
shows "Number of labels", the bottom line shows "00001" with the first figure
flashing. (cursor)
Using the key and the key, the figure at the position of the
cursor may be altered. By pressing the key the cursor can be moved
on to the next figure. After confirming of the last figure, the Apollo starts to
print.
6. To pause the selection of a label or the input of the number of labels you
may press the key.
The data saved on the card is also accessible via interface and computer.
F
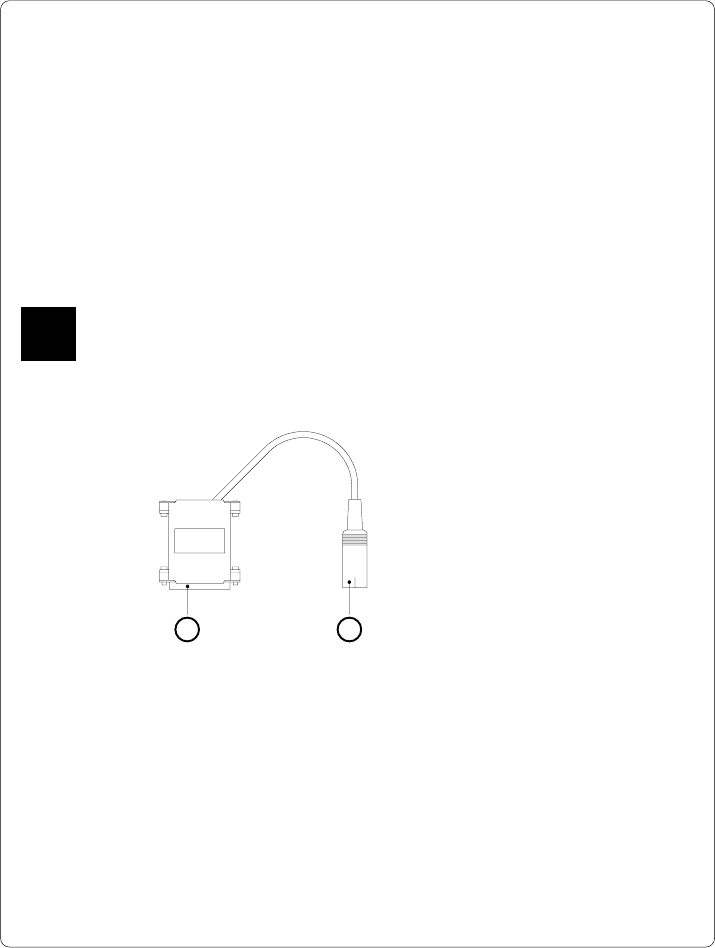
95cab - Produkttechnik GmbH / Tharo Systems, Inc.
Keyboard Adapter
The keyboard adapter option offers to connect the Apollo to a standard PC
keyboard or any other compatible input device (e.g. a bar code scanner) via its
serial interface. Using the keyboard, print jobs of an internal PC card may be
loaded and variable data may be altered. Input data requests as well as data
received from the keyboard will be shown in the display of the Apollo.
The keyboard adapter is designed for use with all keyboards which fulfill the
following requirements : MF-2 compatible, having a 5pin DIN plug, supporting
code set 3, and also operating with a maximum of 15 kBaud.
The current consumption of the connected keyboard or scanner must not
exceed 100 mA.
Installation of the Keyboard Adapter
F
Fig. 13 r Keyboard adapter
1 2
1 - 25 pin SUB-D plug
2 - 5 pin DIN connector
1. Change the interface setting to "RS232C, 9600 Baud, RTS/CTS" and
confirm.
2. Connect the 25 pin plug (1) of the keyboard adapter to the serial interface
connector at the rear of the printer.
Make sure that the printer is switched OFF !
3. Connect the keyboard to the 5 pin DIN connector (2) of the keyboard adapter.