00198146-01_AI_120V_TX12_de_en - 第49页
Assembly Instructions / Montageanleitung SIPLACE TX Series Option 120 V 04/2017 3 Installation 3.1 Performing Preparatory Work 49 3 Installation 3.1 Performing Preparatory Work ► Switch off the machine, disconnect it fro…
2 Brief Description
2.3 Scope of Delivery
Assembly Instructions / Montageanleitung SIPLACE TX Series
Option 120 V 04/2017
48
2.3 Scope of Delivery
Optional package 120V SIPLACE TX [03130699Sxx]
Quantity Designation Item No.
1 3UI 120-51 (autotransformer vertical) 03107593-xx
4 EN 1663 - M6-8 03010700-xx
1 Connection cable US option 03121277-xx
2 Cable ties B = 3.6mm L = 140mm TY 24M 00805141-xx
1 circuit breaker 3RV27 3-pole 12.5A UL489 03138992-xx
1 SOCKET PROTECTION TEDDY 6310 white 00357871-xx
3 Microfuse 6.3x32 / T 6.3A / glass 03078846-xx
4 Cable ties W = 4.8.mm L = 360.mm TYB-28M 00805143- xx
4 NL washer type NL6 sp ss, A4 03055450-xx
4 ISO4762 - M6 x 12-A2-70 03042572-xx
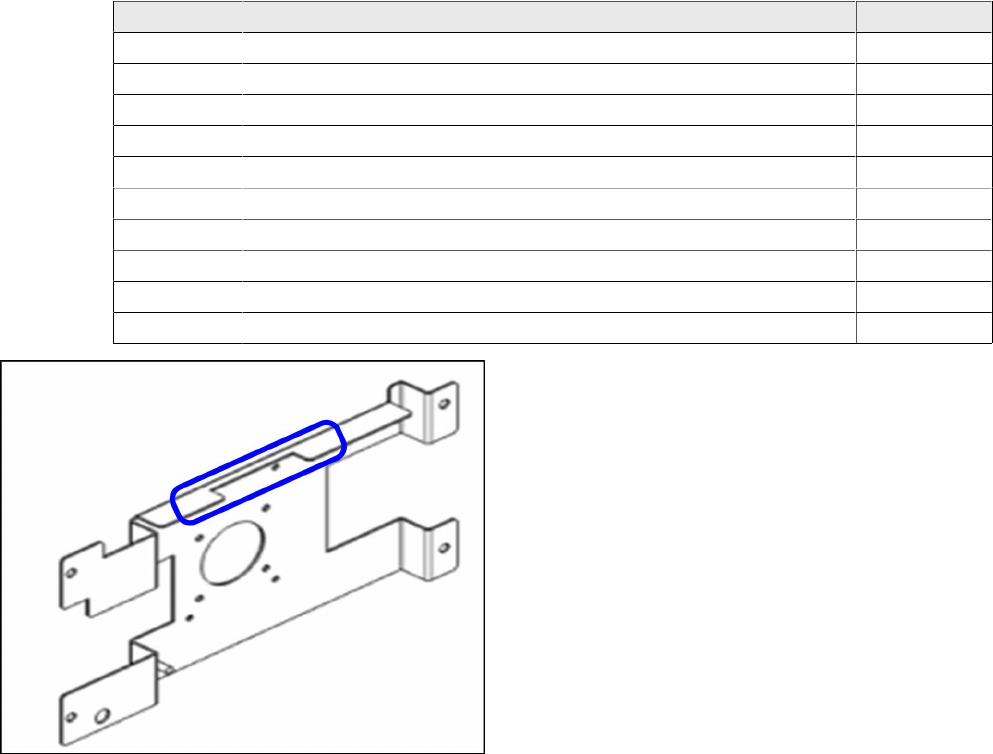
Fig.4: Sheet metal drawer with recess
Sheet metal drawer at "main switch drawer com-
plete" [03110639‑xx]
Depending on your machine version, the sheet metal
drawer might have no recess.
If the recess is missing, we recommend to rework the
sheet metal drawer (see also: 3.3 "Exchanging the cir-
cuit breaker" [}53]). Usually, this can be done
without major difficulties.
If reworking is not possible, you can order the current
version of the "Main Switch Drawer Com-
plete" [03110639‑xx] part.
2.4 Tools and Equipment required
●
Standard tools
If required:
●
Assembly instructions "SIPLACE TX Series – Option Vacuum Pump" [DE+EN:00198147‑xx].
2.5 Required Working Time
The complete installation will take approx. three hours.
Assembly Instructions / Montageanleitung SIPLACE TX Series
Option 120 V 04/2017
3 Installation
3.1 Performing Preparatory Work
49
3 Installation
3.1 Performing Preparatory Work
► Switch off the machine, disconnect it from the power supply and secure it to prevent
unauthorized reactivation. Observe the instructions in section 1.2 "Preparatory Work..." [}41].
DANGER
Checking for absence of voltage!
► Before you start working check the power supply for absence of voltage and observe
the waiting times! For more information about this read section 4.1.2 "Checking For
Absence of Voltage" [}58].
► Move the component trolley at location 2 out of the machine.
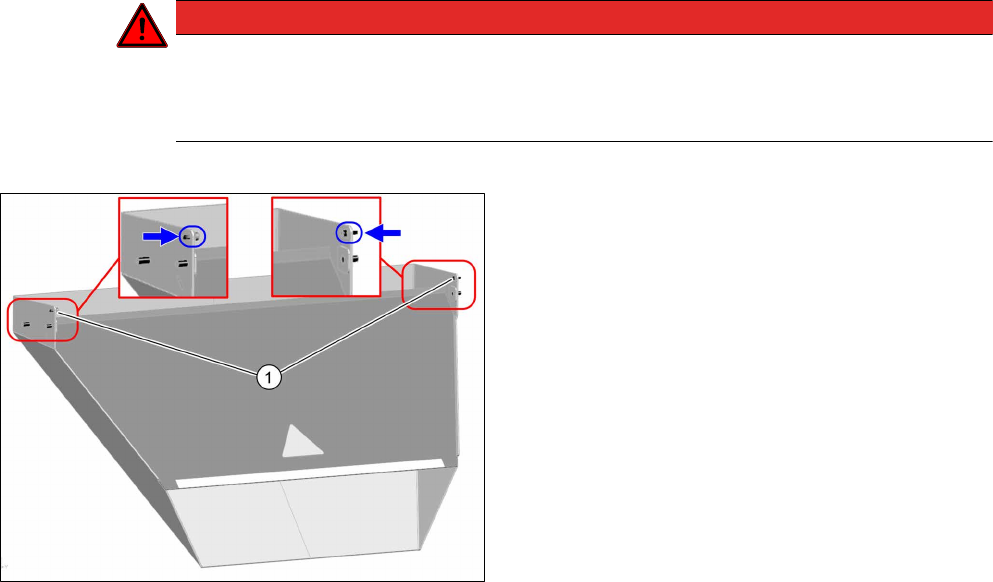
Fig.5: Waste tape chute
► Loosen the two safety screws(1) on the waste
tape chute and unhook the waste tape chute.
3 Installation
3.1 Performing Preparatory Work
Assembly Instructions / Montageanleitung SIPLACE TX Series
Option 120 V 04/2017
50
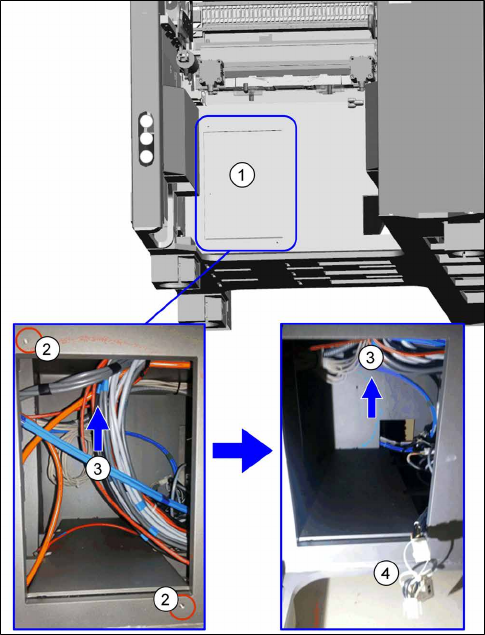
Fig.6: Cable in machine frame
► Remove the two screws (2) fastening the cover
(1) and remove the cover.
► Search the machine frame for the W3.1cable (4)
[03116403‑xx].
This cable has a bridging plug and is provided
with a sign for operating the machine with a va-
cuum pump.
Slightly pull this cable out of the machine.
► Use the cable ties (L=360mm) to tie all cables
and pneumatic lines(3) up high, so that they do
not touch the transformer later on.