00195467-01_Installation Manual Setup Center 2.2.pdf - 第19页
Installation Manual SIPLACE Setup Center 2.2 5.1.2 MSDE Installation If the database decision of SIPLACE Setup Center Database (5.1.1) is mad e to use a MSDE installation, this must be done prior instal ling SIPLACE Setu…

SIPLACE Setup Center 2.2 Installation Manual
5 Installation
5.1 Important Preparations
All computers must have been set up and prepared appropriately in advance of the complete
installation of SIPLACE Setup Center to function correctly. 3
These preparatory measures demand knowledge about the administrative functions of Windows
and SQL Server. Please contact your system administrator for assistance if required. 3
Note:
Always exit the running setup verification via task manager/process before
the installation or uninstallation of Setup Center.
Note:
It is not necessary to uninstall the current version of Setup Center before the
installation of the new version of Setup Center.
Note:
If during the installation a note appears, that Microsoft Data Access Components
(MDAC) must be installed, accept this note.
5.1.1 Operation System Installation
The following steps are essential before conducting the installation of SIPLACE Setup Center
• Installation of Windows 2000 Server (SP3 or SP4) or Windows 2000 Workstation (SP3 or
SP4) or Windows XP with SP1a
• Furthermore, you require Windows 2000/XP administrative rights and write rights for all
computers on which you are installing SIPLACE Setup Center.
Note:
You are required to have administrator rights for the installation proedure!
18 of 90
Installation Manual SIPLACE Setup Center 2.2
5.1.2 MSDE Installation
If the database decision of SIPLACE Setup Center Database (5.1.1) is made to use a MSDE
installation, this must be done prior installing SIPLACE Setup Center.
Installing MSDE is done by executing the file \3rdpartyinstaller\MSDE\SETUP_Step.cmd on the
Setup CD.
If the TCP port 1433 is not available then the alternate installer
\3rdpartyinstaller\MSDE\SETUP_Step_dynamic_port.CMD must be used.
See the file \3rdpartyinstaller\MSDE\readme.txt for more details.
Note:
This installer creates a MSDE instance with the name “SIPLACE_MSDE”.
5.2 Hardware Installation
We recommend performing the installation in the specified order: 5
1) Installation of hardware
2) Installation of software, see page
This chapter describes the hardware installation procedure.
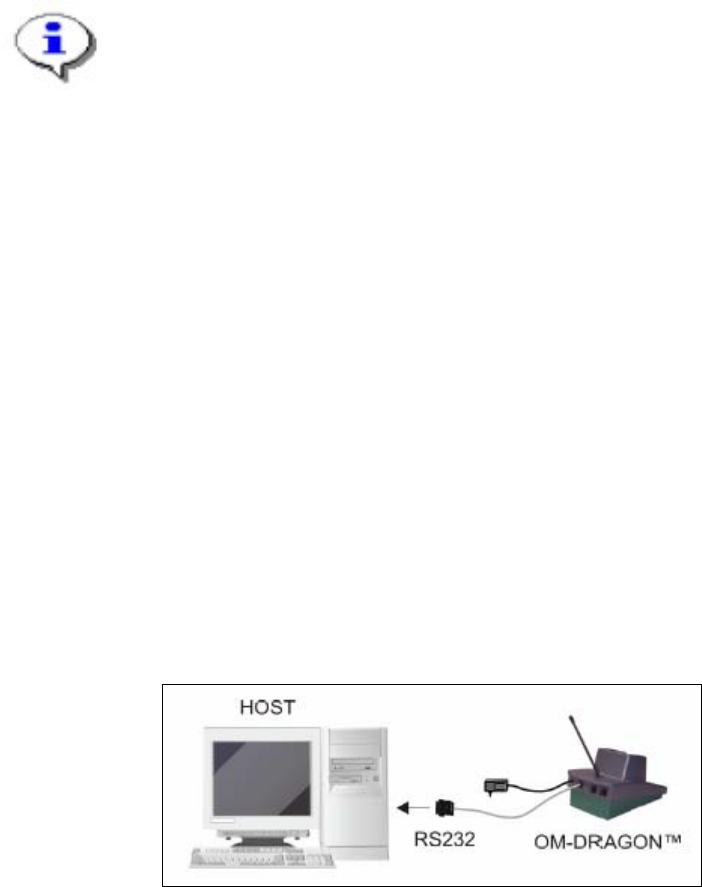
5.2.1 Dragon Scanner’s Cradle
• The Dragon scanner’s cradle needs to be connected to the Setup Center PC’s COM-port.
The default port is COM1.
• If the COM1 port is already in use another COM port need to be configured
(Another port can be configured in the Setup Center after installation: open Setup Center
setting dialog – menu Options/Settings – dialog Scanner/Dragon Scanner/Serial Port).
• Connect the cradle to the Setup Center PC according to the following picture:
Fig. 5-1 RS232 Connection
19 of 90
-

SIPLACE Setup Center 2.2 Installation Manual
5.2.2 Safety Instructions
The Dragon Scanner conforms to laser class 2.
LASER RADIATION!
Do not look into beam
Laser class 2
Warning label W216 (shown above) is displayed on the Dragon scanner.
CAUTION:
Before using the Dragon scanner, inform all operating personnel about the laser
regulations.
While operating the Dragon scanner, observe the respective regulations in line with
VDE 0837 „Protection from radiation emitted by laser devices“ and the „Laser
radiation“ accident prevention regulations (VBG93), applicable in Germany.
Also observe the accident prevention regulations applicable in your country.
Despite the low laser power, avoid looking directly at the laser beam. The natural
closure reflex of your eyelids will protect your eyes from the visible beam.
5.2.3 Optional: Docking Station
To obtain more details about using the docking station for X-Series tables, please refer to the
current version of the operating manual.
5.2.3.1 Installing the CAN Card in the PC
The data connection between the Setup Center PC, on which the Setup Center software is to be
installed, and the docking station is realized via a CAN Bus. This requires installation of a CAN
card in the SC PC on which the SC software is to be installed. This CAN card is included in the
delivery of docking station (optional). 5
Open the SC PC housing according to the manufacturer's instructions.
Select a free PCI slot in your SC PC for installing the CAN card.
Plug the CAN card into the selected PCI slot.
Close the SC PC housing according to the manufacturer's instructions.
20 of 90