00196378-0102_UM X-Feeder_EN.pdf - 第100页
Accessories Tape Splicing Tool for SMD Tape Connections Connecting the Tapes 100 User Manual X Feeder Modules SIPLACE Family 6.4.6.2 Joining Tapes We advise that y ou practise sp licing with various different tap e types…

Accessories
Preparation Tape Splicing Tool for SMD Tape Connections
User Manual X Feeder Modules SIPLACE Family 99
6.4.5 Preparation
►Place all required tools and consumable materials on a conveniently accessible work surface e.g. in
an open, shallow container which you can then fix to the tape container or to a trolley:
►CUT a number of pieces from the special adhesive tape (with the correct width for your component
tape) and place them within reach of your working area.
►Place the splicing plates within reach.
6.4.6 Connecting the Tapes
6.4.6.1 Splicing Time
Correct
Join the tapes when there is approx. 1.5 m left of the "old" tape. This gives you enough time to perform
the splicing properly.
Incorrect
Do NOT join the tapes if the "old" tape is still so long that the volume of the new tape reel would be too
great, after the old tape has been connected and wound onto the new reel.
▪ In this case, the tape could get twisted more easily and then block the feeder.
▪ Part of the tape could also fall off the reel and be damaged on the floor.
Legend
1. Consumable material package
2. Tweezers
3. Scissors
4. Splice tool
5. Special adhesive tape 8 mm
6. Splicing plates
7. Special adhesive tape 16 mm
NOTICE
Make sure that the tapes are connected in good time, so that you do NOT have empty pickup
positions. Each empty pickup position can lead to a vacuum pickup error (error no. 43). Un-
successful pickup runs (pickup errors) reduce the performance of the placement machine. The
3rd pickup error in a specific track causes a machine standstill, if there is no substitute track
available.
NOTICE
You can prepare the beginning of the new tape reels before you actually perform splicing. This
helps reduce the time taken for splicing at the placement machine.
Accessories
Tape Splicing Tool for SMD Tape Connections Connecting the Tapes
100 User Manual X Feeder Modules SIPLACE Family
6.4.6.2 Joining Tapes
We advise that you practise splicing with various different tape types before you splice at the placement
machine for the first time. Being familiar with the splicing process, helps you avoid errors which could
lead to tape conveyor malfunctions or to vacuum pickup errors.
►Take the rest of the "old" tape from its reel.
The tape should still be approx. 1.5 m long.
►Remove the reel from the tape container.
►Insert the new tape reel in its place.
Preparing the Beginning of the Tape
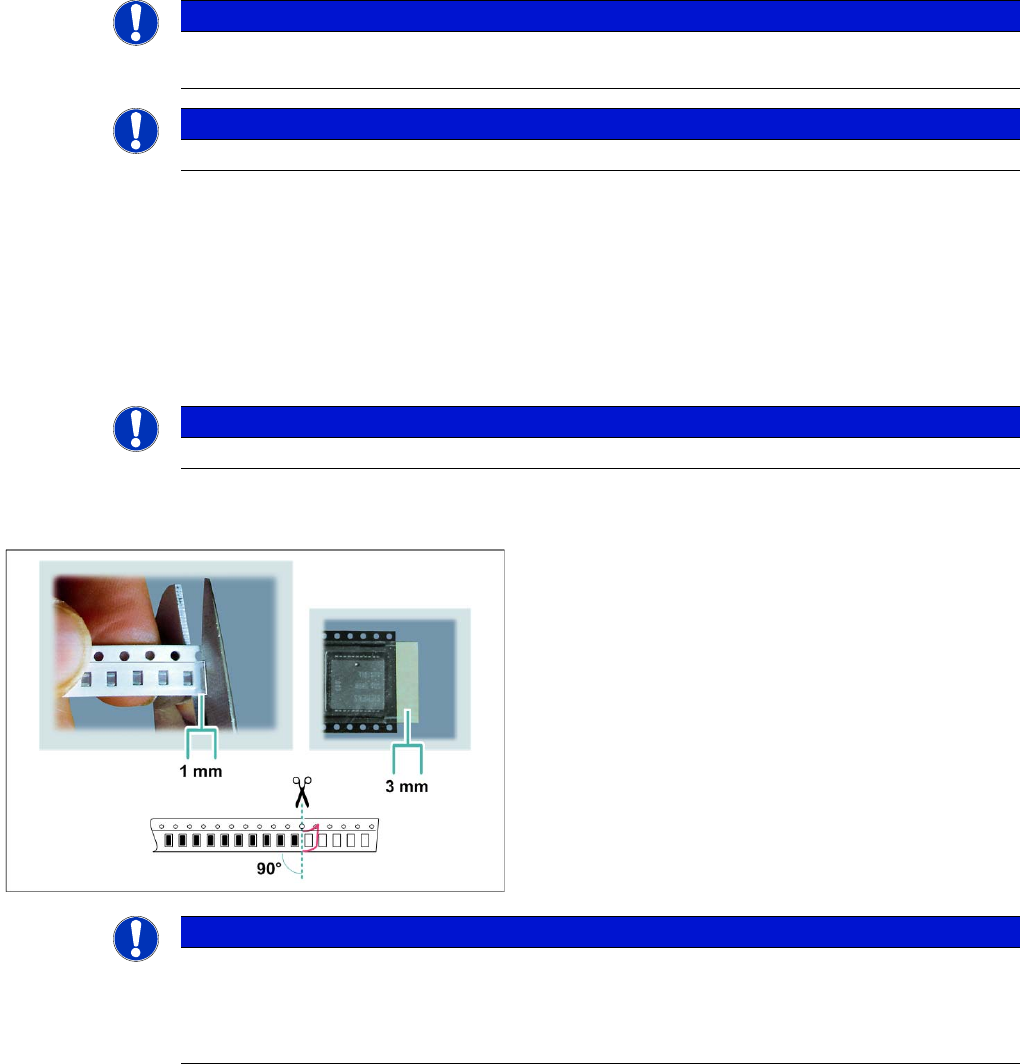
► Leave approx. 1 mm of the cover foil protruding and cut off the rest of the cover foil.
The protruding end is needed for overlapping the other end of the tape later on.
For broader tapes leave a bit more cover foil protruding.
NOTICE
The following description is also available as a poster for your workshop.
Job Poster "Splicing tapes", Item No. 00192460-xx
NOTICE
Perform all the following steps in the specified order.
NOTICE
Make sure that the required components are on the new tape.
►Lift part of the cover foil (about the width of a pocket)
with the tweezers and fold it back.
►Cut the beginning of the new tape exactly in the
middle and at right angles, between two component
pockets.
NOTICE
For blister tapes with small pocket distances:
Bend the tape once in the direction of the cover foil. This helps you to cut more easily between
the component pockets (cut with scissors along the folded line). Lift the cover foil at the
beginning of the new tape and then cut the tape.
Accessories
Connecting the Tapes Tape Splicing Tool for SMD Tape Connections
User Manual X Feeder Modules SIPLACE Family 101
Preparing the End of the Tape
Splicing the tape
During splicing, the two prepared tape ends are connected to one another with the help of a splicing plate
and an adhesive tape. You need to use the splice tool for this.
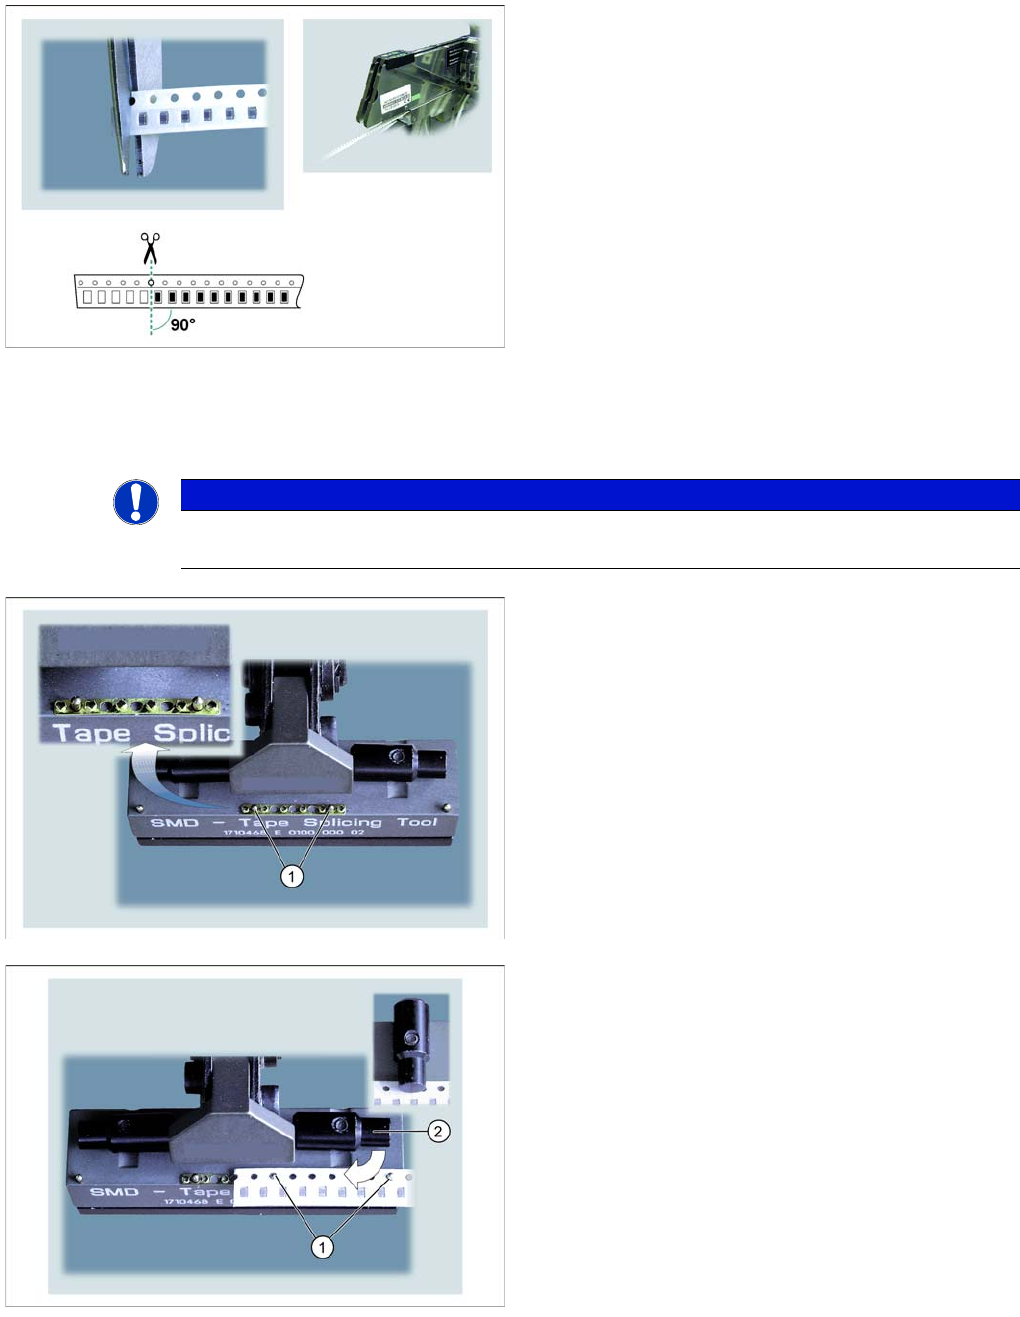
►Cut the end of the tape exactly in the middle and at
right angles, between two component pockets.
NOTICE
When using tapes with perforations on both sides, proceed as described below. Afterwards, join
the tape at the second perforation with another splicing plate.
►Insert a splicing plate onto the two middle pins (1) of
the open splice tool, with the raised "spikes" showing
upwards.
►Place the prepared end of the "old" tape into the splice
tool, so that one half of the splicing plate is covered
and the tape end is held by the two pins (1).
►Turn the swivelling latch towards the front, to fix the
tape end into place.