00196378-0102_UM X-Feeder_EN.pdf - 第66页
Operating Tape Feeder Modules Using the Operator Panel Adjusting the Pickup Positions 66 User Manual X Feeder Modules SIPLACE Family 4.3.2.2 Pick-Up Positions for 8 mm X Feeder Modules Four different pickup positions can…
Operating Tape Feeder Modules
Adjusting the Pickup Positions Using the Operator Panel
User Manual X Feeder Modules SIPLACE Family 65
Pickup Position for 8 mm Pitch
When using tapes with an 8 mm component pitch, a component offset of 4 mm with respect to the pickup
position may occur after threading in the tape.
It is possible to correct this offset without changing the set 8 mm pitch and without re-threading the tape,
using the following function:
CAUTION
The adjustment is automatically cancelled, if the feeder module receives a request or conveyor
command from the machine or if the Set button is being pressed more than 30 seconds.
In these cases any modification made is cancelled and the previously set pickup position is re-
tained.
NOTICE
Before the adjustment it may be necessary to select the desired track using the Track change
button.
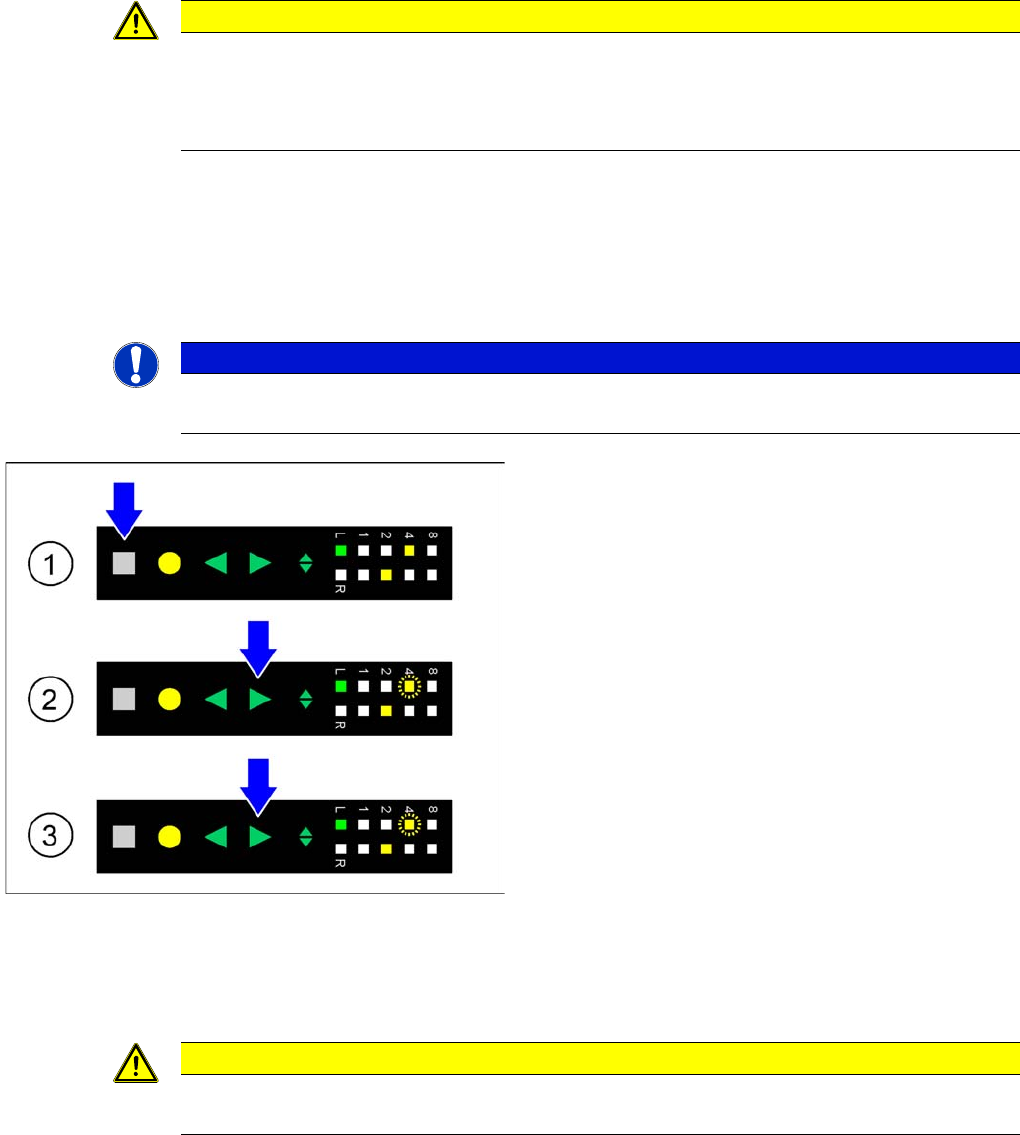
►(1) Initial status: To correct the pickup position of the
selected track by 4 mm, the press Set button first.
This button must be pressed during the whole adjust-
ment process.
►(2) Activating the adjustment function: In addition to
the Set button press the Forwards button; both but-
tons must be pressed simultaneously for at least 0.75
seconds. After this time LED 4 on the pitch display of
the selected track starts to flash slowly. At the same
time the tape is moved forwards in this track by 4 mm.
The Forwards button can now be released.
►(3) Changing the tape position: As long as the Set
button is pressed, you can move the tape forwards by
another 4 mm in the selected track, if necessary, by
briefly pressing the Forwards button. LED 4 on the
pitch display continues to flash slowly.
►Completing the adjustment: If the tape has reached its
desired position, the release Set button. The pitch
display shows the 8 mm pitch set for the selected
track.
CAUTION
The adjustment is automatically cancelled, if the feeder module receives a request or conveyor
command from the machine or if the Set button is being pressed more than 30 seconds.
Operating Tape Feeder Modules
Using the Operator Panel Adjusting the Pickup Positions
66 User Manual X Feeder Modules SIPLACE Family
4.3.2.2 Pick-Up Positions for 8 mm X Feeder Modules
Four different pickup positions can be set for 8 mm X feeder modules.
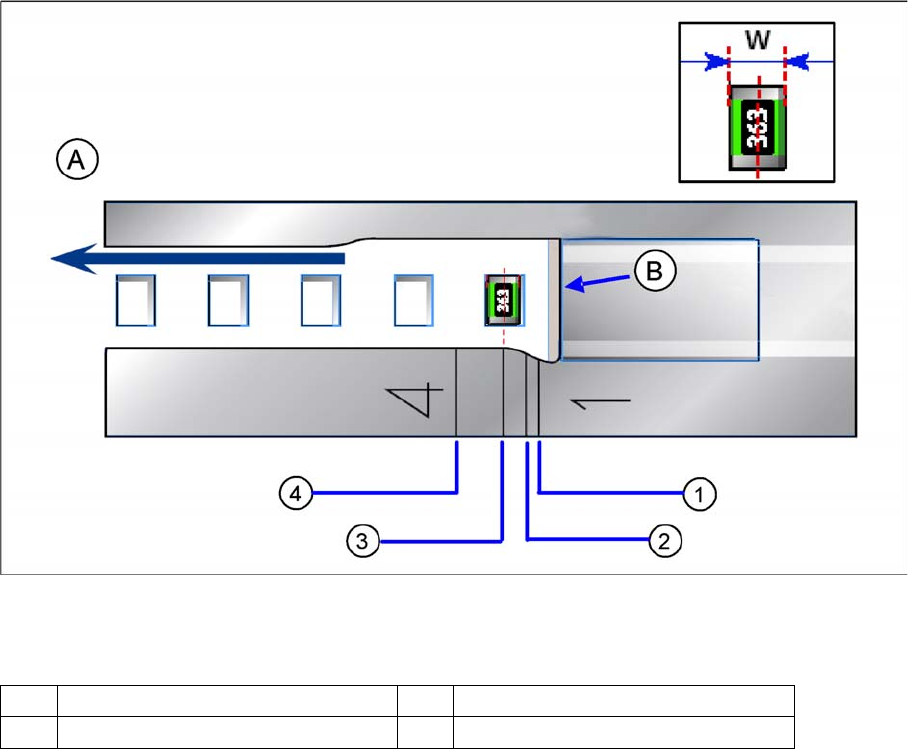
Pickup positions for 8 mm X feeder modules
Legend
▪ Pickup position 1: (pitch 2 mm)
here, components with a width of (W) ≤ 0.5 mm are picked, e. g. 0201, 0402
▪ Pickup position 2: (pitch 4 mm)
here, components with a width of (W) > 0.5 mm and ≤ 1.5 mm are picked, e. g. 0603, 0805,
Micro-, Mini-Melf
▪ Pickup position 3: (pitch 4 mm)
here, components with a width of (W) > 1.5 mm and ≤ 3.5 mm are picked, e. g. 1206, SOT23
▪ Pickup position 4: (pitch 8 mm)
here, components with a width of (W) > 3.5 mm are picked.
A Direction of tape movement W Width of the components
B Foil removal edge 1-4 Numbers of the pickup positions

Operating Tape Feeder Modules
Adjusting the Pickup Positions Using the Operator Panel
User Manual X Feeder Modules SIPLACE Family 67
Setting the Pickup position
NOTICE
The settings for a 8 mm feeder are made by the machine automatically.
►(1) The display shows the start screen ("Track").
Press the Set button until the display shows
"Pick-Pos."
►(2) The currently set pickup position is displayed.
►(3) Press the Forwards button to select the desired
pickup position.
NOTICE! The question mark behind the pickup
position number indicates a modification of the current
setting.
►(4) Press the Foil button to confirm the selected
pickup position.
A "!" is displayed behind the pickup position.
►(5) Repeatedly press the Set button to return to the
start screen.
The setting is retained automatically.
NOTICE
The feeder will also return to the start screen, if no button is pressed for 1 minute.