00196378-0102_UM X-Feeder_EN.pdf - 第68页
Operating Tape Feeder Modules Using the Operator Panel Adjusting the Pickup Positions 68 User Manual X Feeder Modules SIPLACE Family 4.3.2.3 Pick-Up Positions for 12 mm X Feeder Modules Three dif ferent pickup positions …

Operating Tape Feeder Modules
Adjusting the Pickup Positions Using the Operator Panel
User Manual X Feeder Modules SIPLACE Family 67
Setting the Pickup position
NOTICE
The settings for a 8 mm feeder are made by the machine automatically.
►(1) The display shows the start screen ("Track").
Press the Set button until the display shows
"Pick-Pos."
►(2) The currently set pickup position is displayed.
►(3) Press the Forwards button to select the desired
pickup position.
NOTICE! The question mark behind the pickup
position number indicates a modification of the current
setting.
►(4) Press the Foil button to confirm the selected
pickup position.
A "!" is displayed behind the pickup position.
►(5) Repeatedly press the Set button to return to the
start screen.
The setting is retained automatically.
NOTICE
The feeder will also return to the start screen, if no button is pressed for 1 minute.
Operating Tape Feeder Modules
Using the Operator Panel Adjusting the Pickup Positions
68 User Manual X Feeder Modules SIPLACE Family
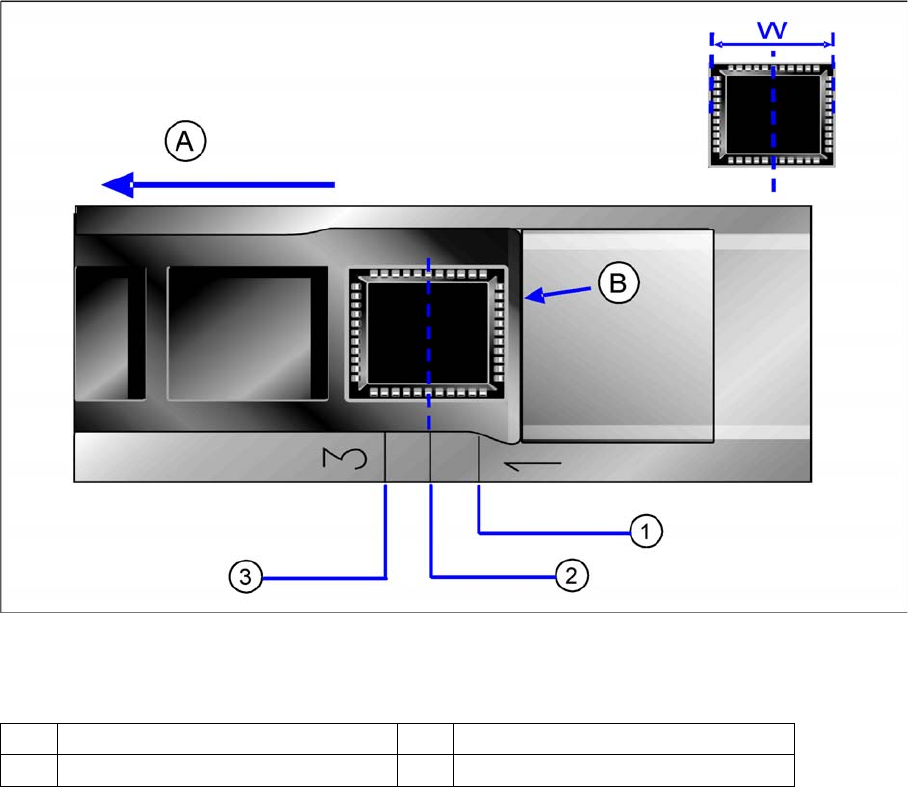
4.3.2.3 Pick-Up Positions for 12 mm X Feeder Modules
Three different pickup positions can be set for 12 mm X feeder modules.
Pickup positions for 12 mm X feeder modules
Legend
▪ Pickup position 1:
here, components with a width of (W) ≤ 3 mm are picked.
▪ Pickup position 2:
here, components with a width of (W) >3 mm and ≤ 7 mm are picked.
▪ Pickup position 3:
here, components with a width of (W) >7 mm and ≤ 11.5 mm are picked.
A Direction of tape movement W Width of the components
B Foil removal edge 1-3 Numbers of the pickup positions
Operating Tape Feeder Modules
Adjusting the Pickup Positions Using the Operator Panel
User Manual X Feeder Modules SIPLACE Family 69
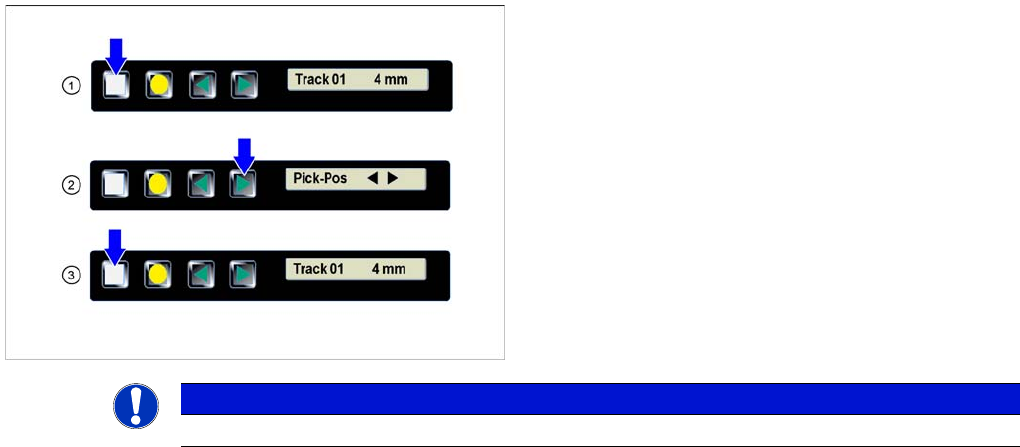
Setting the Pickup position
►(1) The display shows the start screen ("Track").
Press the Set button until the display shows
"Pick-Pos."
► (2) Press the Forwards button.
The tape is moved forwards in 2 mm steps. Press the
key several times, until the component center has
reached the pickup position.
►(3) Repeatedly press the Set button to return to the
start screen.
The setting is retained automatically.
NOTICE
The feeder will also return to the start screen, if no button is pressed for 1 minute.