00196378-0102_UM X-Feeder_EN.pdf - 第72页
Operating Tape Feeder Modules Using the Operator Panel Setting the Pitch 72 User Manual X Feeder Modules SIPLACE Family 4.3.3.1 Setting the Pitch on 2x8 mm Feeder Modules On 2x8 mm feeder module s 4 differ ent pitches ar…
Operating Tape Feeder Modules
Setting the Pitch Using the Operator Panel
User Manual X Feeder Modules SIPLACE Family 71
4.3.3 Setting the Pitch
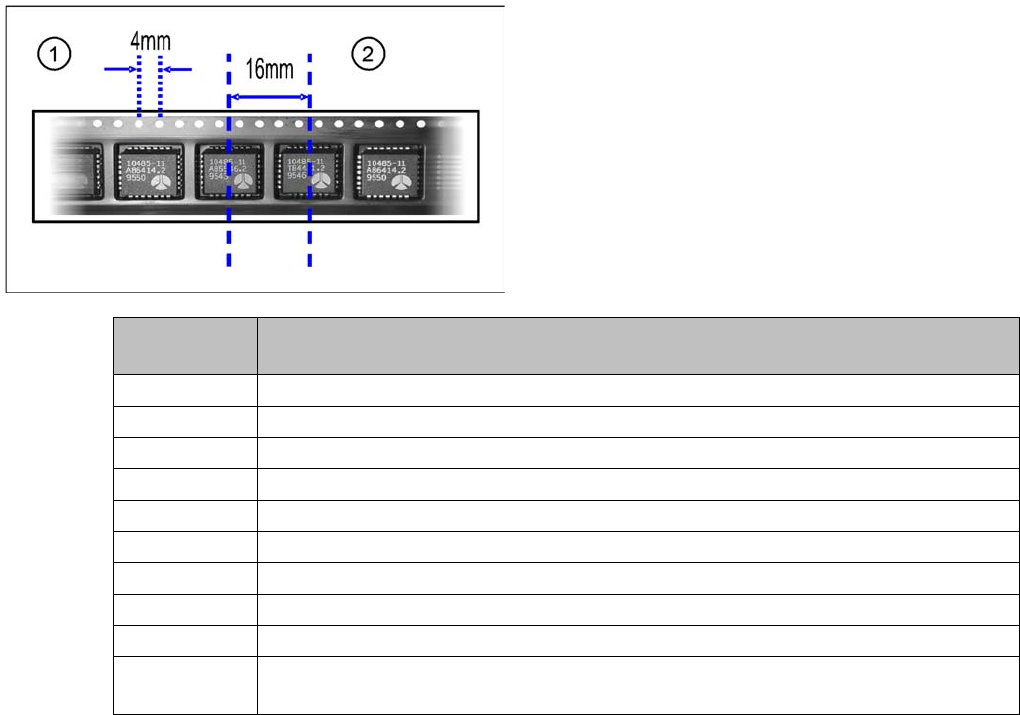
The pitches shown in the table can be set for the different X feeder module types. The pitch corresponds
to the distance between the centers of two adjacent components and must be set according to the size
of the components to be processed. The tape is moved by the set pitch in each step.
Legend
1. Hole distance
2. Pitch
Feeder mod-
ule
Possible pitches
8 mm 1, 2, 4, 8 mm
2x8 mm 1, 2, 4, 8 mm
12 mm 4, 8, 12, 16 mm
16 mm 4, 8, 12, 16, 20 mm
24 mm 4, 8, 12, 16, 20, 24, 28, 32 mm
32 mm 4, 8, 12, 16, 20, 24, 28, 32, 36, 40 mm
44 mm 4, 8, 12, 16, 20, 24, 28, 32, 36, 40, 44. 48, 52 mm
56 mm 4, 8, 12, 16, 20, 24, 28, 32, 36, 40, 44. 48, 52, 56, 60, 64 mm
72 mm 4, 8, 12, 16, 20, 24, 28, 32, 36, 40, 44. 48, 52, 56, 60, 64, 68, 72, 76, 80 mm
88 mm 4, 8, 12, 16, 20, 24, 28, 32, 36, 40, 44. 48, 52, 56, 60, 64, 68, 72, 76, 80, 84, 88, 92,
96 mm
Operating Tape Feeder Modules
Using the Operator Panel Setting the Pitch
72 User Manual X Feeder Modules SIPLACE Family
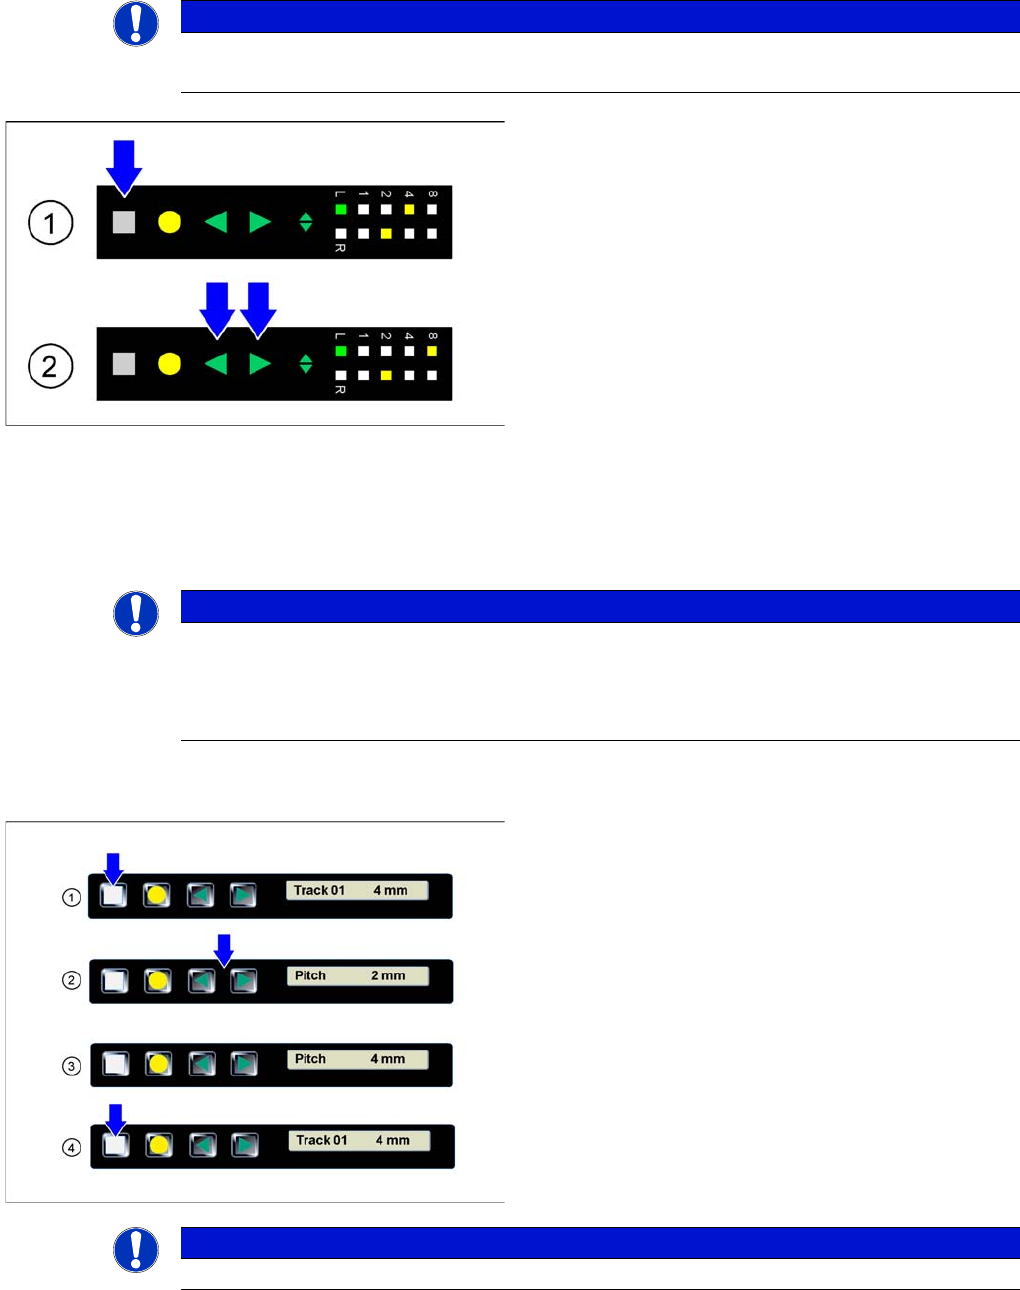
4.3.3.1 Setting the Pitch on 2x8 mm Feeder Modules
On 2x8 mm feeder modules 4 different pitches are available: 1 mm, 2 mm, 4 mm und 8 mm
The currently set pitch is indicated at the operator panel for both tracks by the corresponding LED 1, 2,
4 or 8.
The pitch can be changed as follows:
4.3.3.2 Setting the Pitch on 8 - 88 mm Feeder Modules
NOTICE
Before the adjustment it may be necessary to select the desired track using the Track change
button.
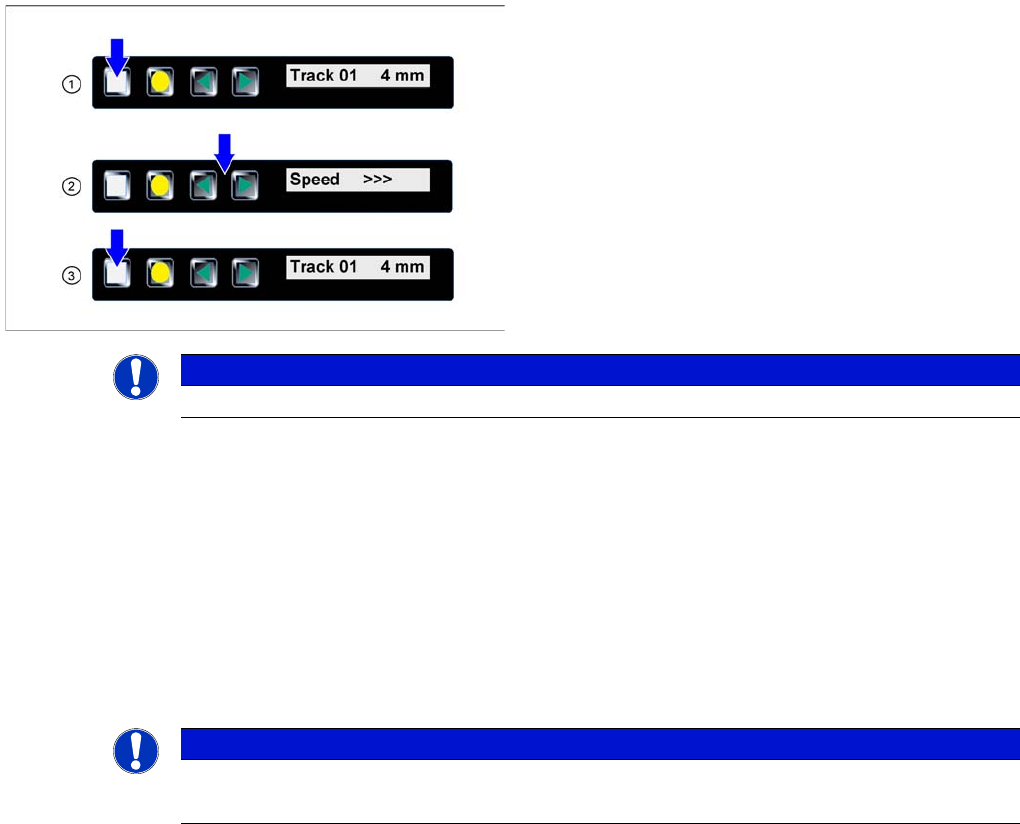
►(1) Initial status: To change the pitch of the selected
track, press the Set button first. This button must be
pressed during the whole adjustment process.
►(2) Changing the pitch: In addition to the Set button
briefly press the Forwards or Backwards button.
After releasing the Forwards or Backwards button,
the pitch display of the selected track changes
accordingly (increases or decreases). As long as the
Set button is pressed, the pitch can be changed
further by briefly re-pressing the Forwards or Back-
wards button.
►Completing the adjustment: If the desired pitch is set,
release the Set button. The changed pitch of the se-
lected track is now saved by the feeder module. If re-
quired, the feeder module will automatically change
the position of the sprocket wheel.
NOTICE
The adjustment is automatically cancelled, if the feeder module receives a request or conveyor
command from the machine or if the Set button is being pressed more than 30 seconds.
In these cases any modification made is cancelled and the previously set pickup position is
retained.
►(1) The display shows the start screen ("Track")
.Press the Set button until the display shows "Pitch."
►(2) Press the Forwards or Backwards button until
the display shows the value for the desired pitch.
►(3) Repeatedly press the Set button to return to the
start screen.
The setting is retained automatically.
NOTICE
The feeder will also return to the start screen, if no button is pressed for 1 minute.
Operating Tape Feeder Modules
Setting the Conveyor Speed for 8 - 88 mm Feeder Modules Using the Operator Panel
User Manual X Feeder Modules SIPLACE Family 73
4.3.4 Setting the Conveyor Speed for 8 - 88 mm Feeder Modules
4.3.5 Setting the Language for 8 - 88 mm Feeder Modules
The language of the texts that are displayed in the operator panel of the feeder module can be set at the
user interface of the station computer via the "
Language
" menu.
If a feeder module is logged in at a station computer, it will be initialized at first. During this process the
language of the feeder module is adapted to the user interface language of the station computer.
▪ If German is set as the language at the station computer, the feeder modules will also be set to Ger-
man.
▪ If any other language than German is set at the station computer, the feeder modules will ALWAYS
be set to English.
►(1) The display shows the start screen ("Track").
Press the Set button until the display shows "Speed."
►(2) Press the Forwards or Backwards button until
the display shows the value for the desired transport
speed.
⇨ > = very slow
⇨ >> = slow
⇨ >>> = standard transport speed
►(3) Repeatedly press the Set button to return to the
start screen.
The setting is retained automatically.
NOTICE
The feeder will also return to the start screen, if no button is pressed for 1 minute.
NOTICE
It is not possible to set the language at the feeder module itself.
The language set in SITEST does not influence the language shown on the feeder module.