OM-1078-002.pdf - 第92页
5 . 3 "TEACHING" Window (Submenu) 5.3.1 "T raverse Ofs" T ab • Sheet Layout When the "T raverse Ofs" tab is pressed in the "TEACHING" window (submenu), the following tab sheet appe…

[Pallet Draw/Storage] Button
When the pallet at the drawout position is not drawn out by the
traverses and the [ENABLE] button is pressed in two seconds after
this button and the [ON] button (entitled "MOVE"), the pallet is drawn
out. When the pallet is already drawn out, it is stored in the rack.
When the rack is loaded with new components, the drawout
and storage actions of the traverses take place approxi-
mately 10 times to check for any positional deviations and
plays (looseness) of the components.
[Rack Shutter Open/Close] Button
When pressed, this button opens or closes the rack shutter.
[Chuck Open/Close] Button
When pressed, this button opens or closes the chucks.
*2 "Data" Group Box
[Elevator Decelerate] Button
The set parameter is used to specify the reduction rate of the eleva-
tor up/down speed.
Set a parameter to specify the reduction rate of the speed (based
on the standard driving waveform) in the text box.
Use this function when there is a possibility that the components in
the tray may deviate from the correct position during elevator move-
ment.
[Traverse Decelerate] Button
The set parameter is used to specify the reduction rate of the traverse
shaft transfer speed while a pallet (tray) is being drawn out from the
rack or being stored.
Set a parameter to specify the reduction rate of the speed (based
on the standard driving waveform) in the text box.
Use this function when there is a possibility that the components in
the tray may deviate from the correct position during elevator move-
ment.
[Step] Button
Set the step No. for which the traverse drawout/storage actions
should take place.
*3 "Information" Group Box
Parameters for "Time", "Step (EV Pos.)", "Draw Step No.", and "Hgt
of Draw Step" are shown in this group box.
*4 "Control Sw" Group Box
Select one of the option buttons and press the [ON] button (entitled
"MOVE"). After that, press the [ENABLE] button on the operation
panel in 2 seconds. The selected action (operation) takes place.
5.2 "UNIT ADJ." Window (Submenu)
0311-003 2-18 AHI01EGP
Note
5.3 "TEACHING" Window (Submenu)
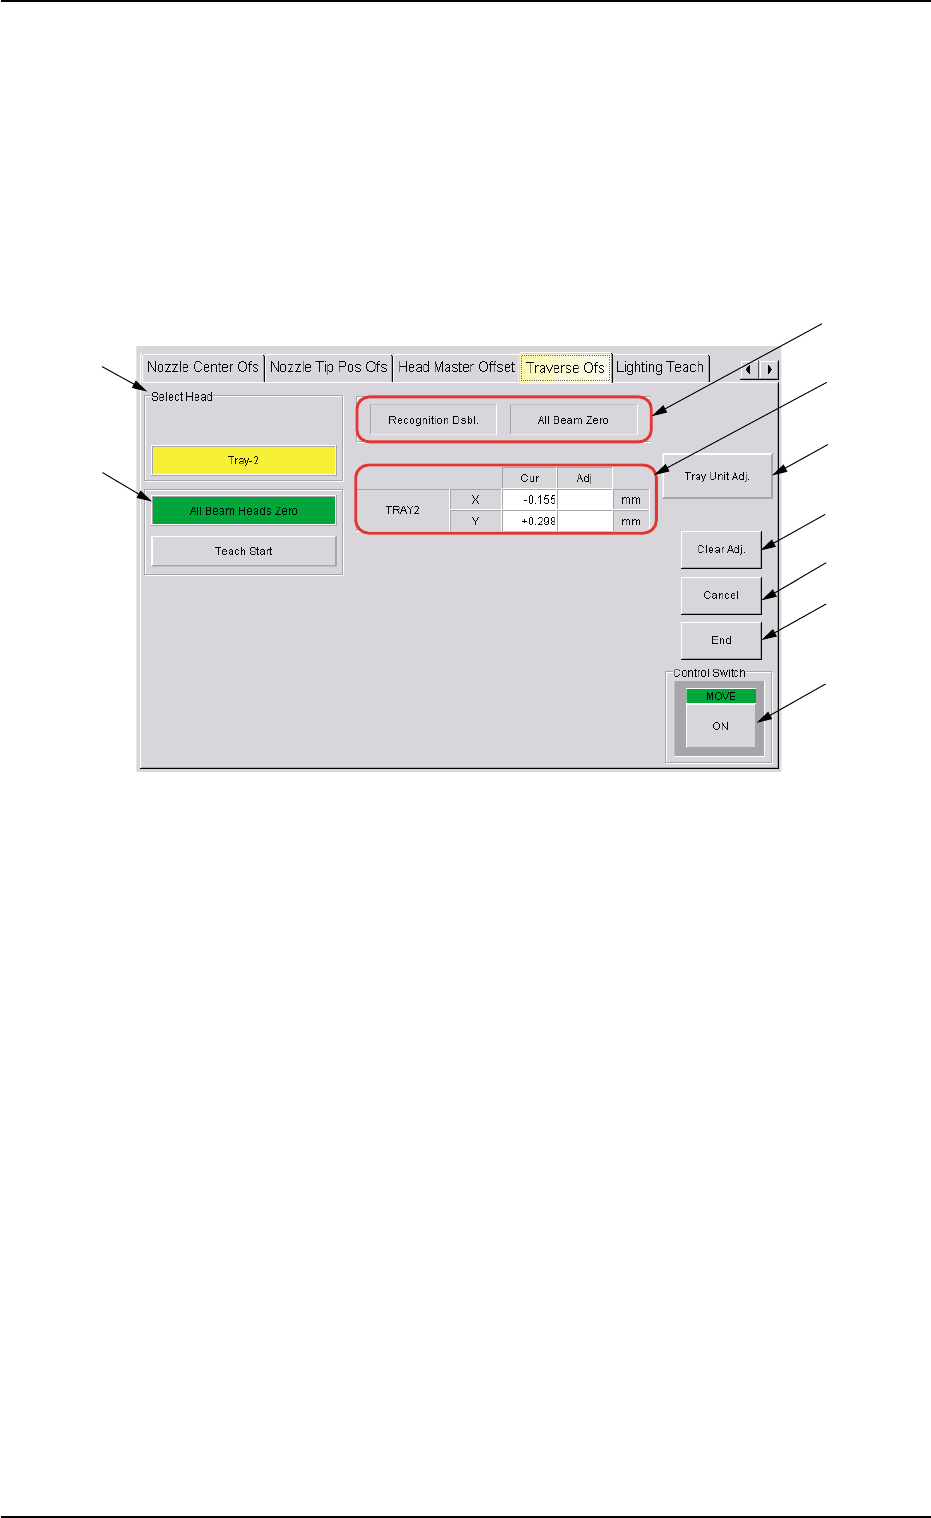
5.3.1 "Traverse Ofs" Tab
• Sheet Layout
When the "Traverse Ofs" tab is pressed in the "TEACHING" window
(submenu), the following tab sheet appears.
Fig. B9-1 "Traverse Ofs" Tab Sheet
• Sheet Composition
*1 "Select Head" Group Box
The following button is provided in this group box.
[Tray-2] Button
*2 "Select Option (Items to be taught)" Group Box
The following buttons are provided in this group box.
[All Beam Heads Zero] Button
When this button is pressed, all X/Y beams are zeroed.
[Teach Start] Button
*4
*1
*2
*5
*3
*7
*8
*9
*6
0311-002 2-19 AHI01EGP
5.3 "TEACHING" Window (Submenu)

*6 [Clear Adj.] Button
When pressed, this button clears the results of the teaching opera-
tion.
*7 [Cancel] Button
When pressed, this button cancels the results of the teaching op-
eration without reflecting them on the offset data.
*8 [End] Button
When pressed, this button reflects the results of the teaching op-
eration on the offset data and exits from this session.
*9 "Control Switch" Group Box
Select the item (the button) to be taught and press the [ON] button
(entitled "MOVE"). After that, press the [ENABLE] button on the op-
eration panel in 2 seconds. A teaching operation is performed on
the selected item.
5.3 "TEACHING" Window (Submenu)
0204-001 2-20 AHI01EGP