ConneX_Help.pdf - 第26页
Cu sto m i ze a D ef a ul t Tem pl a t e Com p le te the fo l l o wi ng step s to c rea te a c us tom t em p l ate (usi ng .XML as an e x a mp l e ) usi ng t he fi e l d s fro m a d e f aul t tem p la te. 1. S tar t Wi n…
Settings
The Settings page displays a list of configuration parameters for ConneX.
Licensing
This section shows the software licensing information for ConneX service, including:
License type (ex. Trial or Perpetual for ConneX Service)
Available Connections (remaining number of client connections, or max connections minus used connections; a client connection is
an instance of the Machine Manager Service connecting to a centralized ConneX Service)
Maximum Connections (number of client connections licensed; possible number of Machine Manager Service connections to ConneX
Service)
ConneX Annual Maintenance Contract (expiration date for Machine Manager connections to ConneX Service)
To export or download a copy of the ConneX data for SentriX jobs, this section also provides a Download SentriX Report button.
For more information about your Data I/O software product licenses (including ConneX):
1. On the Handler/Host PC (of your PSV System), open a browser window (Chrome 100.0.x recommended) to the Data I/O License
Manager at http://localhost:5002/.
2. On the License Information page, under the ConneX section, click ConneX Service to expand and view its license details.
Users Settings
The Users Settings section shows the password options for user accounts:
Field Description
Password requires digit User password requires at least one digit
Password requires lowercase User password requires at least one lowercase character
Password requires uppercase User password requires at least one uppercase character
Password requires non alphanumeric User password requires at least one non-alphanumeric character
Password minimum length Type the minimum number of characters required for user passwords
MQTT Connections
The MQTT Connections section shows the configuration for MQTT ports:
Field Description
MQTT Broker Port The TCP port number for the ConneX MQTT Broker (default TCP port is 1883)
MQTT Machine Manager Client Port The TCP port number for the ConneX MQTT Machine Manager Client (default TCP port is 9002)
Template Records
In addition to accessing ConneX data through MQTT and GraphQL queries, the latest ConneX version also allows users of previous
versions to access ConneX data through standard templates for backwards-compatibility. The Template Records component and service
publishes ConneX data through templates for legacy users of Template Manager in previous versions.
First, you create a custom template (such as .XML and .JSON) to define the specific data fields to collect. Then as devices are programmed,
ConneX writes the programming statistics to the template-based record to effectively capture the user-specified data points.
By publishing the specified fields data (ex. programming statistics) through standard templates, ConneX simplifies the process of integrating
your programming data into your Manufacturing Execution System (MES) or other data processing application(s).
The Template Records page displays a list of your raw programming records while any customized template records are stored in
C:\ProgramData\DataIO\ConneX\TemplateManager\Audit\Output. To modify template settings, click Settings (in the left navigation
pane), then click Template Manager.
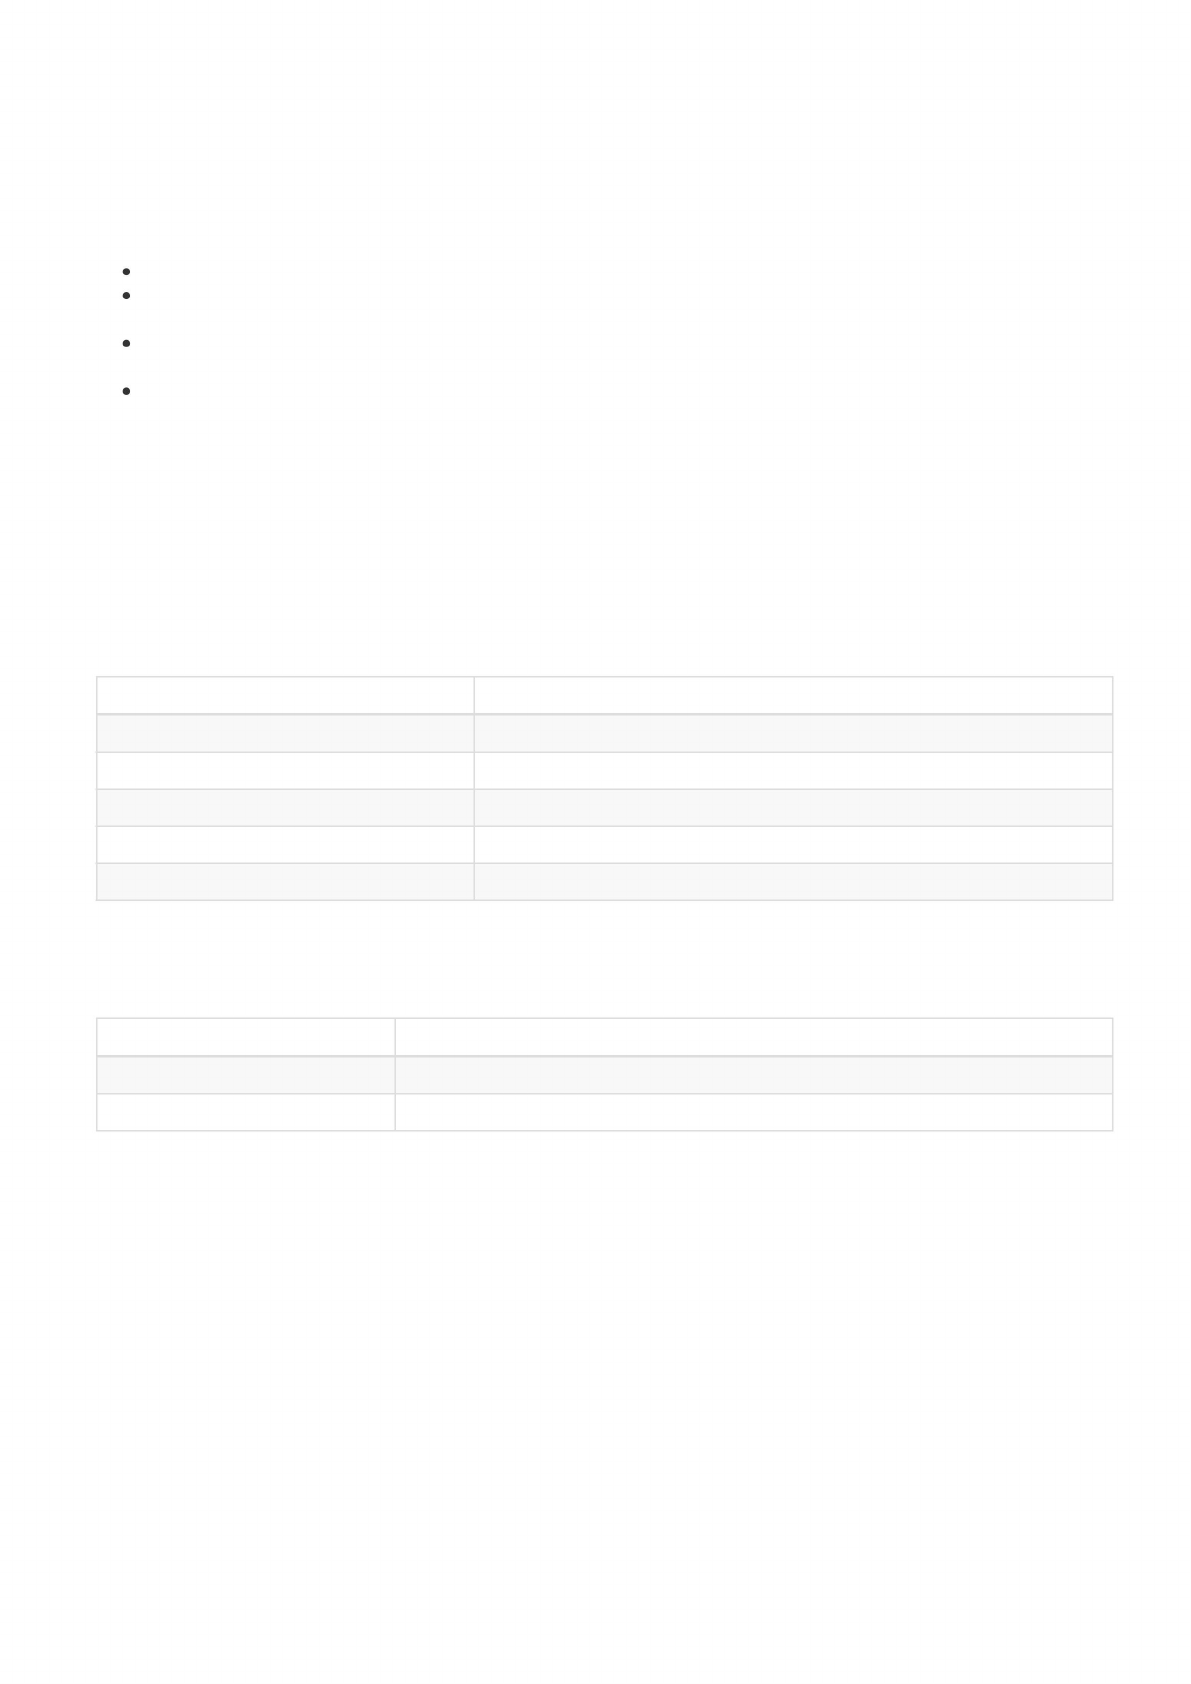
The Templates section lists your current templates and allows you to add a new template (using the Plus button at top), delete an existing
template (using the corresponding Trash button in right column), or specify a different file for an existing template (using Pencil button in
right column).
Customize a Default Template
Complete the following steps to create a custom template (using .XML as an example) using the fields from a default template.
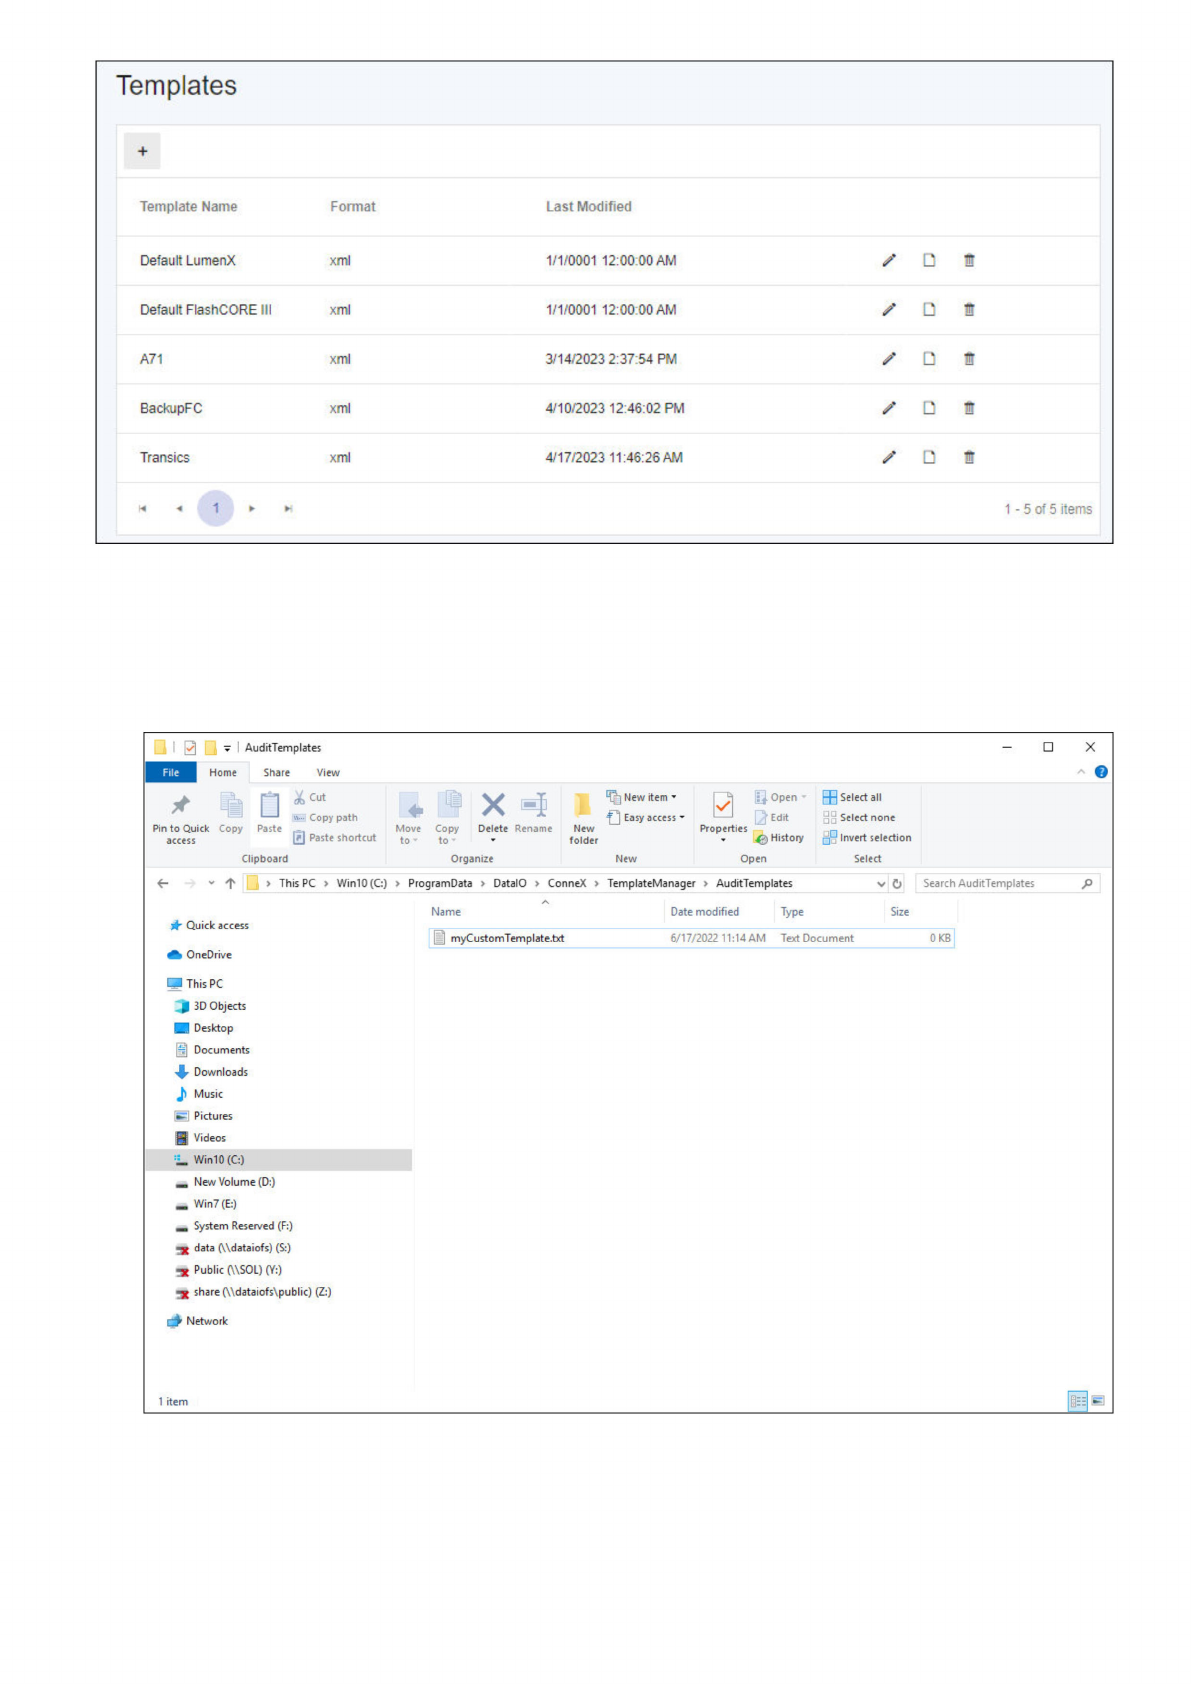
1. Start Windows/File Explorer and navigate to C:\ProgramData\DataIO\ConneX\TemplateManager\AuditTemplates.
2. Right-click anywhere in the right pane, point to New, click Text Document, type a name for the custom template, and then press
ENTER.
3. Open a default template and copy all of its fields.
4. Now open your custom template file and paste the default fields into your custom template, then Save your template.
5. Modify the fields in your custom template as desired (ex. add, remove, reorder fields), then Save.
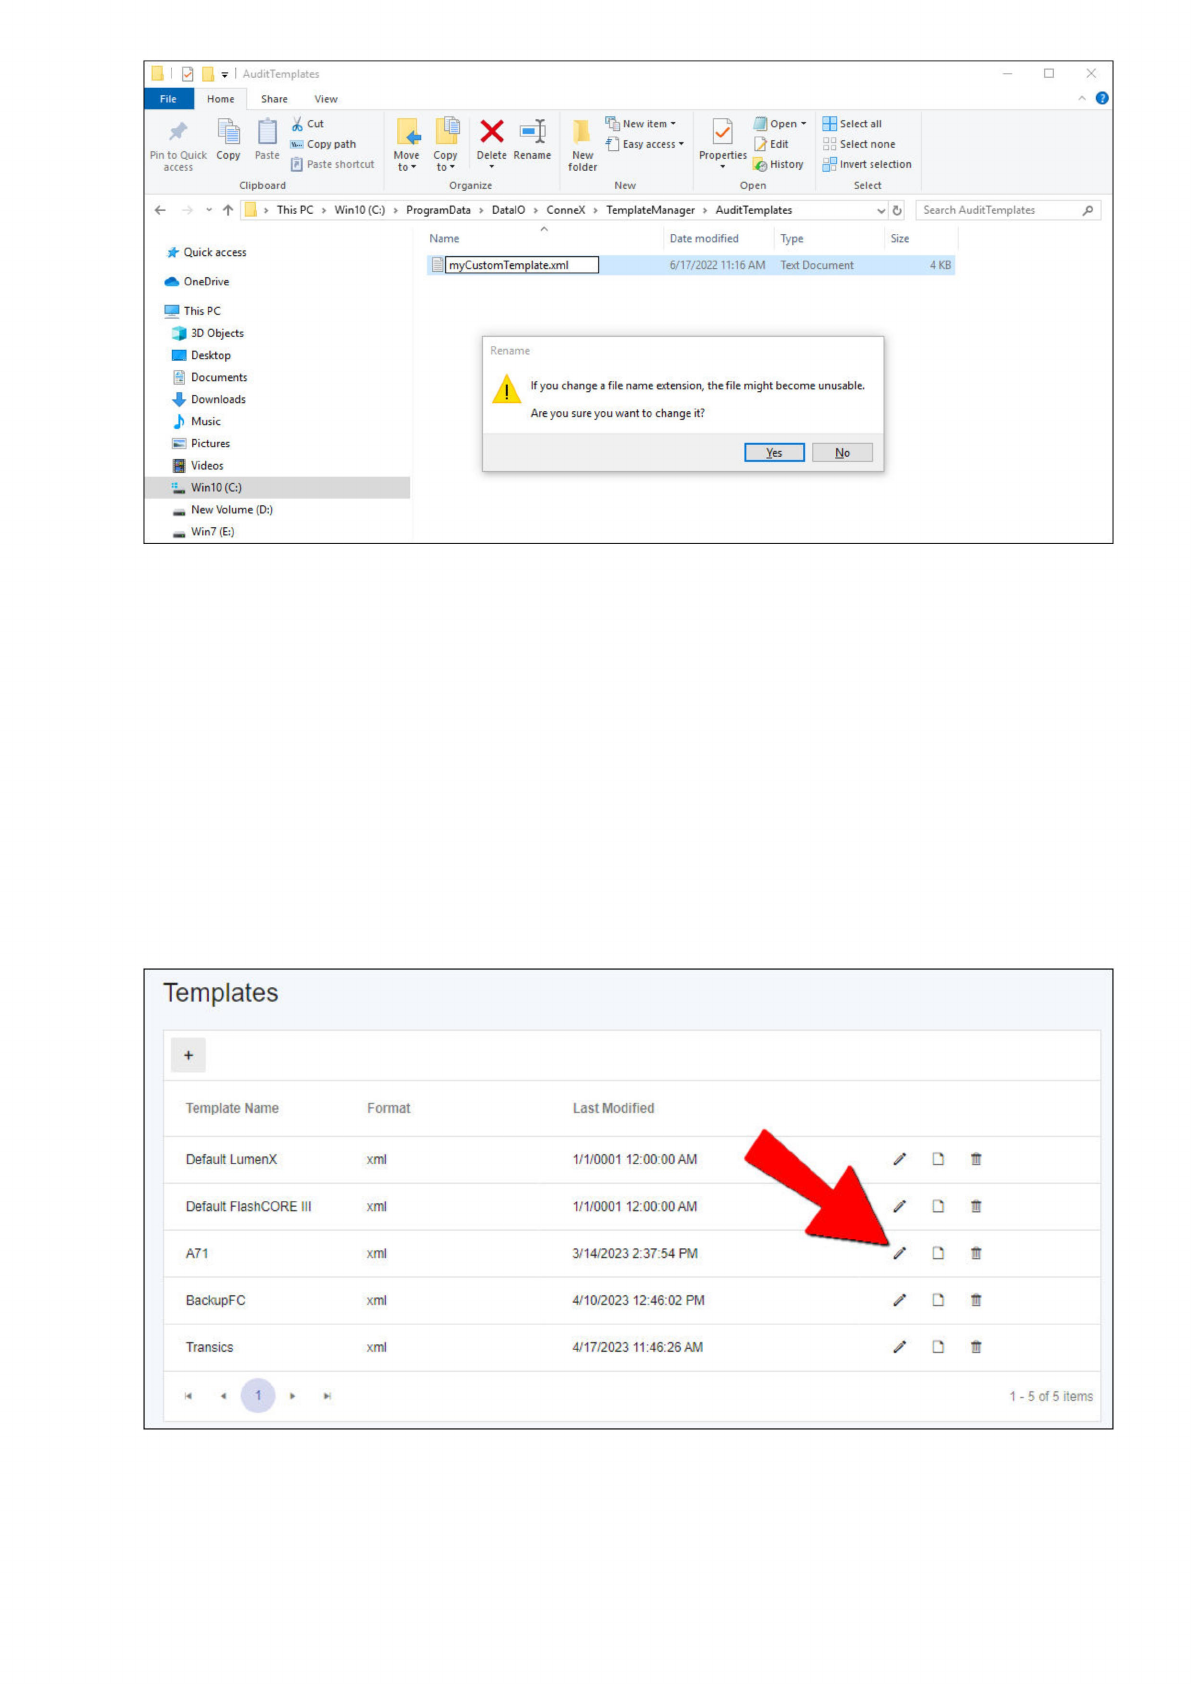
6. Finally, rename the custom template file from .TXT to .XML.
Templates
Template
Name
Format
Last
Modified
Default
LumenX
xml
1/1/0001
12:00:00
AM
z
D
Default
FlashCORE
III
xml
1/1/0001
12:00:00
AM
A71
xml
3/14/2023
2:37:54
PM
z
BackupFC
xml
4/10/2023
12:46:02
PM
z
Transics
xml
4*17/2023
11:46:26
AM
z
ur
Y
<
1
»
*
1
-
5
of
5
items
i
g
v
Au
ditTem
plates
Home
Share
View
File
才嚼口
Pin
to
Quick
Copy
Paste
access
'、…
Copy
path
回
Paste
shortcut
Clipboard
x
Move
Copy
Delete
Rename
to
to
•
Organize
哈
New
item
口
Easy
access
New
folder
New
B
UJOpen
2
Edit
Properties
«
History
Open
田
Select
all
Select
none
比
Invert
selection
Select
±
This
PC
>
Win10
(C:)
>
ProgramData
>
DatalO
>
ConneX
>
TemplateManager
>
AuditTemplates
U
Search
AuditTemplates
人
Name
Date
modified
Type
Size
Quick
access
[J
myCustomTemplate.txt
6/17/2022
11:14
AM
Text
Document
0
KB
OneDrive
This
PC
|
3D
Objects
Desktop
怜
Documents
,
Downloads
』
Music
面
Pictures
.
Videos
J
Win10(C:)
一
New
Volume
(D:)
一
Win7
(E:)
一
System
Reserved
(F:)
data
(Wdataiofs)
(S:)
-X
Public
(\\SOL)
(Y:)
1
share
(\\dataiofs\public)
(Z:)
沙
Network
1
item
i
三
碣
Add Custom Template to ConneX
Complete the following steps to add your custom template (using .XML as an example) to ConneX.
1. Open a browser window to http://localhost:5001 and login.
2. In the left pane, expand Settings, and then click Template Manager.
3. On the Templates page, click the add template (+) button near the upper-left corner.
4. Type a Template Name, and then click Select File.
5. In the Open dialog box, browse to and select your custom template, then click Open.
6. Click Save.
Set ConneX to Use Added Custom Template
Complete the following steps to set your custom template as the format for ConneX to generate and output its programming statistics.
1. In the Templates table, click the Pencil icon/button for the specific template that you want to change (default templates cannot be
changed). For example:
2. Click the Select File button, browse and select your new custom template, and then click Open.
X
AuditTemplates
Home
X
或
Clipboard
Organize
New
Open
Select
New
folder
0
Properties
J
Open
[2
Edit
公
History
尸」
New
item
口
Easy
access
^Select
all
Select
none
出
Invert
selection
Move
Copy
Delete
Rename
Share
View
才
墉
口
《
1
―
1
1—1
~
・
Copy
path
Pin
to
Quick
Copy
Paste
access
回
Paste
shortcut
v
个
>
This
PC
>
Win10
(G)
>
ProgramData
>
DatalO
>
ConneX
>
TemplateManager
>
AuditTemplates
V
U
Search
AuditTemplates
Q
Quick
access
OneDrive
里
This
PC
『
3D
Objects
Desktop
图
Documents
,
Downloads
力
Music
A
Name
Date
modified
Type
Size
myCustomTumpEt
巳
xml
6/17/2022
11:16AM
Text
Document
4
KB
Rename
।
If
you
change
a
file
name
extension,
the
file
might
become
unusable.
Are
you
sure
you
want
to
change
it?
匿
Pictures
舞
Videos
Yes
No
工
Win10
(C:)
—
New
Volume
(D:)
一
Win7
(E:)
Templates
Template
Name
Format
Last
Modified
Default
LumenX
xml
1/1/0001
12:00:00
AM
/Dm
Default
FlashCORE
川
xml
1/1/0001
12:00:00
AM
ZD®
A71
xml
3/14/2023
2:37:54
PM
,口
7
BackupFC
xml
4/10/2023
12:46:02
PM
,口
0
Transics
xml
4/17/2023
11:46:26
AM
,口
逋
M
4
1
>
M
1
-
5
of
5
items