00191369-01.pdf - 第231页
User Manual HS-50 6 Vision functions Software-Version 5.01Edition 01/99 6.5 Teach Fiducial 229 7 HV W)LGXFLDO0HQX In the 7 HVWI LGXFLDO menu the following option s are avai lable : – Centerin g the fiduc ial (…
6 Vision functions User Manual HS-50
6.5 Teach Fiducial Software-Version 5.01 Edition 01/99
228
%XWWRQV
Å Accept
Click on the $FFHSW button to save the settings. The option box will then close.
Å Cancel
With &DQFHO you can discard the settings. The option box will then close.
Å Help
With the +HOS button you can access explanatory material regarding the on-screen presenta-
tion.
Å Standard values
Click on the 6W DQGDUG YDOXHV button if programming the transformation table fails. When you
select this option the transformation table will be preassigned default values. After this you can
start over with programming table 5.
Å Numberinput field
You can choose the number of sections
Å by entering the numerical value directly into the display field, or
Å by moving the scroll field in the scroll bar to the right or left using the mouse. In this way you
can run back and forth through the values range (1 - 5), or
Å by clicking on the left-hand or right-hand arrow on the scroll bar. In this way you can in-
crease or decrease the number of selections.
3URJUDPPLQJWKHWUDQVIRUPDWLRQWDEOH
– Specifying the output values
Position the mouse pointer over the ends of the transformation lines of each section. The ends
are marked with small horizontal lines. A vertical double arrow will then appear on the screen.
Click on the left-hand mouse key and move the arrow upwards or downwards. This will move
the selected end of the transformation line and the numerical value will be displayed at 287
%HJLQor 287(QG.
– Selecting the section limits
The graphical representation in Fig. 6.5 - 19 shows equidistant section limits with the ranges
0 - 50, 51 - 100 and so on. You can change these section limits if you wish. However limits 0
and 255 are permanently allocated and cannot therefore be moved.
Position the mouse pointer on a section limit (but not 0 and 255). A horizontal double arrow will
appear on the screen. Hold down the lefthand mouse pointer and use it to drag the section limit
in the direction you want. The corresponding numerical value will be displayed at ,1.
– Once you have programmed your transformation table you can quit the option box by clicking
on $FFHSW or &DQFHO. If you have not managed to obtain a satisfactory result, click on 'HIDXOW.
User Manual HS-50 6 Vision functions
Software-Version 5.01Edition 01/99 6.5 Teach Fiducial
229
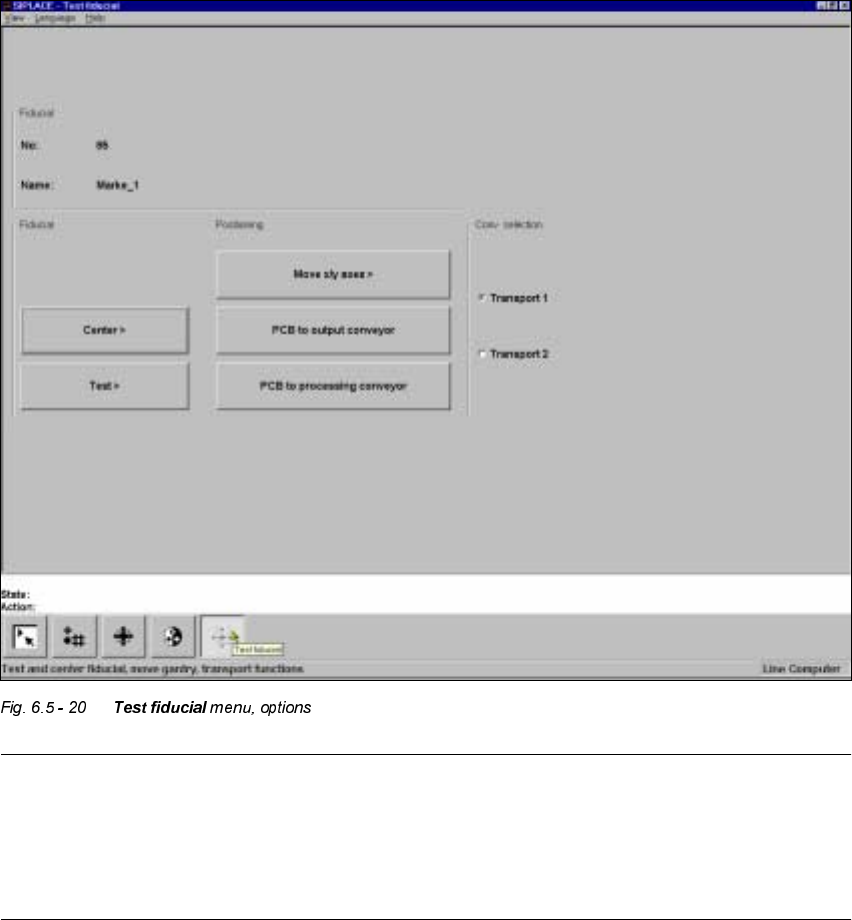
7HVW)LGXFLDO0HQX
In the 7HVWILGXFLDO menu the following options are available:
– Centering the fiducial (Center)
– Testing the fiducial (Test)
– Positioning the teaching gantry (x/y movement) (move X/Y axes)
– Transporting the board onto the output conveyor (PCB to output conveyor)
– Transporting the board onto the processing conveyor (PCB to processing conveyor)
NOTE
Buttons are active when the text on the button is black (rather than gray). This means that you can
launch the associated function by clicking on the button with the mouse.
The &HQWHUand 7HVWoptions will only be available if you have already loaded a fiducial and a
model already exists for this fiducial.
6 Vision functions User Manual HS-50
6.5 Teach Fiducial Software-Version 5.01 Edition 01/99
230
If you have selected a fiducial the fiducial number and the fiducial name will appear in the display
field.
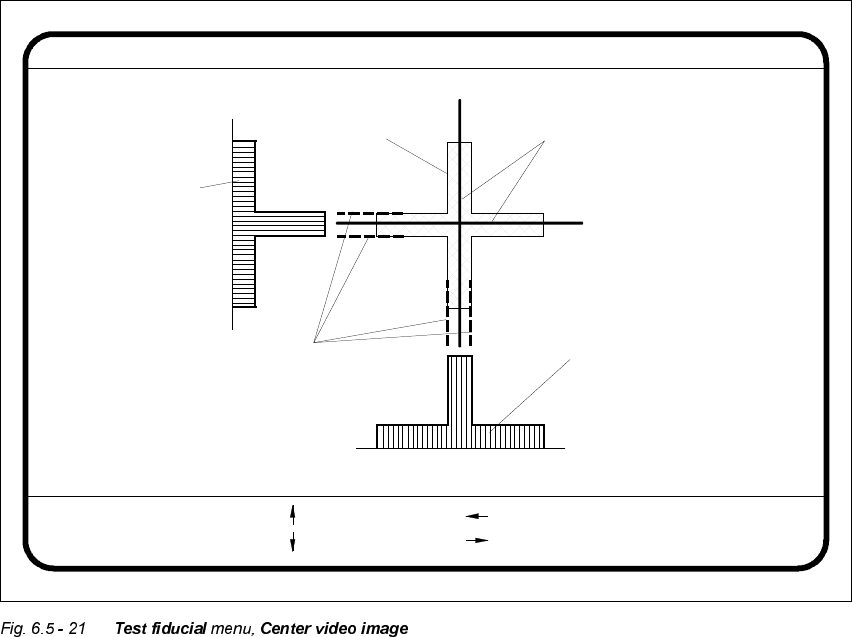
&HQWHU2SWLRQ
If you click on the &H QWHU button the 7HVW ILGXFLDO menu will close and the video image is shown
on the screen. The picture shows the 2D fiducial structure and the rows and columns profiles of
the 1D structure used for determining precisely the center of the fiducial. Header and footer will
be shown as well.
The &H QWHU function determines via software the center of the fiducial. The parameters for the
function, the edges of the fiducial structure, are selected via a dialog. The system draws edge line
markings as suggestions at possible edge positions.
Å With the arrow keys shift the current edge line marking designated in the header.
Å With 5HWXUQ you can accept the position of the suggested edge line marking or the one whose
position you changed. The system will then show you the next edge line marking. The se-
quence in which testing takes place is ’Fiducial edge left’, ’Fiducial edge right’, ’Fiducial edge
top’, and lastly, ’Fiducial edge bottom’. This notation appears in the header.
Edge ok
Fiducial No. = 8 Edge = left
Ret :
Center fiducial
: up
: dn
: right
: left
Fiducial
Result: Centering crosshair
Edge line markings to be shifted
via cursor keys
Row profile of fiducial
Column profile
of fiducial