Nordson_EFD_RV_Series_Operating_Manual - 第102页
RV Series Automated Dispensing Systems 102 www.nordsonefd.com info@nordsonefd.com +1-401-431-7000 Sales and service of Nordson EFD dispensing systems are available worldwide. AppendixA, Command Function Refer ence (cont…
RV Series Automated Dispensing Systems
101www.nordsonefd.com info@nordsonefd.com +1-401-431-7000 Sales and service of Nordson EFD dispensing systems are available worldwide.
AppendixA, Command Function Reference
(continued)
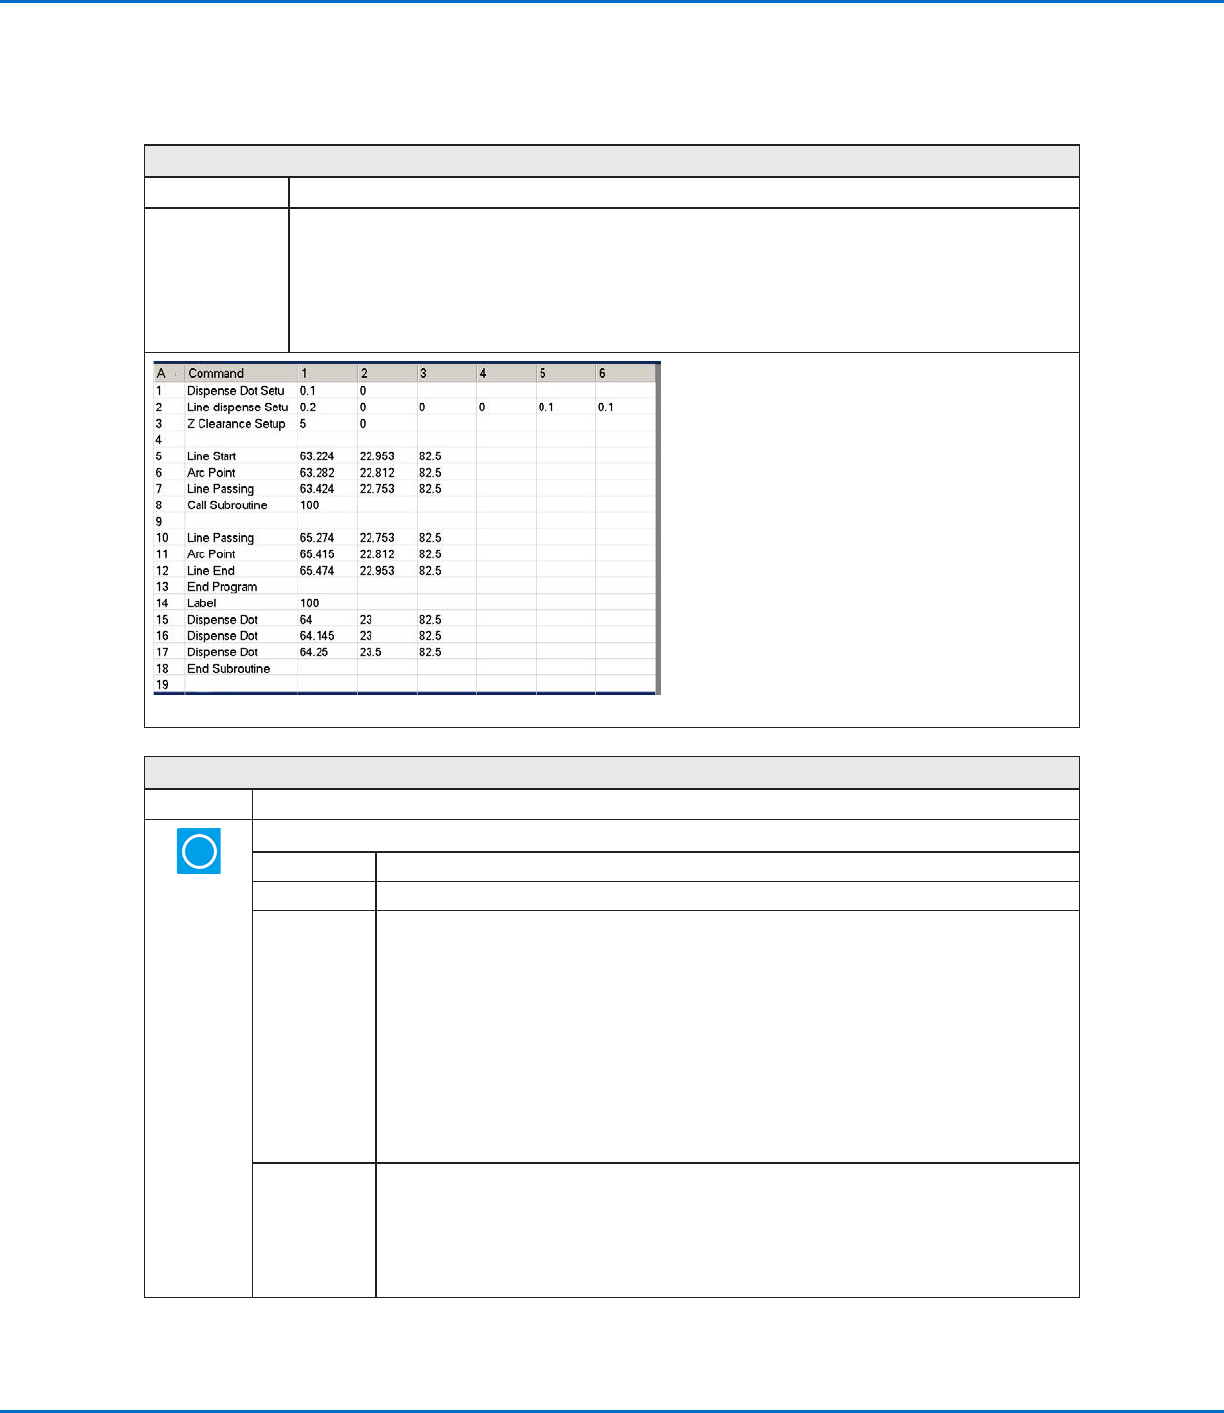
Call Subroutine
Click Function
Double-click
address and
select from drop-
down menu
A subroutine is a set of commands that is located after the end of the program. Call Subroutine causes
the program to jump to the subroutine at a specified address and then to execute the commands at that
address. When the End Subroutine command (which is inside the subroutine) is reached, the program
continues at the address that immediately follows the Call Subroutine command. Call Subroutine is
most useful for repeating a pattern anywhere on the same workpiece (as opposed to the Step & Repeat
command, in which a pattern is repeated on separate workpieces that are arranged in straight lines and at
fixed distances from each other).
Example of a program that includes a Call Subroutine command
Circle
Click Function
Registers a circle with the circle’s center at the current XYZR location
Parameter Description
Diameter The diameter of the circle (inmm)
Start Angle The angle (in degrees) from the center of the circle where the start of the circle begins. The
default of 0 degrees equates to the 3:00 position.
Default: 0 (degrees)
Range: 0 to 360
NOTES:
• You can enter a negative value. For example, if you enter -90, the circle start point will be the
12:00 position.
• You can also enter a value greater than 360, but if you do so, the robot compensates for the
larger value. For example, if you enter 400, the circle start point will begin at the 40 degree
mark.
Total Degree The angle (in degrees) after the Start Angle value at which dispensing stops.
Default: 0 (degrees)
To dispense in a counterclockwise direction, enter a negative value.
NOTE: You can enter a value greater than 360. For example, if you enter 720, the Z axis head
will loop twice.
RV Series Automated Dispensing Systems
102 www.nordsonefd.com info@nordsonefd.com +1-401-431-7000 Sales and service of Nordson EFD dispensing systems are available worldwide.
AppendixA, Command Function Reference
(continued)
Circle 3 Point
Click Function
Double-click
address and
select from drop-
down menu
Used in tandem with the Circle Run command when a circle is too large to fit in the Secondary View
screen (in the CCD Mode). A larger circle can be created by entering three (3) Circle 3 Point commands,
one for each “corner” of the circle. The system uses the three Circle 3 Point commands to calculate the
entire circumference of the circle. The Circle Run command dictates where the circle starts and how many
degrees the circle will be. The correct sequence of commands is: three (3)Circle 3 Point commands followed
by one (1) Circle Run command.
Circle Run
Click Function
Double-click
address and
select from drop-
down menu
Used in tandem with the Circle 3 Point command when a circle is too large to fit in the Secondary View
screen (in the CCD Mode), adjusts the Start Angle and Total Degrees of the large circle.
Parameter Description
Start Angle The angle (in degrees) from the center of the circle where the start of the circle begins. The
default of 0 degrees equates to the 3:00 position.
Default: 0 (degrees)
Range: 0 to 360
NOTES:
• You can enter a negative value. For example, if you enter -90, the circle start point will be
the 12:00 position.
• You can also enter a value greater than 360, but if you do so, the robot compensates for
the larger value. For example, if you enter 400, the circle start point will begin at the 40
degree mark.
Total Degree The angle (in degrees) after the Start Angle value at which dispensing stops.
Default: 0 (degrees)
To dispense in a counterclockwise direction, enter a negative value.
NOTE: You can enter a value greater than 360. For example, if you enter 720, the Z axis
head will loop twice.
Dispense Dot
Click Function
Registers the current XYZR location as a Dispense Dot point.
RV Series Automated Dispensing Systems
103www.nordsonefd.com info@nordsonefd.com +1-401-431-7000 Sales and service of Nordson EFD dispensing systems are available worldwide.
AppendixA, Command Function Reference
(continued)
Dispense Dot Setup
Click Function
Sets how the system dispenses a dot of fluid.
Parameter Description
Valve On Time How long the dispenser stays open (in seconds).
Dwell Time Delay time (in seconds) that occurs at the end of dispensing to allow the pressure to equalize
before the tip moves to the next point.
Head Time Delay time (in seconds) that occurs at the beginning of dispensing.
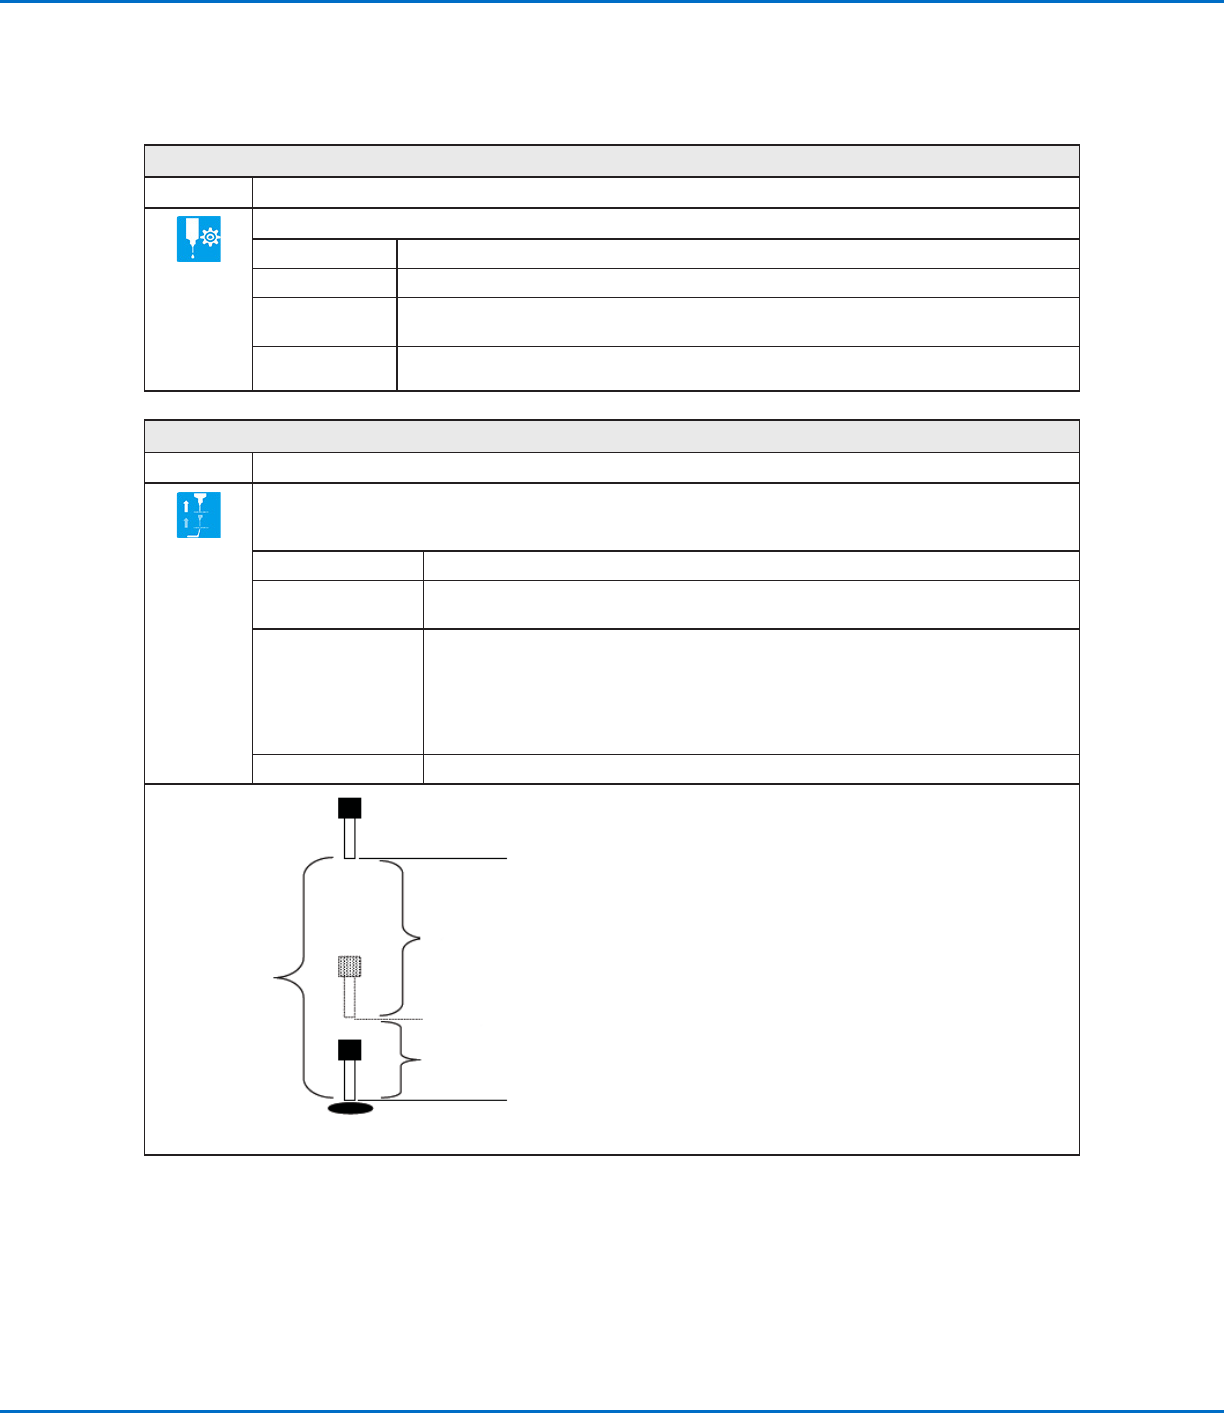
Dispense End Setup
Click Function
After dispensing a dot or line, it is often required to raise the tip a short distance at a slow speed. This allows the
fluid to cleanly break free from the tip to prevent it from being incorrectly applied. The parameters for Dispense
End Setup affect how far and how fast the tip raises after dispensing.
Parameter Description
Retract Low Speed The speed (inmm/s) at which the tip raises after dispensing.
Range: 0–150mm/s
Retract High Speed After the tip raises the amount specified by Retract Distance at the speed specified by
Retract Low Speed, the tip continues raising to the Z-clearance height at the speed
(inmm/s) specified by this setting. The purpose of specifying a Z-clearance height is to
allow the tip to raise high enough to clear any obstacles it encounters on the way to the
next point.
Range: 0–150mm/s
Retract Distance The distance (inmm) the tip raises after dispensing.
Z Clearance
Retract
High Speed to
Z Clearance
height
Retract
Distance at
Retract Low
Speed
Example illustration of Dispense End Setup