Nordson_EFD_RV_Series_Operating_Manual - 第83页
RV Series Automated Dispensing Systems 83 www.nordsonefd.com info@nordsonefd.com +1-401-431-7000 Sales and service of Nordson EFD dispensing systems are available worldwide. Example program using Find Mark, Mark Follow, …
RV Series Automated Dispensing Systems
82 www.nordsonefd.com info@nordsonefd.com +1-401-431-7000 Sales and service of Nordson EFD dispensing systems are available worldwide.
# Click Step Reference Image
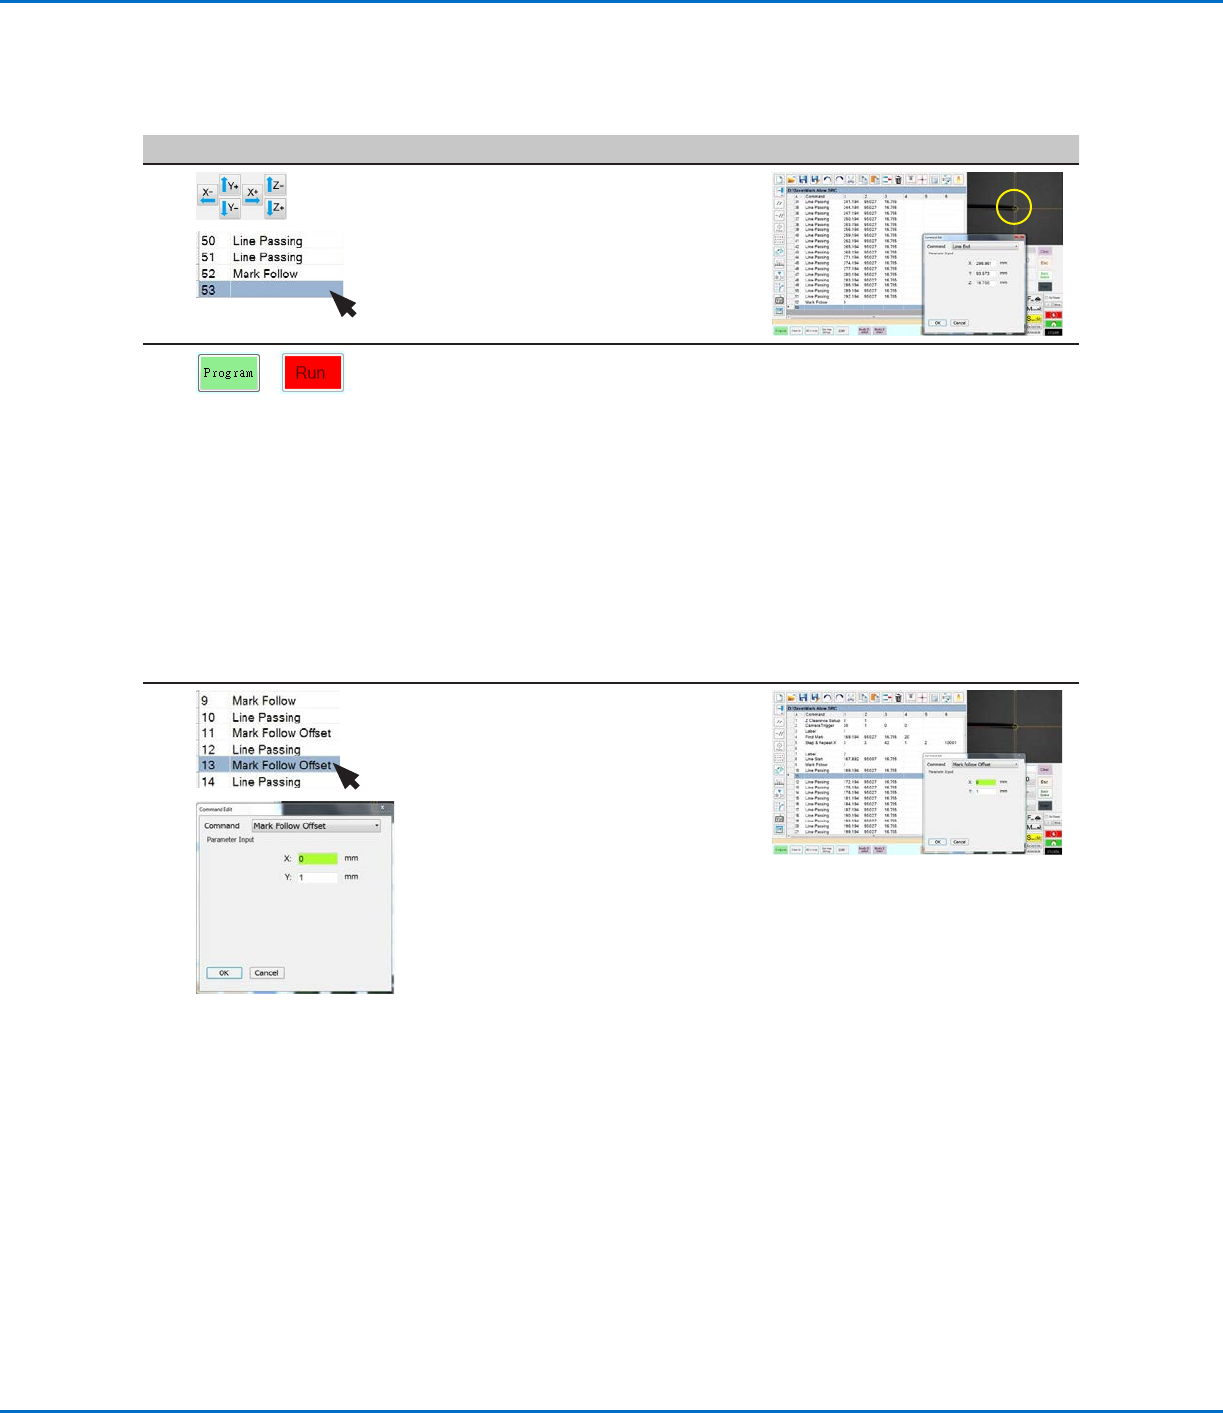
11
>
• Jog the camera to the right side of the
curved line and then insert a LINE END
command.
• Insert an END PROGRAM command.
12
>
• Return to PROGRAM screen and then click RUN to test the program.
The system should go to the Find Mark image created for this program,
then perform the Step & RepeatX command in the X direction 42 times, at
an interval of 3mm each time. Each Step & RepeatX command aligns itself
with the center of the line. Once done, the system dispenses along the line,
following the curve.
NOTES:
- Click VIEW if you want to view the pattern before running it.
- Because the line for this example is fairly straight, this program works
at this point using only a Mark Follow command. For deeper curves, the
Mark Follow Offset command is needed. Continue to the next step for an
explanation of how to use the Mark Follow Offset command for deeper
curves.
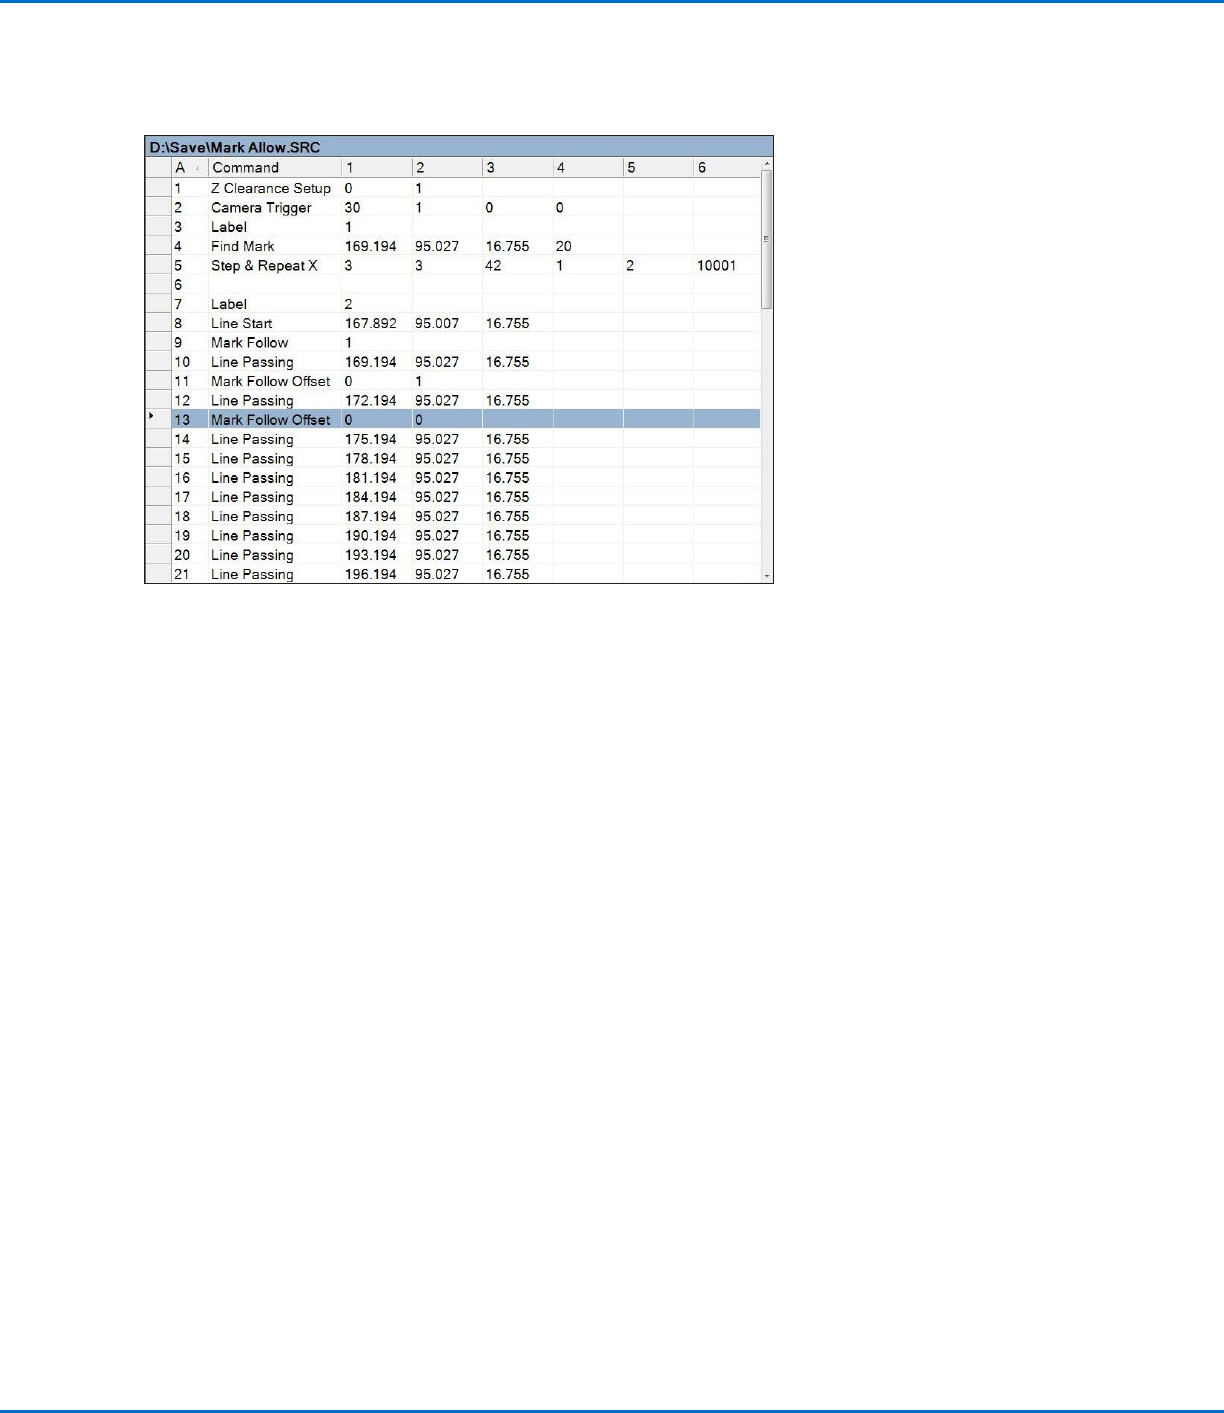
13
>
If needed for a line with a deeper curve:
• Insert a MARK FOLLOW OFFSET
command and enter X or Y offset values
to be applied to all commands below it.
• Insert additional MARK FOLLOW
OFFSET commands as needed to
obtain the desired dispense result.
NOTES:
- To remove the effect of a Mark Follow
Offset command, enter another Mark
Follow Offset command with the X
and Y values set to 0.
- If you are testing this example using
a slight curve, you might need to
recreate it using a deeper curve.
How to Use Mark Follow to Dispense Along a Curved Line (continued)
To Use Mark Follow and / or Mark Follow Adjust in a Program (continued)
RV Series Automated Dispensing Systems
83www.nordsonefd.com info@nordsonefd.com +1-401-431-7000 Sales and service of Nordson EFD dispensing systems are available worldwide.
Example program using Find Mark, Mark Follow, and Mark Follow Adjust commands
How to Use Mark Follow to Dispense Along a Curved Line (continued)
To Use Mark Follow and / or Mark Follow Adjust in a Program (continued)
RV Series Automated Dispensing Systems
84 www.nordsonefd.com info@nordsonefd.com +1-401-431-7000 Sales and service of Nordson EFD dispensing systems are available worldwide.
How to Set Up Auto Purge, Program Cycle Limits, or Fluid Working
Life Limits
The System Setup screen includes the following automatic functions that can be applied to any program. These
functions operate correctly only when the following conditions are met:
• The Enable checkbox for the function is checked.
• The program is locked (refer to “How to Lock or Unlock a Program” on page67).
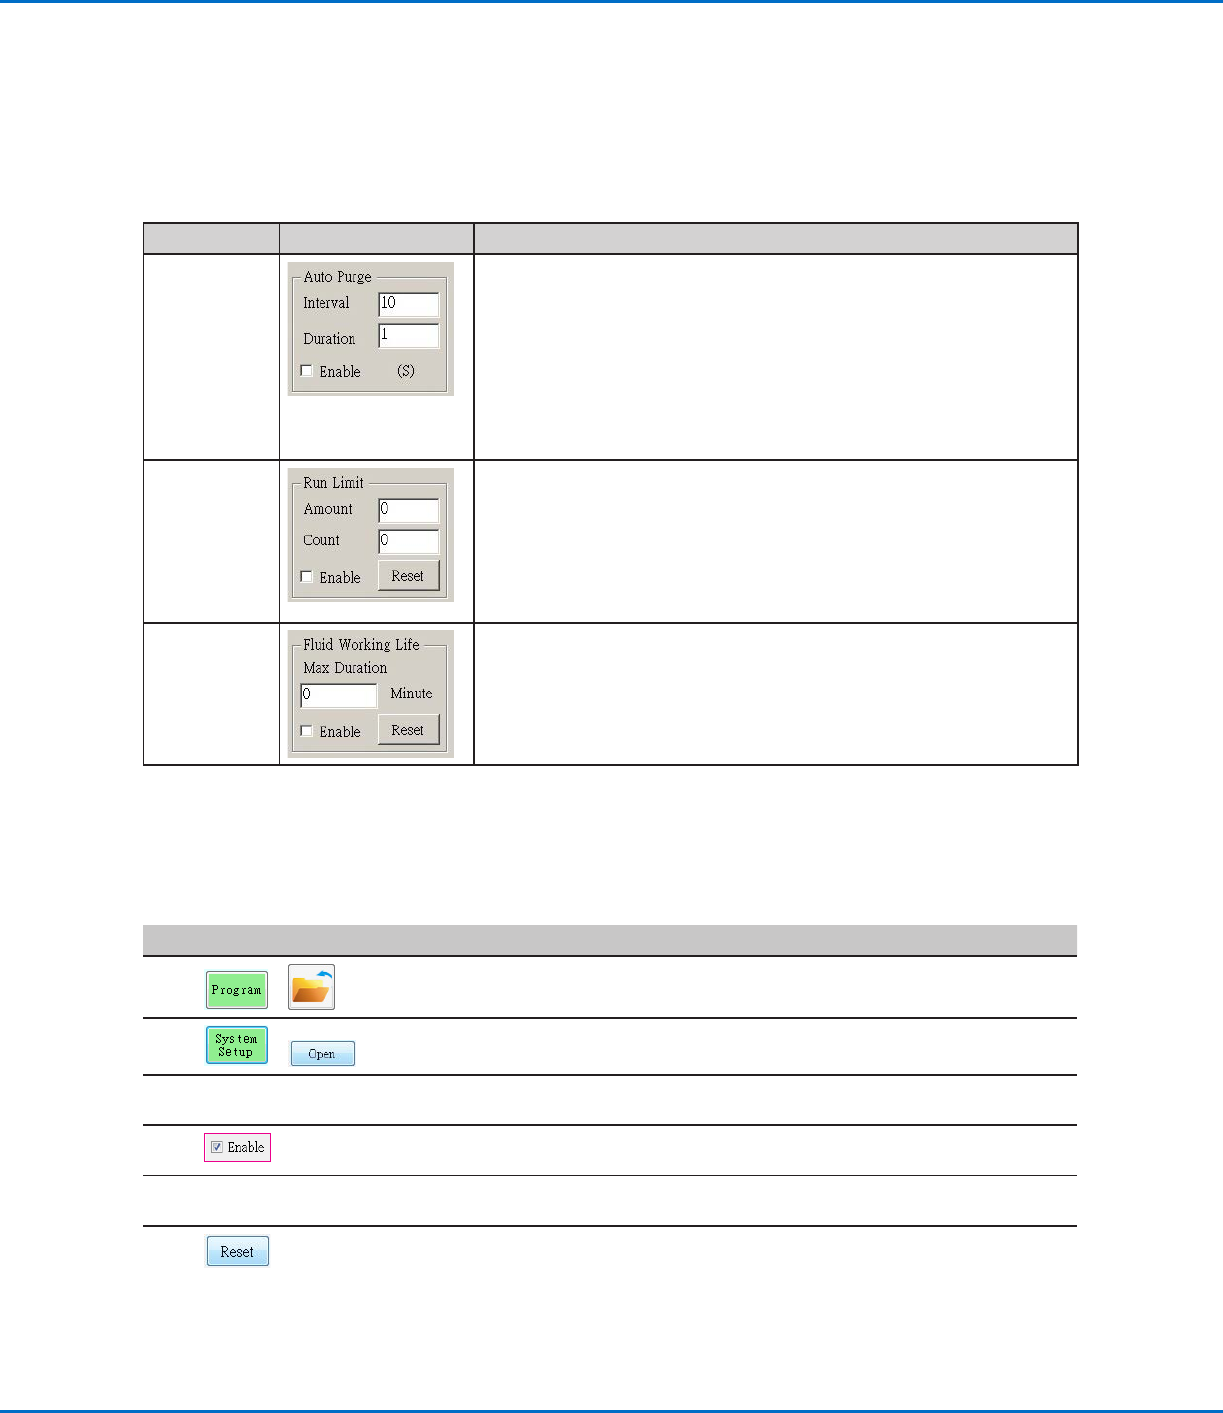
Function Screen Capture Description
Auto Purge
If Auto Purge is enabled, the system performs an automatic purge at the
Park Position using the values entered for Interval and Duration:
• Interval: How long the system must be idle (robot START button not
pressed) before Auto Purge begins.
• Duration: How long the system purges in intervals of 1 second.
EXAMPLE: If Auto Purge is enabled with the values shown at left, the
system automatically dispenses fluid for 1 second every 10 seconds at
the specified Park Position.
Run Limit
If Run Limit is enabled for a program, the number of times the system
runs a program (called a program cycle) is limited according to the
values entered for Amount and Count:
• Amount: Sets the number of times a program can run.
• Count: Shows how many times a program has run.
To reset Count to 0, click RESET.
Fluid Working
Life
If Fluid Working Life is enabled, sets the maximum number of minutes
that a fluid should be in the system (also known as pot life). When the
value entered for Max Duration is reached, the system provides an
indication but does not disable operation.
To reset Max Duration to 0, click RESET.
PREREQUISITES
The system is properly set up. Refer to “Setting Up and Calibrating the System (Required)” on page45.
The program to which you want to apply Auto Purge, Run Limit, or Fluid Working Life settings is complete and
operating properly.
#
Click Step
1
>
• Click PROGRAM > OPEN to open the program to be updated.
2
>
• Click SYSTEM SETUP, then click OPEN.
3
• Refer to the table above to enter settings for Auto Purge, Run Limit, or Fluid
Working Life.
4
• Click the ENABLE checkbox for the function you want to enable for the open
program.
5
• Lock the program (refer to “How to Lock or Unlock a Program” on
page67).
6
• To restart a program cycle after Run Limit or Fluid Working Life values are
exceeded, repeat steps1–2, enter the password, and click RESET.