51074冲击扳手说明书.pdf - 第18页
中文 EN DE RU KO PT JA ES 51074 18 Operation guideline: Caution: Please read the instruction carefully before oper ating the machine. Before the use: 1.Charging: T his charger and machine shall be used together. Do not use…

中文
EN DE RU KO PT JA ES
51074
17
Charging duration of 4.0A battery pack: about 60min
Charging duration of 2.0A battery pack: about 30min
We recommend that you choose the accessories from the store where you purchased the electric tool. 7 Please use the high-quality
accessories from the well-known brands. Please choose the right accessory for your job. Please refer to the accessory package and you
will get more methods and help for using the accessory.
Specification:
Model 51074
Chuck type 1/2" square head
Voltage 18V
No-loading speed 0-900/0-1400/0-2000 rev/min
Frequency 0-1700/0-2500/0-3400 impacts/min
Max. torque 580 N·m
Standard bolt M12-M22
High-strength bolt M10-M20
Machine weight 2.5kg
Battery capacity 4000mA
Recharge time 60min
中文
EN DE RU KO PT JA ES
51074
18
Operation guideline:
Caution:
Please read the instruction carefully before operating the machine.
Before the use:
1.Charging:
This charger and machine shall be used together. Do not use other chargers. The machine has a protection circuit. When the battery is
low, the protection circuit is turned on and the machine stops rotating.
The machine may become hot under the high temperatures or after a long period of operation. At this time, do not charge immediately
but wait until the battery is cooled. Otherwise, the service life of battery will be shortened or the charging failure may be caused due to
overheating.
For the first charging or after a long period of storage, the efficiency of first charging may only reach about 60%. After 2-3 charging and
discharging cycles, the battery efficiency may reach 100%.
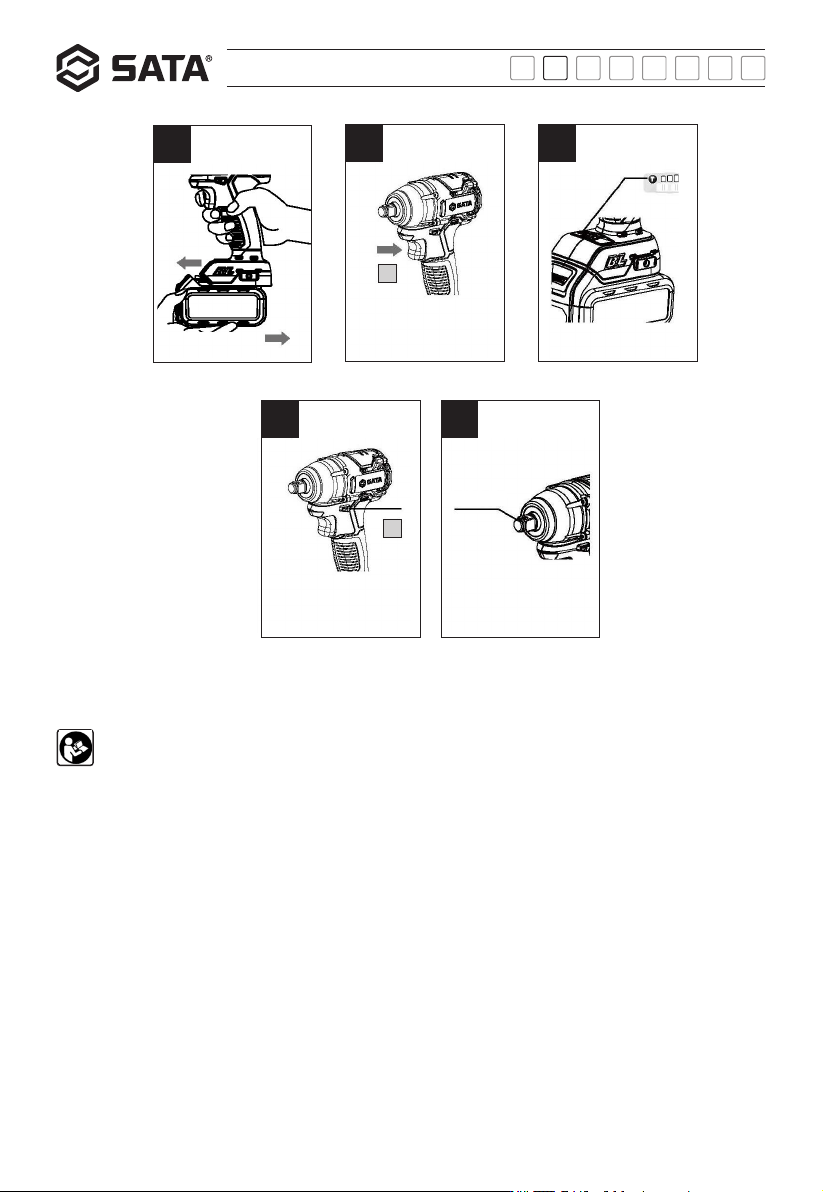
2.Installation and removal of battery pack (see Figure A):
Press the lock button on the front of battery pack and pull it out. To insert the battery pack, simply push it into the machine while
avoiding the excessive force.
A
B
C
D
E
1/2" square head
1
2
中文
EN DE RU KO PT JA ES
51074
19
Operation:
1. Start/stop (see Figure B):
Press and hold the switch (1) to start the machine, and release it to stop the machine.
2.Speed regulation:
Change the force applied to the switch to regulate the rotating speed. The range of adjustment is between 0 and the maximum rotating
speed. The smaller the force is, the lower the rotating speed is. The drilling starts slowly and stably After the stable and reliable start,
press the switch fully for higher speed.
3.Speed position selection (see Figure C):
First select the position, and then regulate the rotating speed with switch; the highest position is selected at delivery and there are three
position indicators (6) where three ones going on means the high position, two ones going on means the mid position and one going on
means the low position: Change the position once each time you press the mark.
4.Switch lock (see Figure D):
The switch has the lock protection function which helps to avoid the accidental activation of the hand drill. Lock the machine by adjusting
the reversing yoke (2) to the center position.
5.Rotation reversing (see Figure D):
Forward: Push the side of reversing yoke (2) marked with " " to the end (left side) for drilling and driving the screw. Reverse: Push
the side of reversing yoke marked with " " to the end (right side) for releasing or unscrewing the screw the screw.
Warning:
The rotating speed can only be changed after the machine is completely still.
6.Installation or removal of sleeve (see Figure E):
Caution:
When installing or removing the sleeve, be sure to confirm that the drill has been turned off and that the battery pack has
been removed.
1 )Sleeve without O-ring and pin:
a) Install the sleeve: press it on the square driving head (1) of tool until it is fully seated.
b) Remove the sleeve: just unplug it.Gently tap it if necessary.
2 )Sleeve with O-ring and pin:
a)Install the sleeve: Move the O-ring out of the sleeve groove, remove the pin on the sleeve, place the sleeve on the square driving
head (1), align the hole in the sleeve with that on the square driving head, and fit the pin through the holes in the sleeve and
square driving head (1), and then return the O-ring to the original position in the sleeve to fix the pin.
b) Remove the sleeve: please follow the reverse steps of installation.
Warning:
Do not operate at low speed for a long time by pressing the switch. Otherwise the machine will be overheating inside. Change
the rotating speed after stop.