00196614-03_AI_Vakuumpumpe_SXDX12_de_en.pdf - 第97页
Fitting the Vacuum Pump 3.3.2 Prefitting the Vacuum Pump Preparatory Steps Vacuum Pump Vakuumpumpe 97 3.3.2.5 3 . 3 . 2 . 5 P r e p a r in g a n d C o n n e c t in g t h e D is t r ib u t o r B lo c k Preparing and Conne…
Fitting the Vacuum Pump
Preparatory Steps 3.3.2 Prefitting the Vacuum Pump
96 Vacuum Pump Vakuumpumpe
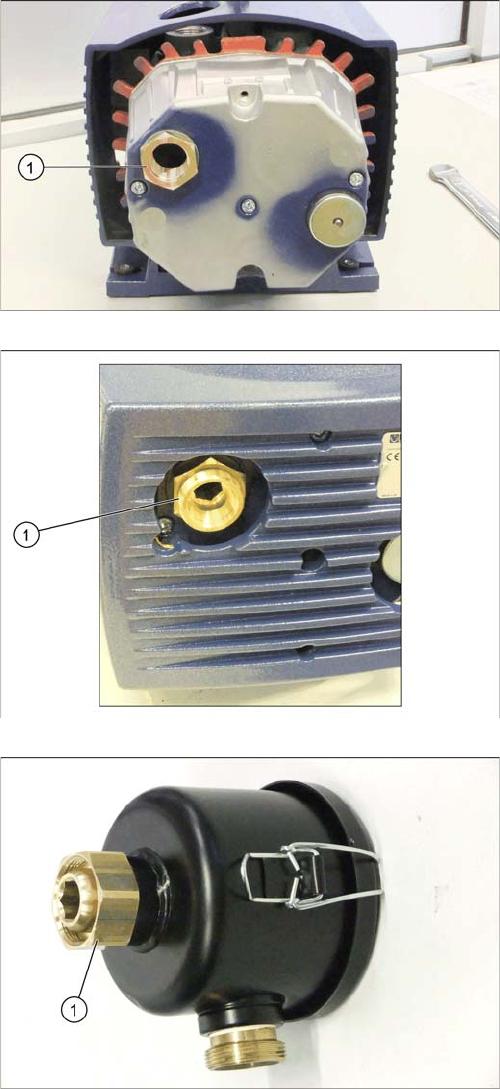
1. Fitting G1 - G3/4 [03088251-xx]
► Apply Loctite 55 to the threaded connection and
screw in the fitting instead of the leakage valve (1).
Observe the installation instructions from the pump
manufacturer. The thread sealing cord must be
wound on in the direction of the thread.
► Replace the cover and fix it with the two screws which
you removed.
► Screw the "double nipple, detachable G3/4 Ms"
[03038435-xx] apart and screw one half into the
fitting (1). Apply Loctite 55 to the threaded connec-
tion.
Observe the installation instructions from the pump
manufacturer. The thread sealing cord must be
wound on in the direction of the thread.
► Screw the second half of the "double nipple, detach-
able" [03038435-xx] into the filter (1). Apply Loctite
55 to the threaded connection.
Observe the installation instructions from the pump
manufacturer. The thread sealing cord must be
wound on in the direction of the thread.

Fitting the Vacuum Pump
3.3.2 Prefitting the Vacuum Pump Preparatory Steps
Vacuum Pump Vakuumpumpe 97
3.3.2.5
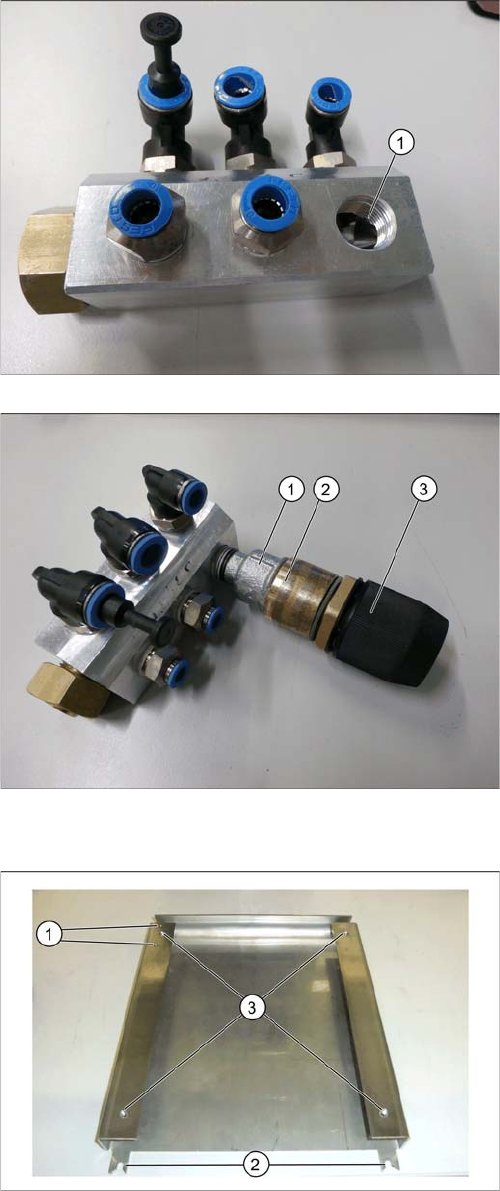
3.3.2.5 Preparing and Connecting the Distributor Block
Preparing and Connecting the Distributor Block
1. Four o'clock position
► Screw the filter insert [03077677-xx] onto the first half
of the double nipple and into the pump. First apply
Loctite 55 to the threaded connection.
► Correctly position the filter. The connecting piece
must point to 4 o'clock (1).
► Tighten the nuts with the "spanner wrench SW36"
[03090043-xx].
► (1) Screw a double nipple G3/4 brass [03093668-xx]
into the filter. First apply Loctite 55 to the threaded
seal.
1. 3x push-in L-fitting QS-1/2-10 [03038816-xx]
2. 3x push-in L-fitting QSL-1/2-10 [03081051-xx]
► Screw the three 10er angle connections to the distrib-
utor block [03086336-xx].
► Use the M36 open-jawed spanner [03090043-xx]
provided to fix the distributor block in the position
shown (1).
Fitting the Vacuum Pump
Preparatory Steps 3.3.2 Prefitting the Vacuum Pump
98 Vacuum Pump Vakuumpumpe
3.3.2.6
3.3.2.6 Installing and Adjusting the Leakage Valve
Installing and Adjusting the Leakage Valve
The leakage valve is closed completely with two placement heads in vacuum mode.
If only one placement head is to be operated with the vacuum pump, the valve must be opened by a ½
rotation.
3.3.2.7
3.3.2.7 Placing the Vacuum Pump onto the Slide
Placing the Vacuum Pump onto the Slide
► Dismantle the distribution block from the vacuum
pump.
► Unscrew a Festo screw joint (1).
► Mount the ½ inch (1) to 1 inch (2) adapter and the
Becker vacuum valve (3).
Vacuum pump slide
1. Fixture points for cable clamps
2. Nibs for subsequent fixture of slide to exhaust air duct
3. 4 fixture points for vacuum pump