PS288_PS388_PS588_981-0424-002D - 第110页
Operation ■ Administrator Functions 3—40 Data I/O • 981-0424-002 back This completes the process of teaching the Refere nce V ision File. T eaching the P ackage File The P ackage File is a text file cont aining calibrati…
■ Administrator Functions ◘ Teaching the Reference Vision File
PS Series Owner’s Manual 3—39
back
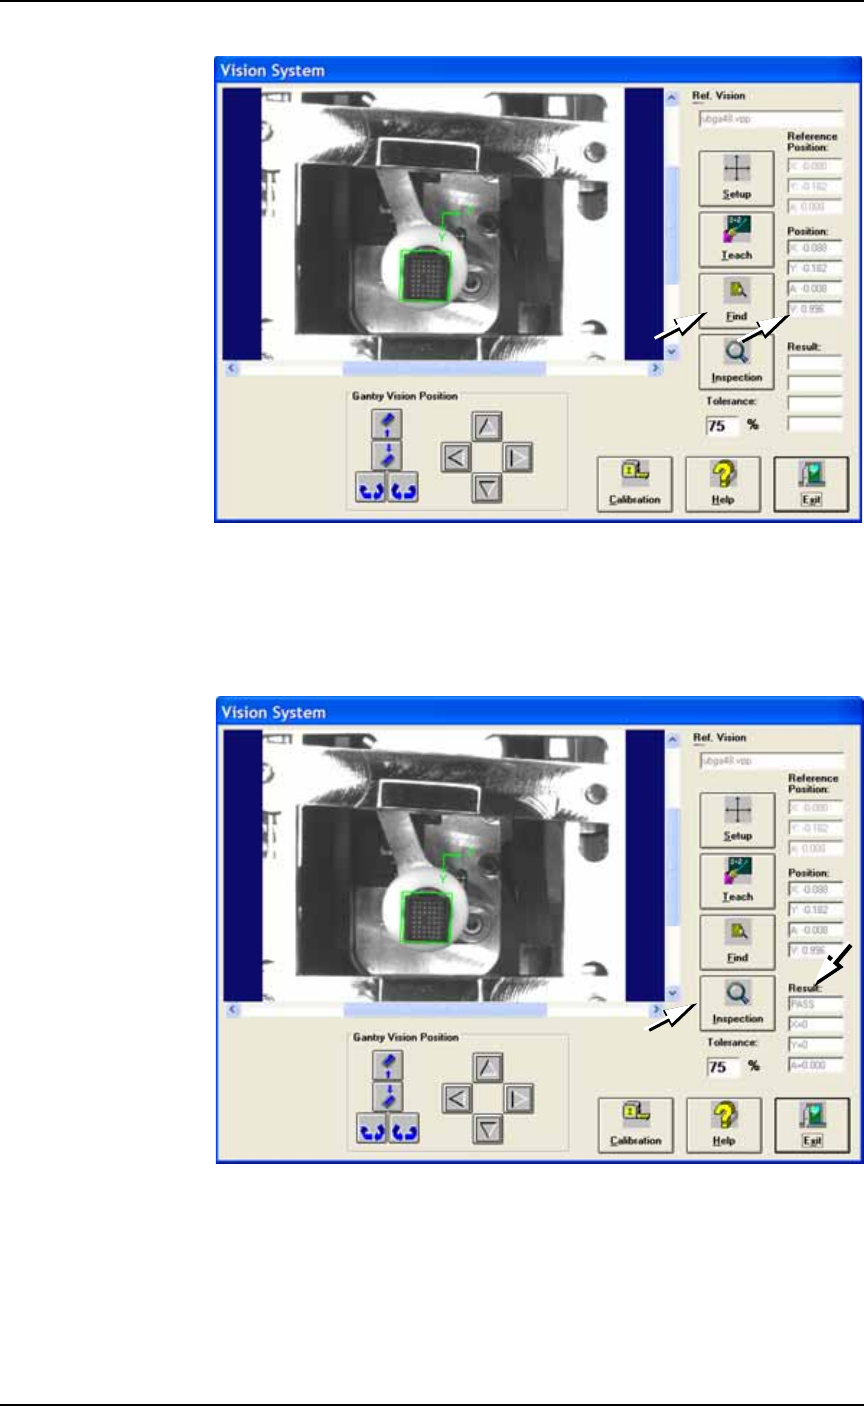
Figure 3-33: The Vision System dialog. Verifying the Position V value
after having clicked Find. In this sample, the V value is 99.6%.
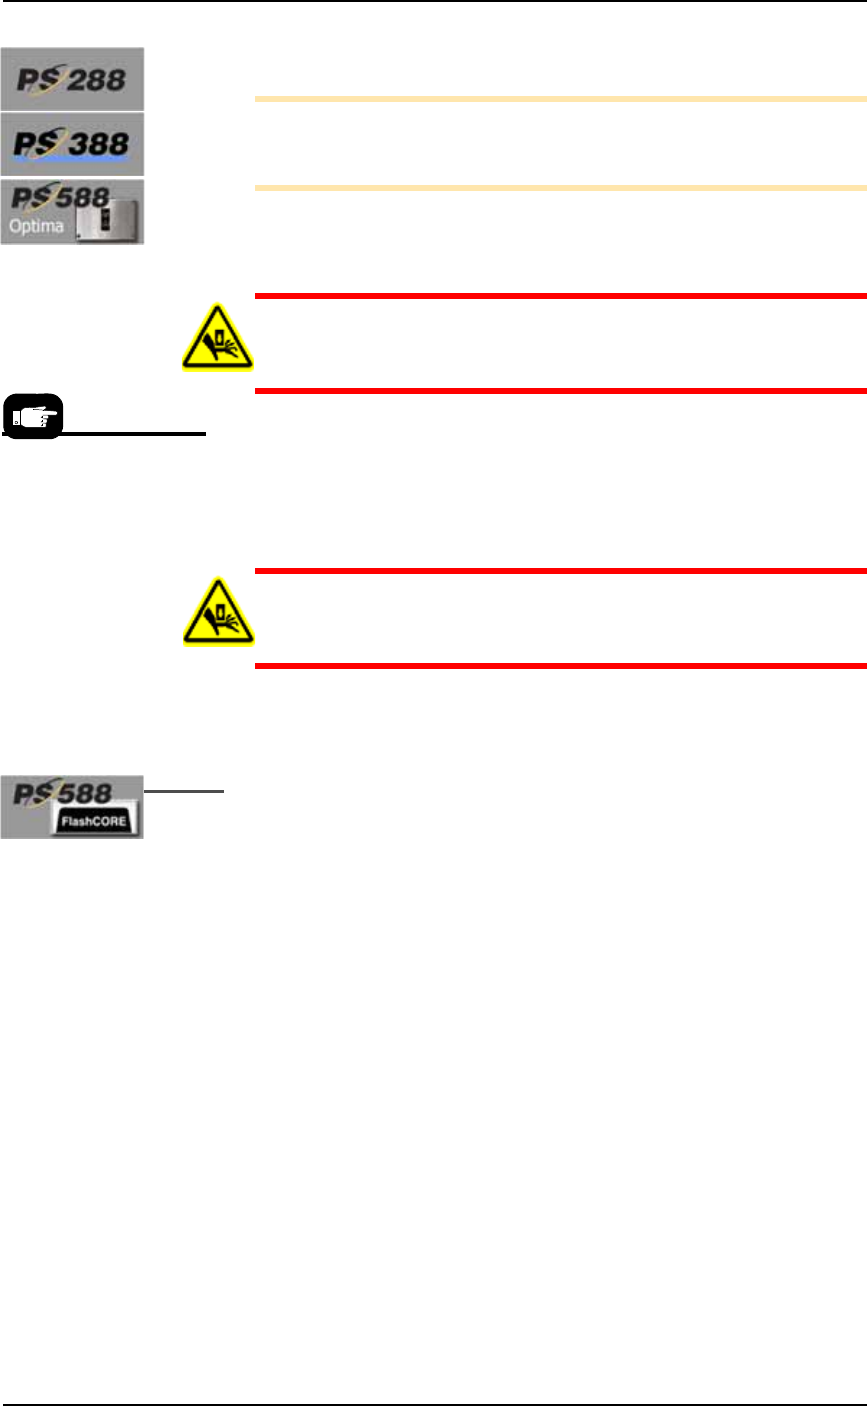
5i. Click Inspection.
5j. In the Results field, verify that it reads PASS, and that X, Y and A
are all 0 (zero).
Figure 3-34: The Vision System dialog. Click Inspection and check
Results
5k. Click Exit.
5l. Click Park and remove the device from the programmer.

Operation ■ Administrator Functions
3—40 Data I/O • 981-0424-002
back
This completes the process of teaching the Reference Vision File.
Teaching the Package File
The Package File is a text file containing calibration information that
the PNP head uses to properly pick, rotate and place devices.
After your new Package File is taught, it will contain information
about the physical dimension of a specific device package and Socket
Adapter as well as the location of all programmers, input and output
media, and the shuttle transfer (if marking or labeling is done).
A Package File must be created for each device that uses a different
Socket Adapter.
Note: The Vision File must be taught first. See Teaching the Refer-
ence Vision File on page 3-34.
A new Package File was created (but not taught) in the previous
topic, Teaching the Vision File, to be used for this procedure. Refer to
Step 1 on page 3-34.
To review:
• You created a Package File from the Package Template
• Used the Socket Adapter number for the name
• Selected the job in TaskLink that uses this new Package File
•Clicked Run
• In the AH500 Application, clicked Start.
•At the Setup Window, you made setup selections
• and clicked System > Gantry)
(Optional) Quick Vision File Test
1. At the Gantry Window, pick a device: right-click a programmer
label.
2. Send it to the Vision Camera: click Vis.
3. Navigate to the Vision System Window: from the Gantry Window
click Go To tab > Go To Vision.
4. At the Vision System Window, when you see your device in the
on-screen image, click one of the rotate buttons and verify that
the device rotates the correct direction. If not, there is a problem
with the Vision file.
Package Files reside in
the Handler Computer in
folder
C:\AH500\Package.
■ Administrator Functions ◘ Teaching the Package File
PS Series Owner’s Manual 3—41
back
Adjust Socket Opener Ribs
Note: Adjust the Socket Opener only if the socket fails to open or
if devices are dropped. It is necessary to adjust the Socket Opener
only once while teaching a package file.
Adjust the Socket Opener Ribs as described at Adjust Socket Opener
Ribs on page 3-14.
WARNING: Possible collision hazard. Stay clear of the operating
envelope while teaching PNP head locations except as directed.
The PNP head can move without notice.
Setting Programmer Rotation
1. Setting Programmer Rotation to Zero
1a. At the Gantry Window click Park.
CAUTION: Pinch Hazard. Sockets can actuate even with an
Access Door open. Push the E-Stop prior to working near the
actuators.
1b. Manually insert a device into the first and last sockets of all pro-
grammers intended for use with this job.
To open the sockets on PS588 FlashCORE programmers:
1) Click the label for the programmer, 2) Click the Actuate Socket
toggle to ON (on the Actuate tab), 3) Click the next programmer
label, and repeat.
1c. Click P1.
1d. Click the Rotation button, enter 0.0, press Enter on the keyboard.
1e. Click Save and Yes.
1f. Click Z-AutoFind, then Yes.
1g. Click P1 and then click X,Y AutoFind.
If the resultant values are less than the absolute value of 5, then
click NO. Otherwise click Yes and repeat from Step 1d.
1h. Click the Go To tab.
1i. Click [Go] Last Socket, then the X,Y AutoFind button next to it.
If the resultant values are less than the absolute value of 5 click
NO. Otherwise Yes and repeat.
1j. Repeat step 1a–1i for all programmers.
If an error button appears
on the Gantry window
while teaching the pack-
age file, see Errors on
page 3-50