PS288_PS388_PS588_981-0424-002D - 第192页
Maintenance ■ T he Vision System 4—52 Data I/O • 981-0424 -002 back you to do so. Use extreme caution an d do not touch any electronic equipment except as directed. 5c. Open the right access door . 5d. Without touching a…

■ The Vision System ◘ Calibrating The Vision System
PS Series Owner’s Manual 4—51
back
• The probe is in the center of the taught Vision location.
• The plastic lens cover is in place.
• The camera picture is well-focused with adequate light.
• The Glass Checkerboard Calibration Target is available. (Each
square is 1.1 mm x 1.1 mm.)
• Vision station height and travel height are the same.
• Vision drop/pick height setting allows for the calibration target
to clear the socket opener ribs (if present).
•Ensure that msec, delay before Vision Inspection equals 100 in
the Parameters Tab.
Getting a Good Picture: Vision System
To get a good, clear picture with the Vision System (Cognex camera):
1. Navigate to the System > Gantry Window.
2. Go to socket 1 of any programmer or tray and pick a device.
2a. To pick up a device: Click Tray 1 or Socket [X] in the Gantry Win-
dow to send the head to that component.
2b. Right-click to pick up the device. Click the Go To tab.
3. Click the Go To Vision button.
Figure 4-48: The Vision System Dialog with a good quality picture.
4. At the Vision System dialog, visually check that the picture is
good quality similar to the figure above.
5. If the image is not good (blurry, too dark, etc):
5a. Click the Calibration button.
5b. Click the Display Live Video button.
WARNING: Electric shock hazard. Opening any access doors
while the power is ON can be dangerous even when steps instruct
If the glass target is
unavailable, print a checker-
board target from the PDF
file on the installation CD:
Use card stock.
In the Adobe Reader Print
dialog, select NONE for the
PAGE SCALING field.
Maintenance ■ The Vision System
4—52 Data I/O • 981-0424-002
back
you to do so. Use extreme caution and do not touch any electronic
equipment except as directed.
5c. Open the right access door.
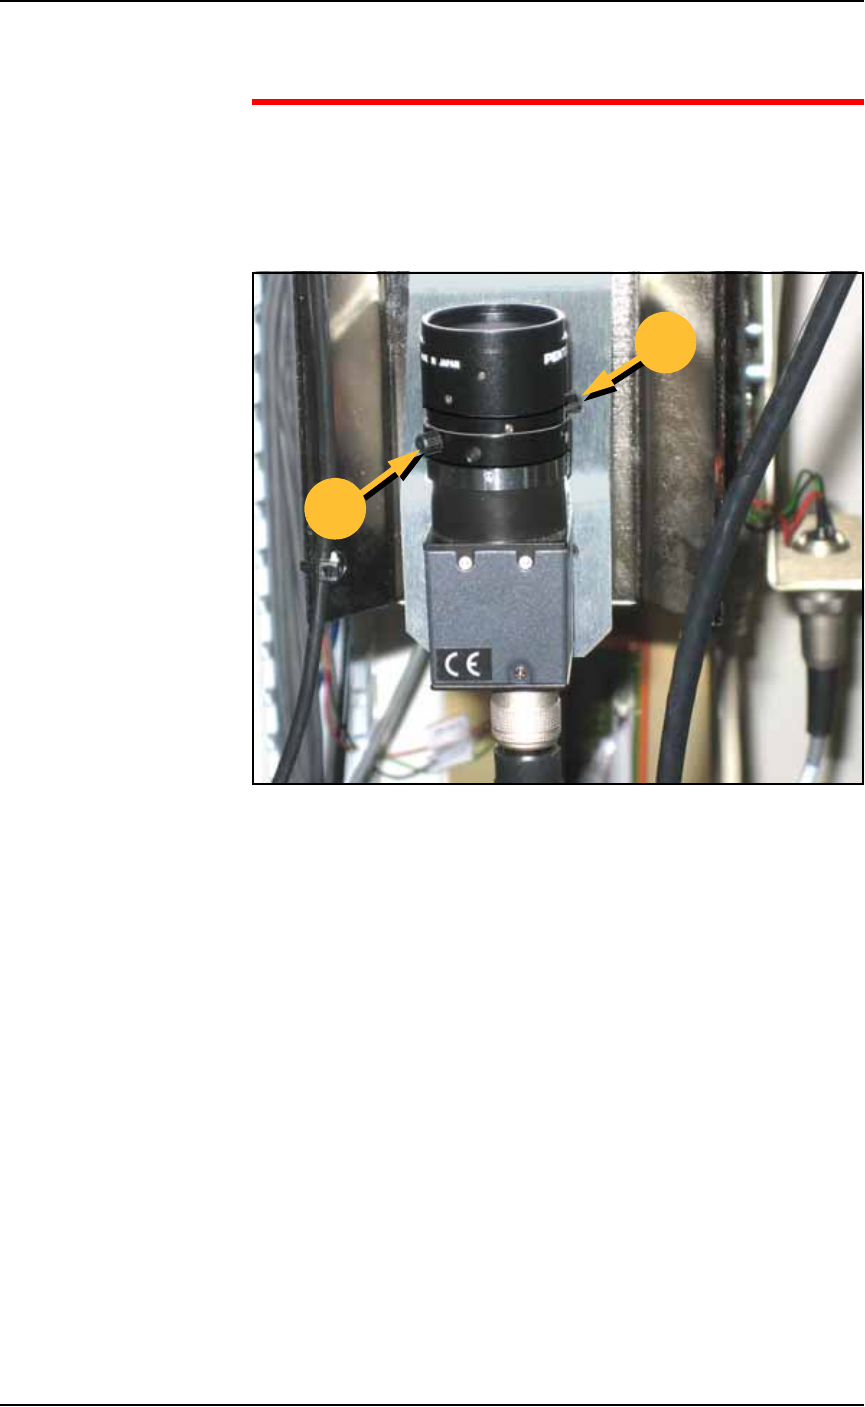
5d. Without touching any live electronics, adjust the camera lens as
follows:
5d.1) Loosen the lower of the two ring locking screws (by
hand). See figure.
Figure 4-49: Roughing-in camera lens adjustment by hand. 'B' is the
locking screw and adjustment ring for the Brightness. 'F' is the locking
screw and adjustment ring for the Focus.
5d.2) Turn the ring to lighten or darken the image.
5d.3) Tighten the ring (by hand).
5d.4) Loosen the upper ring locking screw.
5d.5) Turn the ring to adjust focus.
5d.6) Tighten the ring.
5e. Close the Live Video window.
5f. Click Exit.
6. Finish getting a good picture—
6a. Click Exit again to get back to the Gantry Window.
6b. Replace the device into its original location.
6c. Click the Vision button and visually check that the picture is
good quality again.
B
F
■ The Vision System ◘ Calibrating The Vision System
PS Series Owner’s Manual 4—53
back
Part 1–Calibrating Cognex Vision with Checkerboard
Target
CAUTION: After recalibrating your vision system, all existing .vpp
files (Vision and Package files) will need to be retaught.
To calibrate the Vision System:
1. Preparation—
1a. Create a good Vision System picture. See the previous heading
on page 4-51.
1b. Click the Vacuum on button.
1c. Place the calibration target by hand so that the checkerboard
pattern is facing downward, towards the camera.
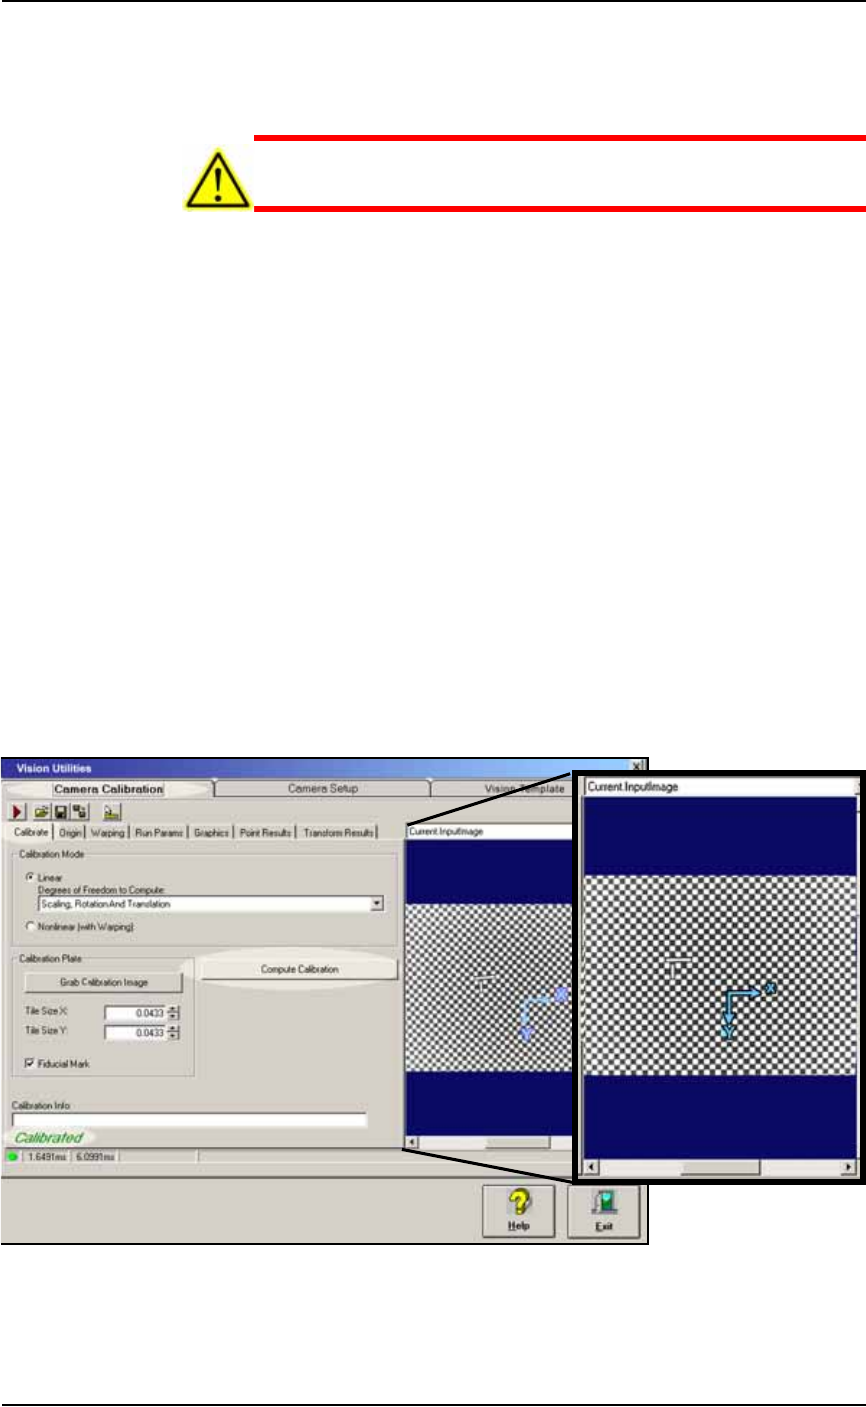
2. Verify settings—
2a. Navigate to the Camera Calibration Tab (System > Gantry > Go-to
tab > Go-To-Vision button > Calibration tab) and then click the Cal-
ibrate tab.
2b. Verify that:
• the Calibration Mode is set to Scaling, Rotation and Translation,
and
• Tile Size X & Y are 0.0433, and
• Fiducial Mark is checked. See the figure below.
You can position the blue axis by selecting Current.CalibrationIm-
age from the drop-down list above the image window, and drag-
ging the axis to the new location.
Figure 4-50: The Vision Utilities Dialog with Camera Calibration Tab
selected, and then Calibrate tab selected. In this image, the Compute
Calibration function has finished successfully.