PS288_PS388_PS588_981-0424-002D - 第209页
■ Trouble shooting ◘ PS Computer Failure PS Series Owner’s Manual 4—69 back 9. T urn the PS System on. 10. After it starts up press Control + f to view the FastBuild Utility . 11. Assign RAID 0 (the new drive) to RAID 1.…
Maintenance ■ Troubleshooting
4—68 Data I/O • 981-0424-002
back
PS Computer Failure
A PS computer drive fails. A message indicates that a computer
has crashed.
[Models built after 2010] Your PS System is equipped with a
mirror-backup system called RAID that creates a real-time ghost
image. You may see an error message, or see a very quick mes-
sage at system start-up that reads CRITICAL STATUS. Your
PS System will continue to operate as normal on the backup
drive. However, you must replace the failed drive for continued
safety. Follow these steps for replacement.
1. Shut down the PS System. See Turning Off System Power on page
3-27.
2. Unscrew four 3/8 inch SHCS from the front of the Handler com-
puter and pull open the computer drawer from the PS frame.
3. Remove the top panel from the computer. Some models have
two screws on the back while others have thumb screws. With
screws removed, the top cover should slide back about.5 inch.
4. Locate the computer drive that has failed.
5. Remove wires from the back of the drives.
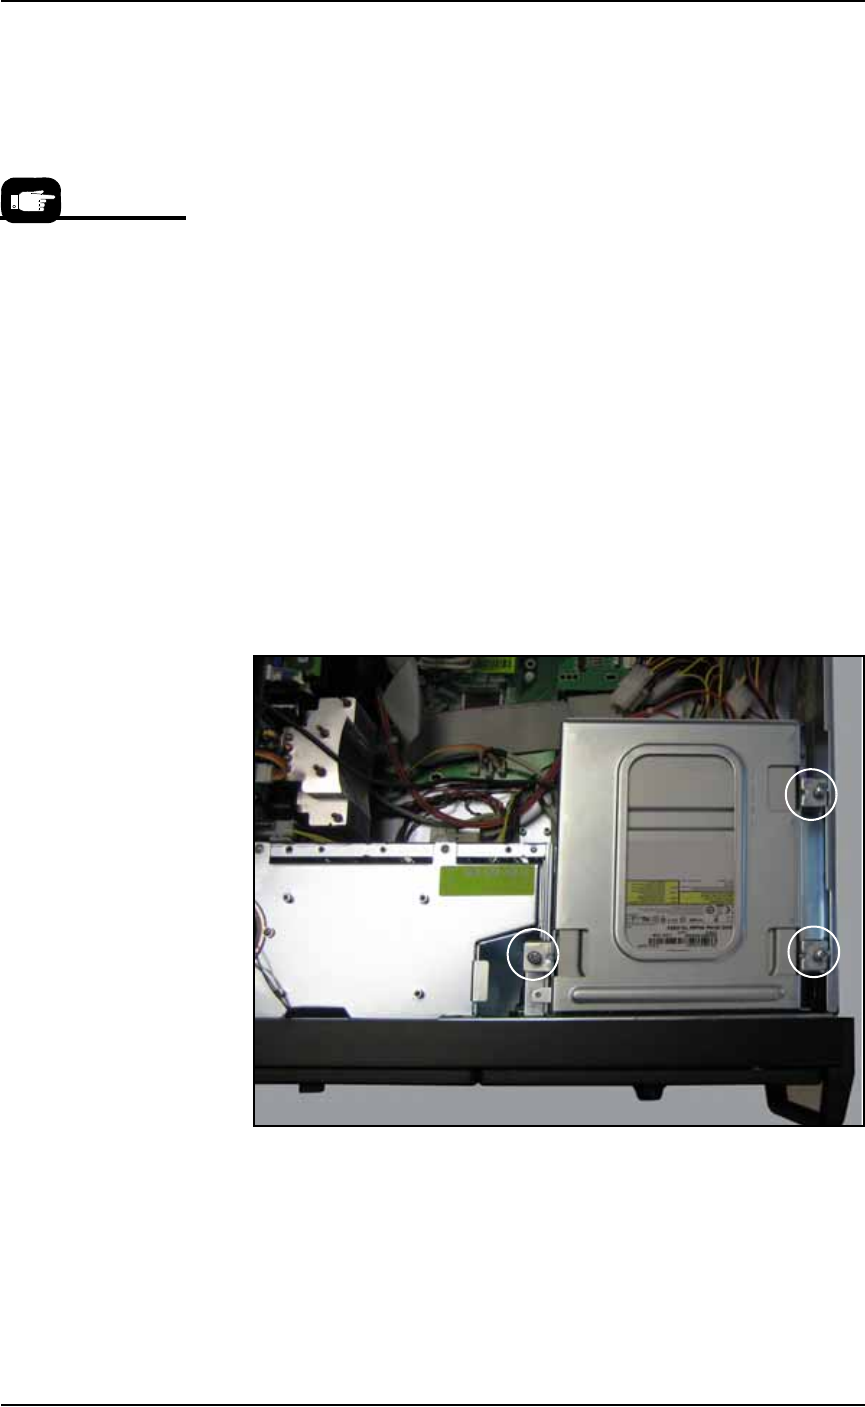
6. Remove the failed drive removal by unscrewing the three Phil-
lips screws holding bracket that supports all the drives.
Note that these have lock washers and at least one has a plastic
standoff.
Figure 4-60: Three Phillips screws (circled) secure the bracket holding
all the hard drives that are accessible from the from of the PS Machine.
Your PC Box and bracket may be different depending on manufacture
date.
7. Replace the failed drive with a similar model with 250 GB (not
more, not less), and install it.
8. Re-install in the reverse order.
For more information,
see the Promise Tech-
nologies, Inc. Fast Track
Manual that came with
your 2011-or-later
PS System.

■ Troubleshooting ◘ PS Computer Failure
PS Series Owner’s Manual 4—69
back
9. Turn the PS System on.
10. After it starts up press Control + f to view the FastBuild Utility.
11. Assign RAID 0 (the new drive) to RAID 1. (It should display (2)
RAID 1 drives.)
12. For the fastest rebuild, leave the PS System power on for about
seven hours for the RAID mirror backup system to rebuild the
file system on the new drive. (If it gets turned off, the backup
drive continues to get rebuilt the next time the power is turned
on.)
Note: There will be no obvious on-screen indication that the new
drive is running or being rebuilt.
[Model built prior to 2011] If you have a ghost backup of your
hard drive, follow the instructions of the ghost software to install the
backup. If you have any questions, contact Data I/O Service.
Maintenance ■ Troubleshooting
4—70 Data I/O • 981-0424-002
back
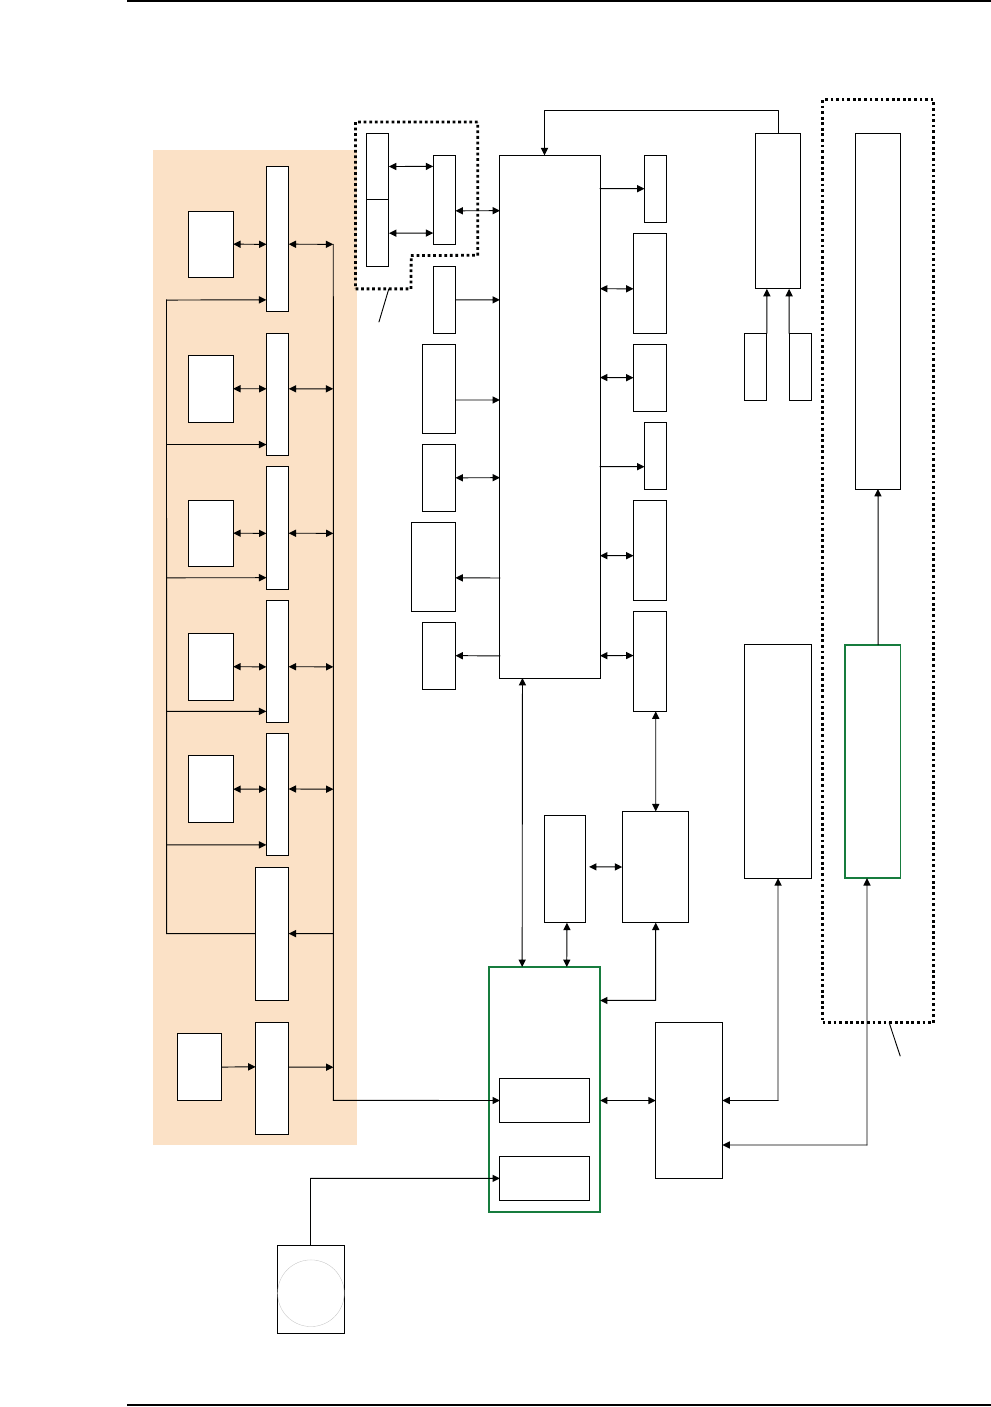
Functional Block Diagram
PS SYSTEM FUNCTIONAL BLOCK DIAGRAM
HANDLER PC
CAMERA
DIGITAL IO
SOCKET
OPENER
LIGHT
TOWER
TRAY
FEEDERS
TAPE OUT PLC
TUBE IO TAPE IN
PNP
VAC/BLOWOFF
TRAY
PRESENT
LASER
MARKING HEAD
SHUTTLE
VAC/BLOWOFF
MAIN AIR
SERVO
CONTACTOR
ETHERNET (MODBUS PROTOCOL)
Z AXIS CONTROLLER AXIS CONTROLLER X AXIS CONTROLLER Y AXIS CONTROLLER
MOTION CONTROL
AMP ENABLE RELAYS
(OPTO 22)
Motor Motor Motor Motor
HOMING RELAYS
(OPTO 22)
SENSORS
USER
INTERFACEE
VISION CARD
MOTION CARD
E-STOP CONTROLLER
DOORS
E-STOP
16 PORT SWITCH
Up to 12 FC Programmers PS588
Up to 4 Programmers PS288, PS388
Up to 12 PCs 104
Up to 12 OPTIMA Programmers
10BaseT
10Base2
PARALLEL
PORT
PS588 ONLY
LASER
COMPUTER
RS232
USB
10BaseT
USB
USB
SHUTTLE CONTROLLER
Motor
V-TEK PNP HEAD
TAPE OUT