PS288_PS388_PS588_981-0424-002D - 第69页
■ Setting Up the Laser Marking System ◘ Set Up for Camera Contrast PS Series Owner’s Manual 2—27 back Setting Up the Laser Marking System The PS System that is ordered with a Laser Marking System requires no additional s…
Setup ■ Setting Up Input and Output Media
2—26 Data I/O • 981-0424-002
back
Set Up for Camera Contrast
If you are programming light colored devices, such as white, silver or
beige, then it may be necessary to flip over the Vision Background
Plate. The Vision Background Plate is located on the Data I/O J-Head
only. One side is white and one side is black. Since most devices are
black, the plate is installed from the factory with the white side down.
To flip the Vision Background Plate over:
1. If the PS Machine power is On, send the head to the Park posi-
tion and then push the E-Stop.
If not, Push the E-Stop and move the head by hand to a location
with easy access.
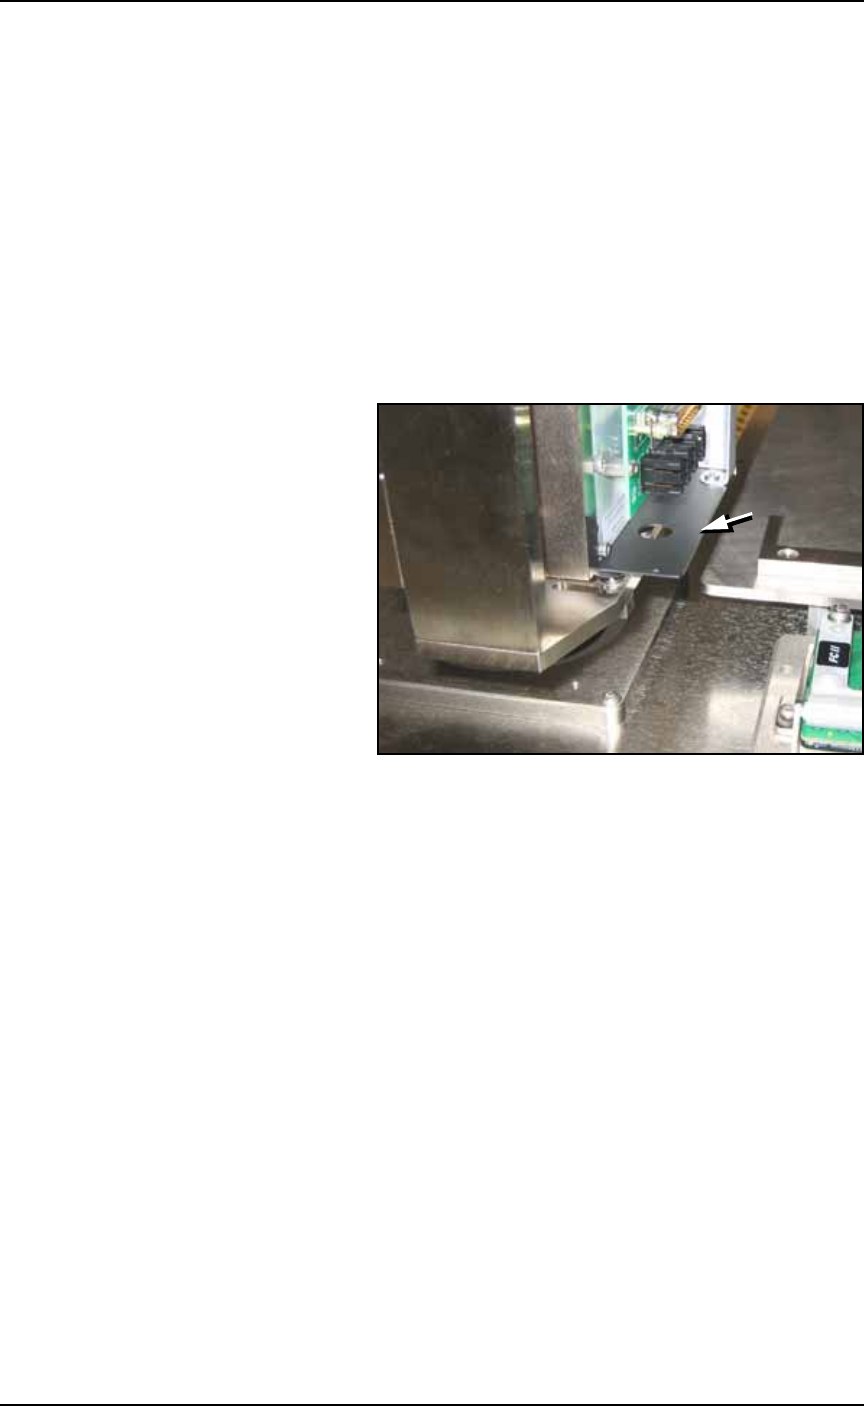
2. Locate the plate at the bottom of the PNP head.
Figure 2-26: The Head Vision Background Plate (arrow) can be
reversed for better vision contrast with light colored devices. This view
is from the back, right side of the J-Head.
3. Remove four SHCS with a 1.5 mm hex key.
4. If the head has a Socket Opener mounted on it:
4a. Turn off the main air supply at the Power Panel.
4b. Pull the Socket Opener down, away from the probe tip.
5. Carefully remove the plate and turn it upside down.
6. Reinstall.
7. Close all Safety Shields, reset the E-Stop, and switch the main air
back on as applicable.

■ Setting Up the Laser Marking System ◘ Set Up for Camera Contrast
PS Series Owner’s Manual 2—27
back
Setting Up the Laser Marking
System
The PS System that is ordered with a Laser Marking System requires
no additional set up at a customer’s site. All software is installed and
all mechanical connections are complete—the laser marking system is
ready to use.
Your job file, created in TaskLink, determines whether or not devices
get marked.
Note: To use the laser marking system, a laser marking file must
first be created and added to a job file. For more information, see
(Optional) Creating a Laser Marking File on page 3-62.
If, for some reason, your winAH400.ini file requires changes, you can
set up the Laser Marking System as follows:
1. Edit the winAH400.ini file for Laser Marking—
1a. Using Windows Explorer, locate
C:\AH500\winAH400.ini
and m
ake a backup copy, for example,
WinAH400backup.ini
.
1b. Open the original file with Microsoft Notepad.
Locate the heading:
;------- Marking System Selection -----
1c. There is a list of marking system names. Remove the semicolon
from the Laser System corresponding to the one installed on
your PS System. Only one line should be without a semicolon.
;Markersystem=NONE
;Markersystem=LASERMARK
;Markersystem=SYNRAD
Markersystem=SYNRAD_DIGITAL
;Markersystem=ROFIN_SINAR
1d. Locate the heading:
;----- Laser System Definitions & Options ------
and set this line as follows;
for PS Models whose option bay has its own computer (and con-
nects to the PS with a serial cable) set
LaserRemoteConnection=TRUE
for PS Models whose option bay does NOT have its own com-
puter (and connects to the PS with a USB connection) set
LaserRemoteConnection=ETHERNET 139.138.240.31
1e. Save the
winAH400.ini
file and exit Windows Explorer.
If you have previously
used a Marking System,
you may already have
saved a winAH400.ini
file (with a modified
name) specifically for
that marking system
setup.
For more ini file infor-
mation, see the
on-screen Help.

Setup ■ Setting Up the Label Printing System
2—28 Data I/O • 981-0424-002
back
Note: If you have other options such as a remote laser system or
Serialization, contact Data I/O Customer Support or a local
Data I/O approved service representative.
Setting Up the Label Printing
System
If your PS System has the optional Label Printing System, it was
installed by Data I/O. If you need to remove, repair, or reinstall your
Label Printer, refer to the Label Printer Owner’s Manual that came
with your PS System. For questions and service contact Data I/O
Customer Support or a local Data I/O approved service representa-
tive.