PS288_PS388_PS588_981-0424-002D - 第98页
Operation ■ Operator Functions 3—28 Data I/O • 981-0424-002 back 3. Exit the Laser Marker sof tw are (if open), and tur n off the Laser Computer from the W indows Star t menu (if this option is installed). Later PS model…
■ Operator Functions ◘ After a Job Completes
PS Series Owner’s Manual 3—27
back
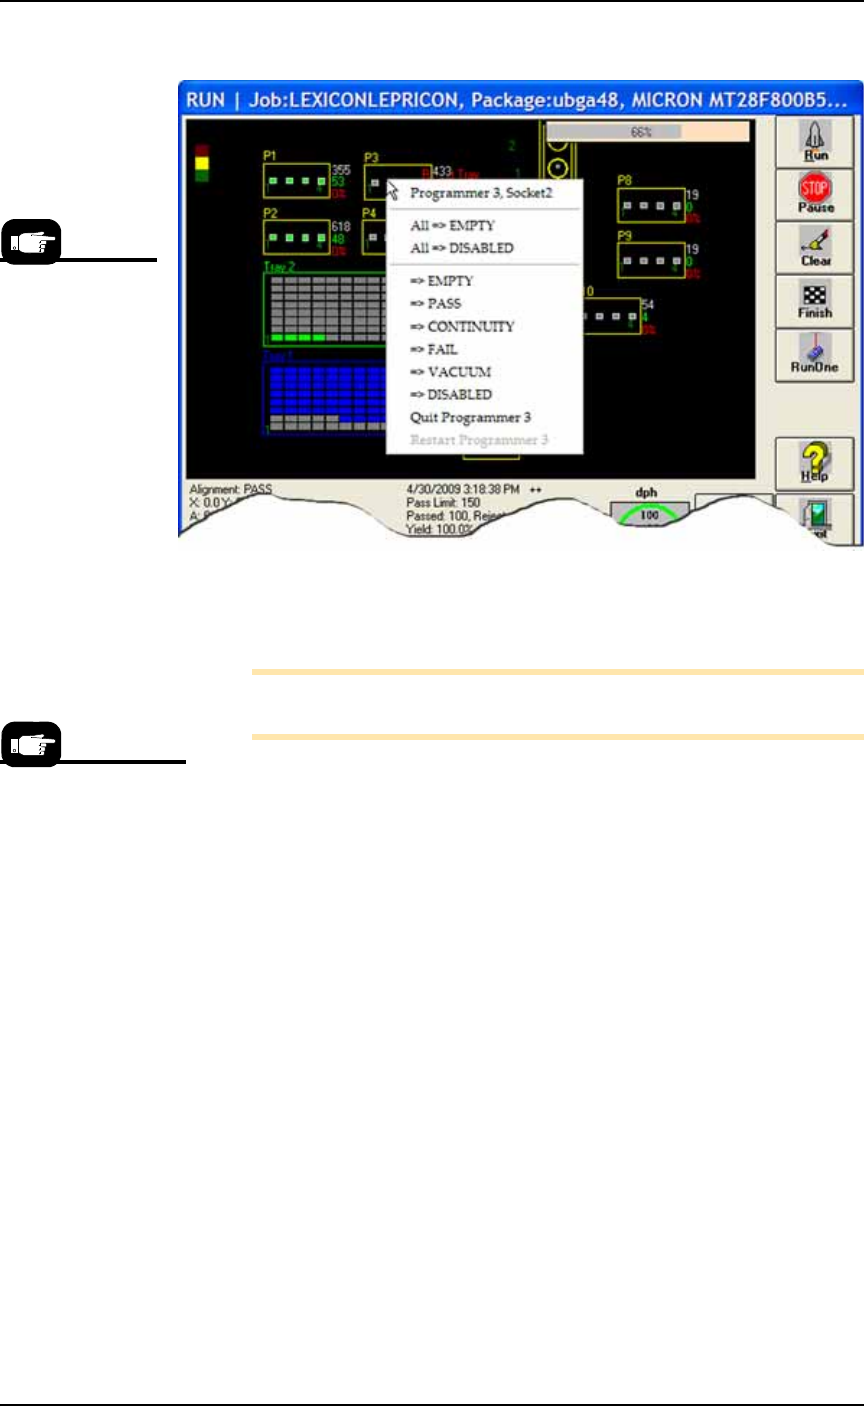
Figure 3-26: Right-click a programmer in the Run Window to change
the status of the programmer, empty the sockets, toggle the vacuum,
or perform various other functions. (PS588 shown.)
Note: To re-enable a single socket, right-click the socket and select
=> EMPTY. The socket changes to grey and is re-enabled.
2. Resume the paused job—
2a. Manually remove any devices from sockets whose status you
have enabled.
2b. To resume a job click Run.
After a Job Completes
After a job completes:
1. Wait for the PNP head to park.
2. (Optional) If Sort-On-Error-Code was employed, record the num-
ber of devices in Reject 1, (FailBox1).
3. Empty the Reject Bin(s).
4. Remove programmed devices.
Turning Off System Power
When the PS System will not be run overnight, or before performing
a service procedure, turn off the power.
1. Finish or end the job if one is running.
2. Remove all devices from the workspace.
This right-click pro-
cedure allows
changes to one
socket or one pro-
grammer, while the
Clear button on the
Run Window clears
all sockets on the all
programmers in use.
Always Pause a job
prior to opening a
workspace access door.

Operation ■ Operator Functions
3—28 Data I/O • 981-0424-002
back
3. Exit the Laser Marker software (if open), and turn off the Laser
Computer from the Windows Start menu (if this option is
installed). Later PS models with Laser Markers may not have a
Laser Computer.
4. Exit AH500 and TaskLink, and turn off power to the Handler
Computer with the Windows Start menu.
5. Rotate the main power switch to the OFF (vertical) position (on
the back Power Panel).
6. (Optional) Padlock the main power switch so that it cannot be
rotated back on while the lock is in place.
■ Operator Functions ◘ Automatic Tray Feeder
PS Series Owner’s Manual 3—29
back
Automatic Tray Feeder
There is an automatic Tray Feeder option available for the PS System.
Chapter 2 discusses setting it up; operation is discussed here.
Operating the TF20 Automatic Tray Feeder
[TF20 only] As an option, the PS System can be configured with an
Automatic Tray Feeder. Only basic operation of the TF20 Automatic
Tray Feeder is described here.
To start the TF20:
1. Plug the TF20 power cable and air line into the PS System. Refer
to Figure 2-8 on page 2–11.
2. Manually initializing the Tray Feeder—
2a. After power up, four LEDs on the feeder operator interface light
up. Initializing the feeder enables a choice between normal
(Fast) mode and slow mode.
To enable slow mode, momentarily press the INDEX 1 and INDEX 2
buttons simultaneously.
To enable normal mode, momentarily press the ELEV button. Once
the speed is set in this way, the LEDs dim and the run mode will
be maintained until the power to the feeder has been removed.
3. Verify that the Thick/Thin switch correctly matches the type of
JEDEC trays used: thick trays or thin.
Note: If the Thick/Thin switch is set incorrectly, the feeding mech-
anism will jam and cause an error condition (blinking orange
LED).
CAUTION: Trays or devices might get damaged and the Tray
Feeder might be difficult to restart if an orange LED error occurs
and the feeder is not stopped immediately. Press the Stop button
immediately if the orange LED illuminates.
• If the blue LED (indicating Full or Empty) is illuminated and
steady (not blinking), the lower input stack is out of trays. Open
the tray access door and place one or more trays in the lower
input stack. Close the door. The elevator automatically begins to
move up to a normal run position.
• If the blue LED is illuminated and blinking, the TF20 upper out-
put stack is full of trays. Remove the trays from the upper out-
put stack.
• If the yellow LED is illuminated and not blinking (indicating an
inhibit condition), the elevator access door might be open: close
it.
Note: The TF20 can be reloaded with trays at any time.
For detailed information,
see the Tray Feeder
Owner’s Manual that
came with your
PS System.