OM-1058-002.pdf - 第34页
Tg0409-PM-SO 0410-002 33 4.1 Feed Pitch Selecting Procedure (a) When the pitch is changed from 4 or 8 mm to 12 or 16 mm in TF-1610, it is necessary to change the take-up spring (Refer to T able 3). (b) Attach and store t…
Tg0409-PM-SO0410-002 32
4.1 Feed Pitch Selecting Procedure
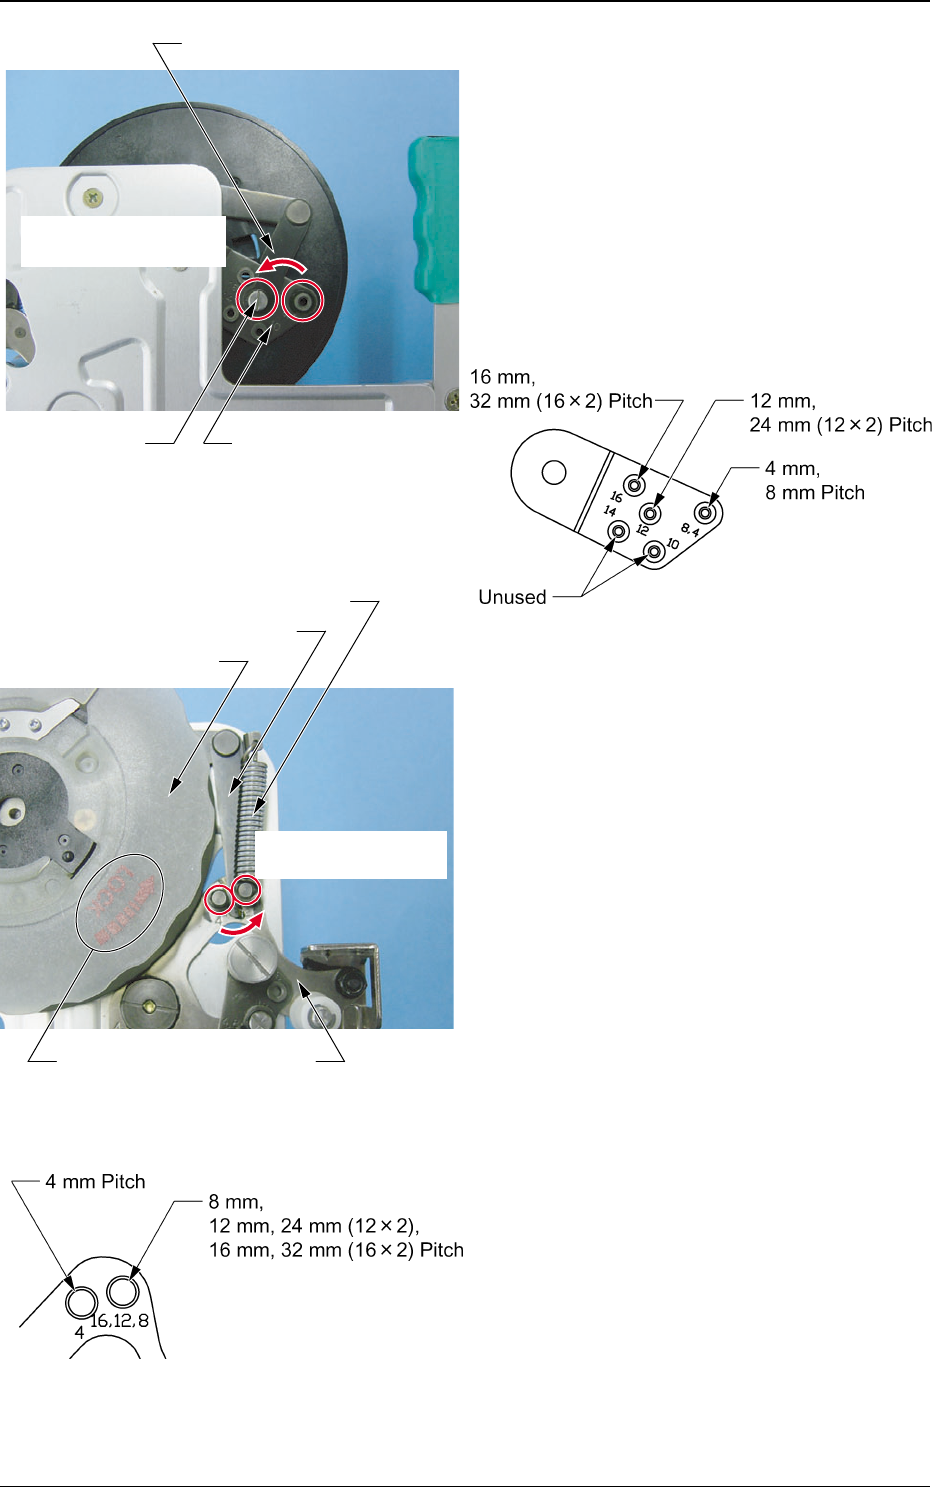
(3) Remove the set screw for the tape take-
up link with a driver and remove the
tape take-up link from the pitch selecting
section on the swing arm.
(4) Attach the tape take-up link on the
position which is correct for the feed
pitch. Attach the set screw together with
flat and spring washers.
(5) Turn the take-up reel socket in the
direction away from the arrow (Refer to
"Note" in Fig. 55), and remove it.
(6) Remove the take-up reel feed spring from
the spring hook on the swing arm side.
(7) Attach the feed pitch selecting sliding
section on the tape take-up link to a
position appropriate for the feed pitch.
(8) Catch the take-up reel feed spring on
the pin hook on the tape take-up link
attached on the changed position.
(9) Turn the take-up reel socket to the arrow
direction (Refer to "Note" in Fig. 55) and
attach it.
If the take-up reel socket is not set
correctly, the take-up reel socket might
come off during operation, which might
cause the machine to malfunction. Turn
the take-up reel socket in the direction
of the arrow (Refer to "Note" in Fig. 55)
and confirm that the plate spring is
inserted until it locks.
Fig. 53
Fig. 54 Pitch Selecting Section on the Swing Arm
Fig. 56
Fig. 55
Tape Take-up Link
Reel Drive Pitch
Selection Section
Set Screw
Change the attachment
position.
Tape Take-up Link
Change the attachment
position.
Note
Take-up Reel Socket
Swing Arm
Take-up Reel Feed Spring
Tg0409-PM-SO0410-002 33
4.1 Feed Pitch Selecting Procedure
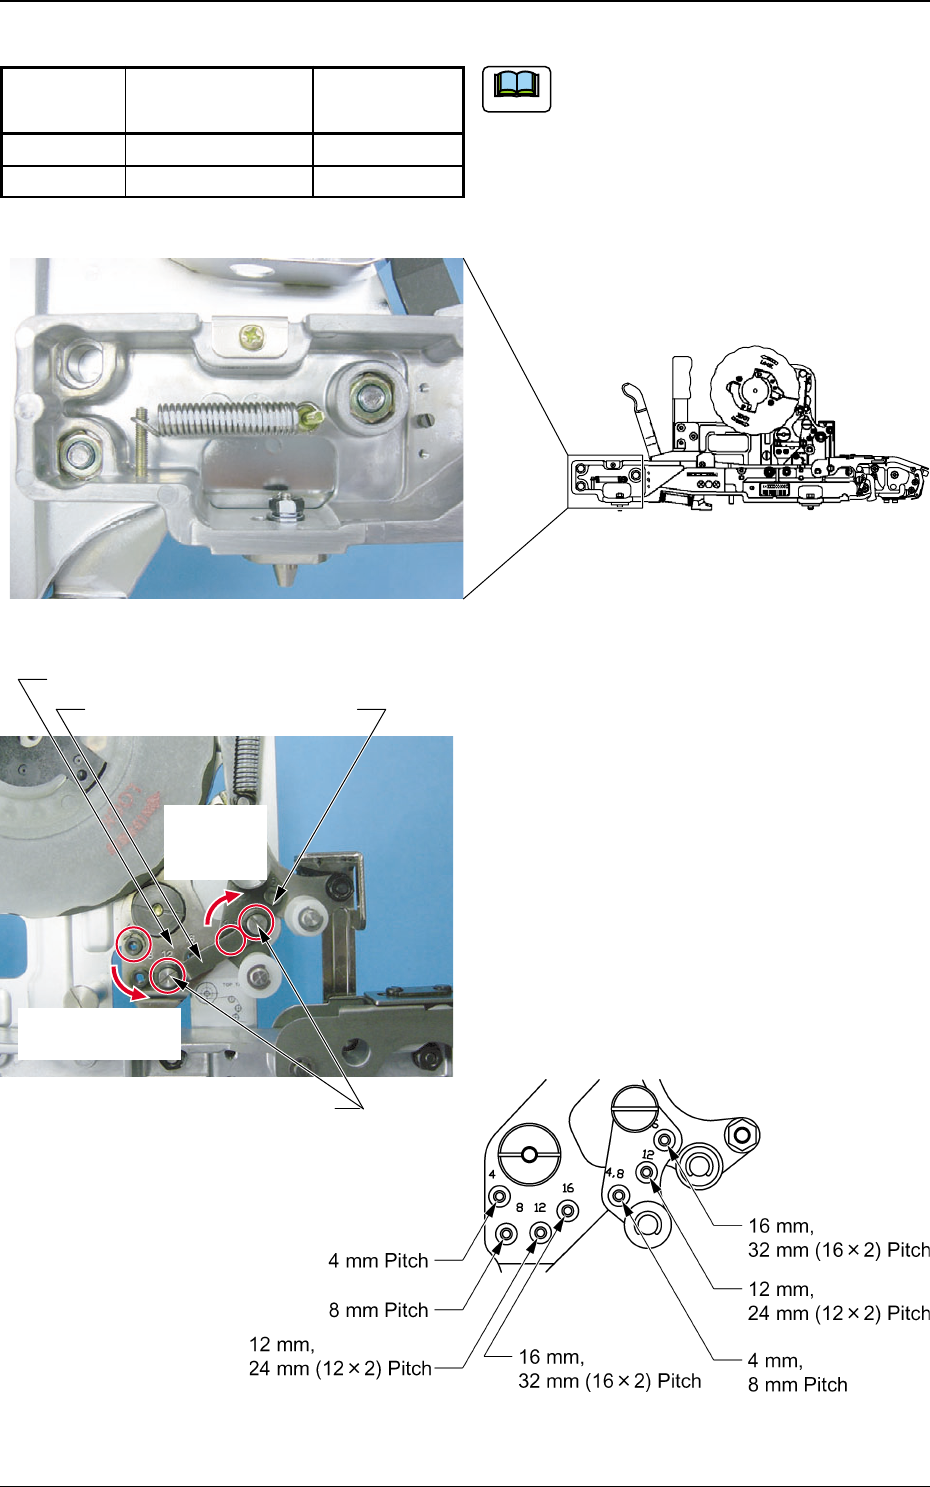
(a) When the pitch is changed from 4 or 8
mm to 12 or 16 mm in TF-1610, it is
necessary to change the take-up spring
(Refer to Table 3).
(b) Attach and store the unused take-up
spring onto the housing spring hook in
order not to lose it (Refer to Fig. 57).
(10) Remove the set screw on the slack link
with a driver and remove the slack link
from the slack lever and the swing arm.
(11) Attach the slack link onto the position
which is correct for the pitch. Attach the
set screw together with the flat and
spring washers.
Tape Feeder of TF-1610
Slack Link
Change the
attachment
position.
Change the
attachment position.
Slack Lever
Set Screw
Swing Arm
Fig. 57 Take-up Spring Housing Condition
Fig. 58
Fig. 59 Slack Lever and Swing Arm
Table 3
Note
Identification
None
White Marking
4, 8
12, 16
Feed Pitch
(mm)
Max. Take-up Load
(gf)
2
3.6

Tg0409-PM-SO0410-002 34
5. Periodical Maintenance
5.1 Precautions before Maintenance
This describes the check, cleaning, and adjustment for tape feeders operating
in good conditions.
A full and periodical maintenance of the tape feeder is recommended.
5. Periodical Maintenance
5.2 Preparation for Maintenance
5.2.1 Preparation for Cleaning
• Rag
Use a rag made of such material (cotton, etc.) that produces
as less waste thread as possible.
A clean rag must be used depending on a spot to be cleaned.
• Air Gun
Do not use an air gun on unspecified locations.
• Brush
Use a normal brush on the market.
• Cotton Swab
Use a normal cotton swab on the market.
• Tweezers
Use normal tweezers on the market.
• Toothbrush
Use a normal toothbrush on the market.
• Alcohol
Do not use alcohol on unspecified locations.
5.2.2 Feeder Adjusting Jig
• Use the feeder adjusting jig JG-0148 (option).
Only trained persons should perform mainte-
nance, both carefully and according to the speci-
fied procedures.
CAUTION