00197684-02_AI_Innenraumbeleuchtung_SX12_de_en.pdf - 第40页
Brief description Tools and Equipment Required 40 Interior Lighting Innenraumbeleuchtu ng 2.4 2 . 4 T o o ls a n d E q u ip m e n t R e q u ir e d Tools and Equipment Required ▪ Standard tool ▪ Cable clamps or cable ties…

Brief description
Product Description
Interior Lighting Innenraumbeleuchtung 39
2
2 Brief description
Brief description
2.1
2.1 Product Description
Product Description
The interior lighting illuminates the machine interior if the safety circuit is opened, for example if the cover
is opened.
The interior lighting is switched off in production mode.
2.2
2.2 Prerequisites
Prerequisites
Prerequisites for installing the interior lighting:
▪ the I/O distributor unit [03065892-xx] FS06 or [03115376-xx] from FS01 that is installed in
SIPLACE® SX1/SX2 machines from serial number L468 and M001 upwards
▪ station software 707.1 SP 2 and higher
2.3
2.3 Scope of Delivery
Scope of Delivery
Interior lighting SX1/SX2 [00119745-xx]
Quantity Designation Item No.
1 Interior lighting SX1/SX2 complete 03116845-xx
1 Holder light strip 03116843-xx
2 ISO4762 - M4 x 8-A2-70 03042551-xx
2 ISO 7089 - 4 - 200 HV - A2 03100634-xx
1 Interior light complete 03107107-xx
2 DIN6912-M4x5-A2-70 03046112-xx
1 Cable: Interior light SX1/SX2 (called extension cable in the following) 03114815-xx
2 Cable clip d=5mm H2P polyamide 00319192-xx
5 Cable ties B=3.6 mm L=140 mm TY 24M 00805141-xx
5 Cable ties W=4.8mm L=186mm TYB-25M 00805142-xx
2 Self-adhesive cable tie mounting base 03064015-xx
1 DIN EN ISO 10511 - M4-A2-70 03054130- xx
1 ISO4762 - M4 x 8-A2-70 03042551-xx
2 ISO 7089 - 4 - 200 HV - A2 03100634-xx
1 Assembly Instructions Interior lighting SX1/SX2 00197684-xx
Interior lighting
1. Cable
2. Interior light
3. Fixing holes the cable
4. Fixing hole on the right of the machine base
5. Fixing hole on the left of the machine base
Brief description
Tools and Equipment Required
40 Interior Lighting Innenraumbeleuchtung
2.4
2.4 Tools and Equipment Required
Tools and Equipment Required
▪ Standard tool
▪ Cable clamps or cable ties
Consumables
▪ Loctite 243 screw locking varnish [00334892-xx]
2.5
2.5 Required Working Time
Required Working Time
The complete installation will take approx. 0.5 hours.
Installation
Preparatory Steps
Interior Lighting Innenraumbeleuchtung 41
3
3 Installation
Installation
3.1
3.1 Preparatory Steps
Preparatory Steps
► If the interior light is not pre-assembled on the mounting rail, fix the two brackets of the interior light
onto the mounting rail using two M4 x 5 screws (with a short head).
► Snap the interior light onto the brackets.
► Switch off the machine, disconnect it from the power supply and secure it to prevent unauthorized
reactivation. Observe the instructions in section "1.2 Preparatory Work..." [ ➙ 32].
► Move the component trolley out of the machine.
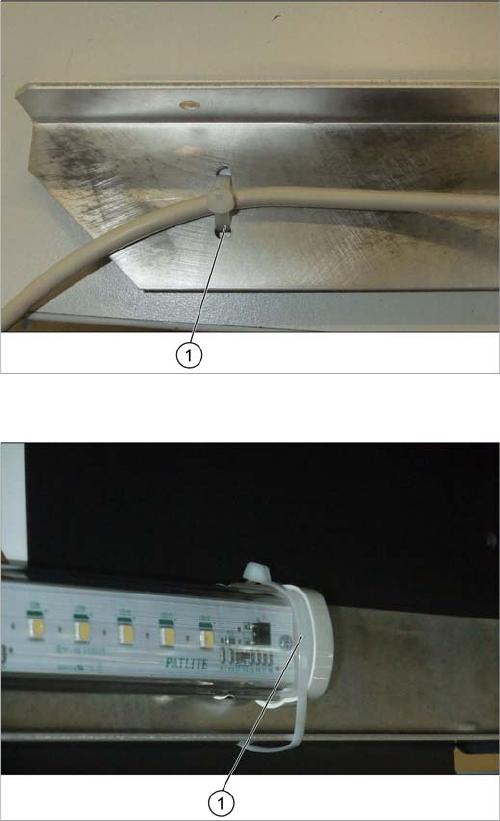
Fixing the cable
► Fix the cable of the interior light to the mounting rail
using a cable tie (1).
Additionally securing the interior light
► Additionally secure the interior light on the other side
using a cable tie (1).