00197455-01_IM_TX150SS8_en.pdf - 第6页
Installing Prim ergy TX 150 S8 with W indows S erver 20 12 07/2012 Edit ion 6 2 Prepar ation Before i nstalling t he s er ver, som e preparatio n task s have to b e perfor med . 2.1 Interfaces Overview The f ollowing pic…
Installing Primergy TX150 S8 with Windows Server 2012 07/2012 Edition
5
1 Purpose
This document describes the installation of the Primergy TX150S8 with Windows Server 2012
using the installation media delivered from Fujitsu.
Installing Primergy TX150 S8 with Windows Server 2012 07/2012 Edition
6
2 Preparation
Before installing the server, some preparation tasks have to be performed.
2.1 Interfaces Overview
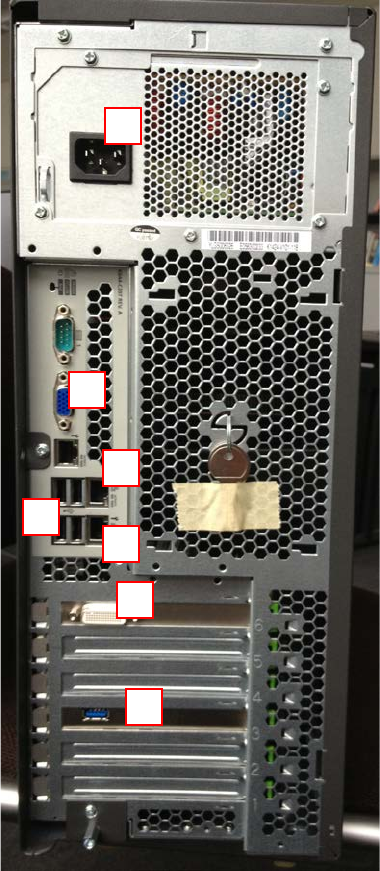
The following picture shows an overview of the interfaces of your computer hardware (backside).
Figure 2-1: Back of TX150 S8 computer
Legend:
1) Connector to graphics card (use the delivered 2* DVI splitter cable)
2) Onboard VGA connector
3) SIPLACE LAN Network connection
1
2
3
4
5
6
7
Installing Primergy TX150 S8 with Windows Server 2012 07/2012 Edition
7
4) Additional onboard LAN connection (not used)
5) USB 2.0 connectors
6) USB 3.0 connector (use this connector for your USB 3.0 devices for enhanced
performance)
7) Power connector
2.2 Used Network Connections
► Before you begin, please ensure that you have connected the SIPLACE LAN network cable
(usually IP range 172.22.x.x) to the (onboard) network adapter and removed all other network
cable connections.
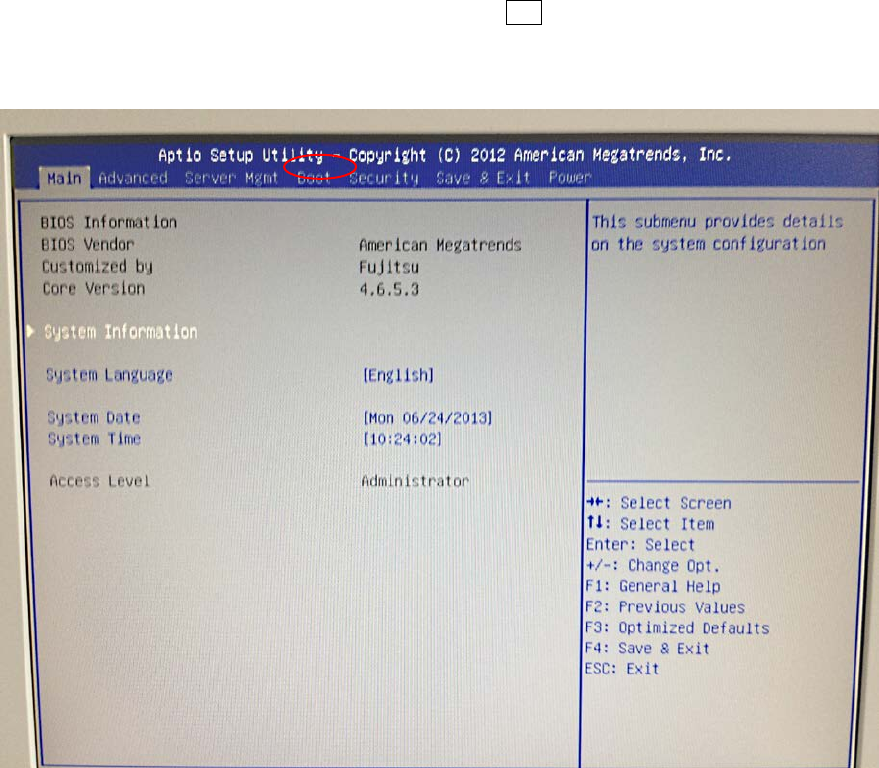
2.3 BIOS Settings
Some boot devices need to be removed from the boot order.
► Press the power button of the server.
After a couple of seconds, some boot information will be displayed.
► Immediately after the first text is displayed, press the F2 key multiple times to enter the BIOS.
It may take about 45 seconds, until the BIOS screen is displayed.
Figure 2-2: Initial BIOS screen