Autosite_Users_Manual.pdf - 第24页
Setup and Ins tallation 2-2 Aut oSi te User Manua l Before You Begin Before you begin the setup a nd installatio n, make sure you read and understand the terms of the S oftware License Agreement, which is printed on the …

AutoSite User Manual 2-1
Setup and Installation
This chapter describes how to set up AutoSite and get it working with
your equipment. Before you read this chapter, make sure you have read
the previous chapter, “Introduction.”
This chapter guides you through configuring the hardware, connecting
AutoSite to a device handler, installing the system software, and
powering up AutoSite for the first time. The installation process is
divided into the following steps:
• Connect AutoSite to a ProMaster Handler
• Connect AutoSite to a ProMaster 2000..........................................2-2
• Connect AutoSite to a ProMaster 3000 or ProMaster 7000......2-12
• Connect AutoSite to a non-ProMaster Handler................................2-25
• Power Up AutoSite...............................................................................2-27
• Insert an Algorithm Disk......................................................................2-30
• Finish Up ................................................................................................2-31
Once you get AutoSite set up and installed, you will want to refer to
Chapter 3, “Operation,” for information on commonly performed tasks
such as changing programming modules and adding device support
packages.
2

Setup and Installation
2-2 AutoSite User Manual
Before You Begin
Before you begin the setup and installation, make sure you read and
understand the terms of the Software License Agreement, which is
printed on the outside of the envelope containing the AutoSite disks.
Connect AutoSite to a ProMaster 2000
This section describes how to connect AutoSite to a ProMaster 2000
handler. The installation is divided into two main steps:
• Attach the AutoSite control unit to the 2000
• Attach the AutoSite pin driver head to the 2000
Figure 2-1 is a flowchart that illustrates the general flow of the installation
procedures contained in this section.
What You Need
In addition to the contents of the Installation Kit, you will need the
following to connect AutoSite to a ProMaster 2000:
•Programming module
• Grounded wrist strap
• Antistatic workstation
• 5/32-inch hex driver
• Flatblade screwdriver
• #2 Phillips screwdriver
Safety Information
This information is provided as a supplement to the Safety Summary at
the beginning of this manual.
The circuitry housed inside the pin driver head and the control unit and
the devices AutoSite programs are static sensitive and can be damaged by
electrostatic discharge (ESD). To help minimize the effects of ESD, we
suggest you wear an antistatic wrist strap while you follow the
procedures described in this section.
For best performance, the antistatic wrist strap should be connected to a
properly grounded antistatic workstation and the wrist strap should
contain a 1M
Ω
(minimum) to 10M
Ω
(maximum) isolating resistor.
Setup and Installation
AutoSite User Manual 2-3
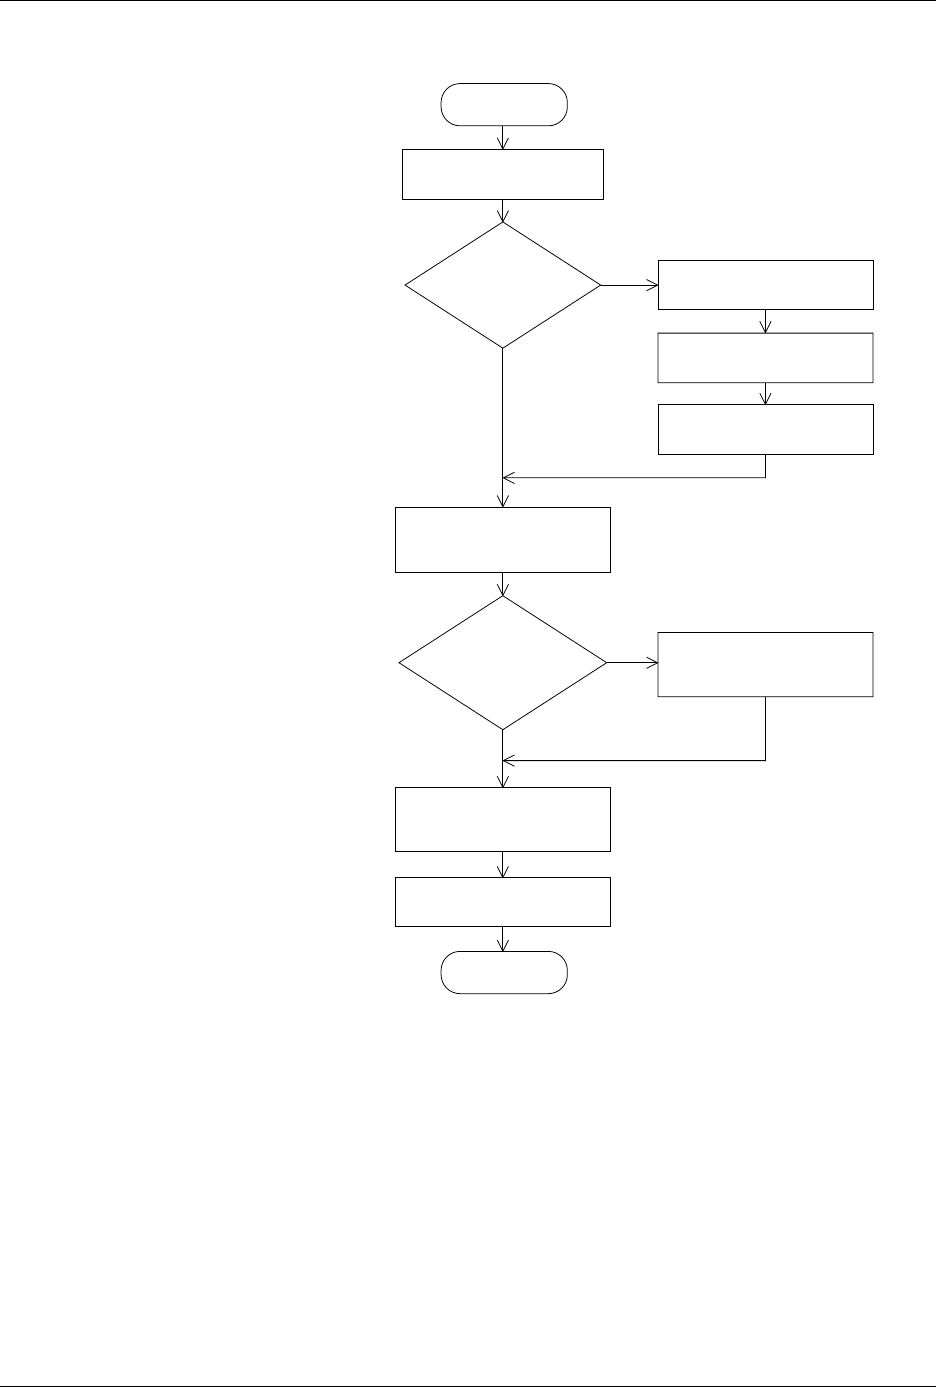
Figure 2-1
Flowchart of the Installation
Process for the ProMaster 2000
START
CONVERT
CONTACTOR
SET ?
MOUNTING
BRACKETS
ALREADY ON PIN
HEAD DRIVER?
REMOVE CONTACTOR
SET FROM HANDLER
ATTACH MOUNTING
BRACKETS TO
PIN DRIVER HEAD
Y
N
N
Y
ATTACH PROGRAMMING
MODULE TO PIN
DRIVER HEAD
ATTACH PIN DRIVER
HEAD TO 2000
FINISH
1415-2
ATTACH CONTROL UNIT
TO PROMASTER 2000
REMOVE CONTACTOR
SET FROM SMALL PLATE
FASTEN CONTACTOR
SET TO MOUNTING PLATE
ATTACH CONTACTOR
SET AND MOUNTING
PLATE TO 2000