Autosite_Users_Manual.pdf - 第53页
Setup an d Installa tion AutoSite User Manual 2-31 Finish Up Establishing Communication By this point, AutoSite should ha ve completed and passed a power-up self-test. To establ ish communication with AutoSit e, do the f…

Setup and Installation
2-30 AutoSite User Manual
If one or more of the LEDs is blinking after the self-test, there may be a
faulty circuit board in AutoSite. Contact Data I/O Customer Support for
more information.
Are the Right LEDs Lit?
If AutoSite completed the self-test successfully, the Power LED is lit.
Also, if you have equipment connected to the Auxiliary and Handler
ports, the corresponding LEDs should be lit. If all the right LEDs are lit,
AutoSite has powered up successfully. Go to the “Finish Up” section.
If the Handler LED and/or Auxiliary LED should be lit and are not, check
the connections between AutoSite and the connected equipment.
Checking the Connections
Sometimes problems are caused by unconnected cables. Turn AutoSite
off and check all of the following:
• Power cords—Are they all plugged into a live outlet and into the
equipment?
• Cables—Is each cable that connects AutoSite to another piece of
equipment connected properly? Is each cable connected to the proper
port?
• Algorithm/System disk—Is the disk inserted properly?
• Programming module—Is there a programming module (or Base)
inserted into AutoSite? Is it inserted properly? Is the programming
module (or Base) empty? The programming module (or Base) must
be empty for AutoSite to boot up properly.
After checking everything described above, reboot AutoSite and go to the
beginning of the “Power Up AutoSite” section.
Insert Algorithm Disk
At various times, such as when you select a device, AutoSite accesses the
Algorithm disk. You might be prompted to insert a different Algorithm
disk than the one currently in the programmer. If so, insert the disk for
which you are prompted. For instance, if AutoSite prompts you to
Insert Algorithm Set 3 Disk
, insert the Algorithm disk that contains
Algorithm Set 3. If AutoSite prompts you to
Insert Algorithm Disk
,
insert any one of the Algorithm disks.
Note: If a Mass Storage Module is installed and has been updated with the
current algorithms, you do not need to insert an Algorithm disk in the
disk drive.

Setup and Installation
AutoSite User Manual 2-31
Finish Up
Establishing
Communication
By this point, AutoSite should have completed and passed a power-up
self-test. To establish communication with AutoSite, do the following:
1. After AutoSite has powered up, start your terminal or terminal
emulator (such as TaskLink) that you are using to communicate with
AutoSite. This terminal or terminal emulator must be capable of
emulating one of the following terminal types:
• ANSI 3.64 compatible terminals
• DEC VT-100 compatible terminals (supported by TaskLink)
• Qume QVT-101 compatible terminals
• TELEVIDEO TVI--910 compatible terminals
• Wyse WY-30 compatible terminals
If you are using handler control software, consult the documentation
to see if it supports one of the terminal types listed above.
2. If you are using terminal emulation software, configure your
software to match the following parameters:
• 9600 baud
•No parity
• 8 data bits
•1 stop bit
For more information, refer to the documentation supplied with the
software you will be using to control AutoSite.
If you are using TaskLink, the communication parameters listed above
can be set from the
Options
menu, in the
Programmer Port
dialog box.
TaskLink
If you are controlling AutoSite from TaskLink, make sure TaskLink is
running and press
C
TRL
+ F1
to check communication between TaskLink
and AutoSite.
If TaskLink responds with
Contact With Programmer Established
,
then TaskLink and AutoSite are communicating. If TaskLink cannot
contact AutoSite, check the cables connecting AutoSite to the PC and then
see the
TaskLink documentation for more information.
Note: Unless otherwise noted, all references to TaskLink in this manual refer to
the DOS TaskLink product. TaskLink for Windows performs similar
operations using different user interface commands. Refer to the
TaskLink for Windows Getting Started Guide
and online Help for
additional information.
Setup and Installation
2-32 AutoSite User Manual
Ways to Control
AutoSite
Once communication with AutoSite is established, you could control
AutoSite in any of the following ways:
•
Terminal Mode
—This interface is the standard menu system that is
built into AutoSite.
•
CRC Mode
—This mode uses Computer Remote Control codes to
instruct AutoSite. In order to use this mode, AutoSite must be
running in Remote Mode. CRC mode is described in Appendix A of
this manual.
•
Custom Software Interface or TaskLink
—This interface is a custom
interface or a PC-based menu interface (such as TaskLink, which
offers a full menu-driven user interface). For more information about
TaskLink, refer to the documentation included with TaskLink or
contact Customer Support.
More About Terminal
Mode
In most cases, the emulation software must be set to
full screen
terminal
mode before you can view
terminal mode
. If you are using TaskLink,
start TaskLink and select
Programmer Interface
from the
Utilities
menu
to access terminal mode. See your TaskLink documentation for more
information.
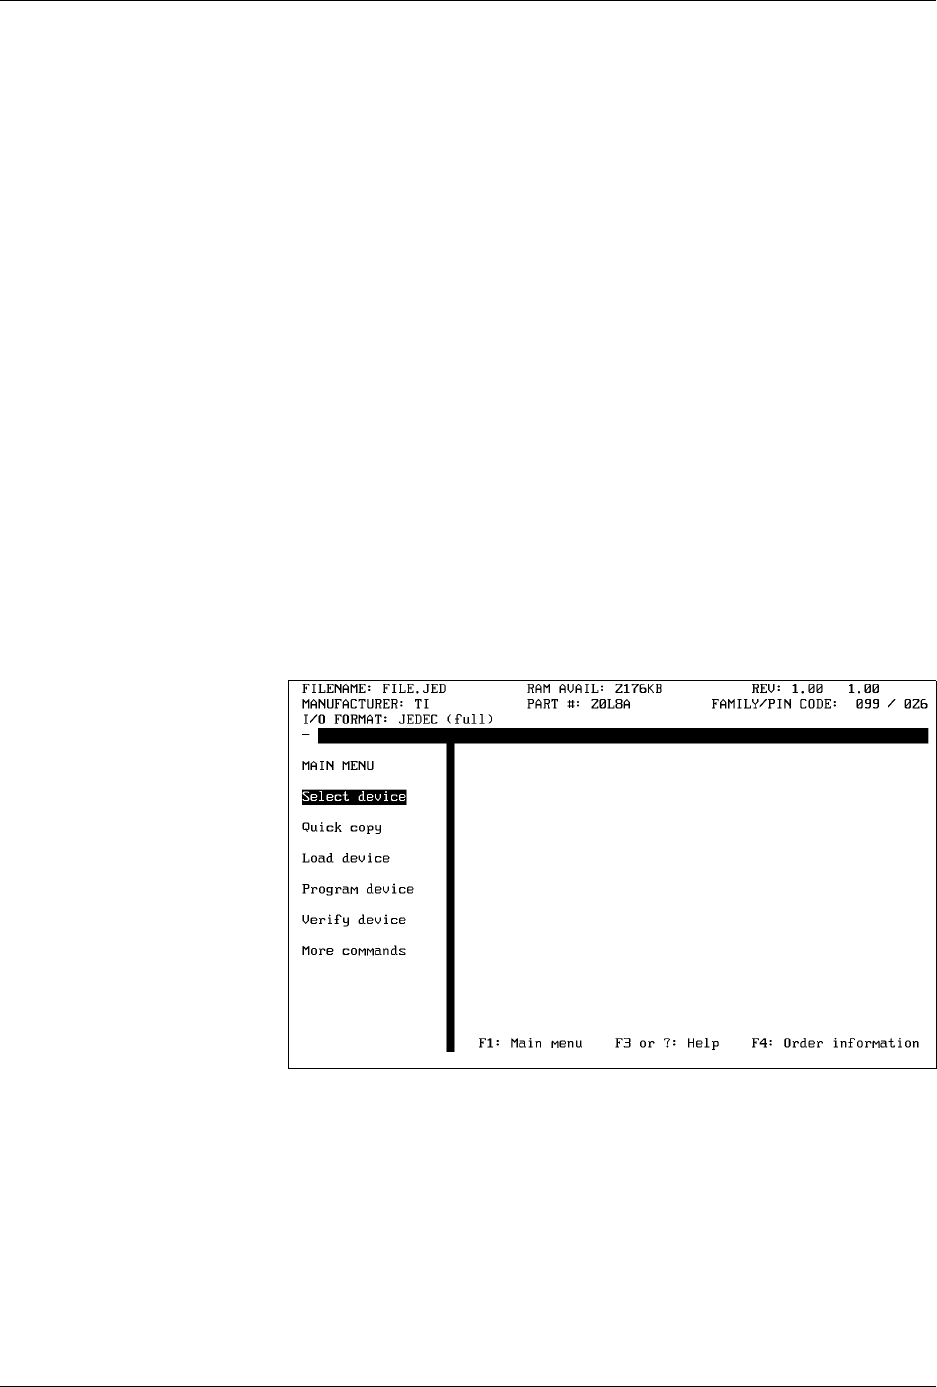
While in terminal mode, you can access the Main Menu, shown in Figure
2-23, which is the starting point from which you can select commands.
Selecting a Command in
Terminal Mode
You can select a command while in terminal mode by using one of two
methods:
• Type the first letter of the command, or
• Move the cursor to the menu item and press
E
NTER
.
If you get lost in the menu structure, press
F1
to return to the Main Menu.
Figure 2-23
The AutoSite Main Menu