semi合集-English.pdf - 第7430页
SEMI MF1529-1104 © SEMI 2004 11 12.6.2 The current at each m easurement site may be kept at the value used for the first site, or it may be readjusted for each site to give a specimen voltage across the specimen sites th…
SEMI MF1529-1104 © SEMI 2004 10
diameter being scanned. Doing so would risk noisy
measurements if probes were placed in previous measurement
locations. This may be avoided by slightly misaligning the
probe pins with respect to the diameter.
12.4 Measuring in Configuration A to Obtain R
A
—
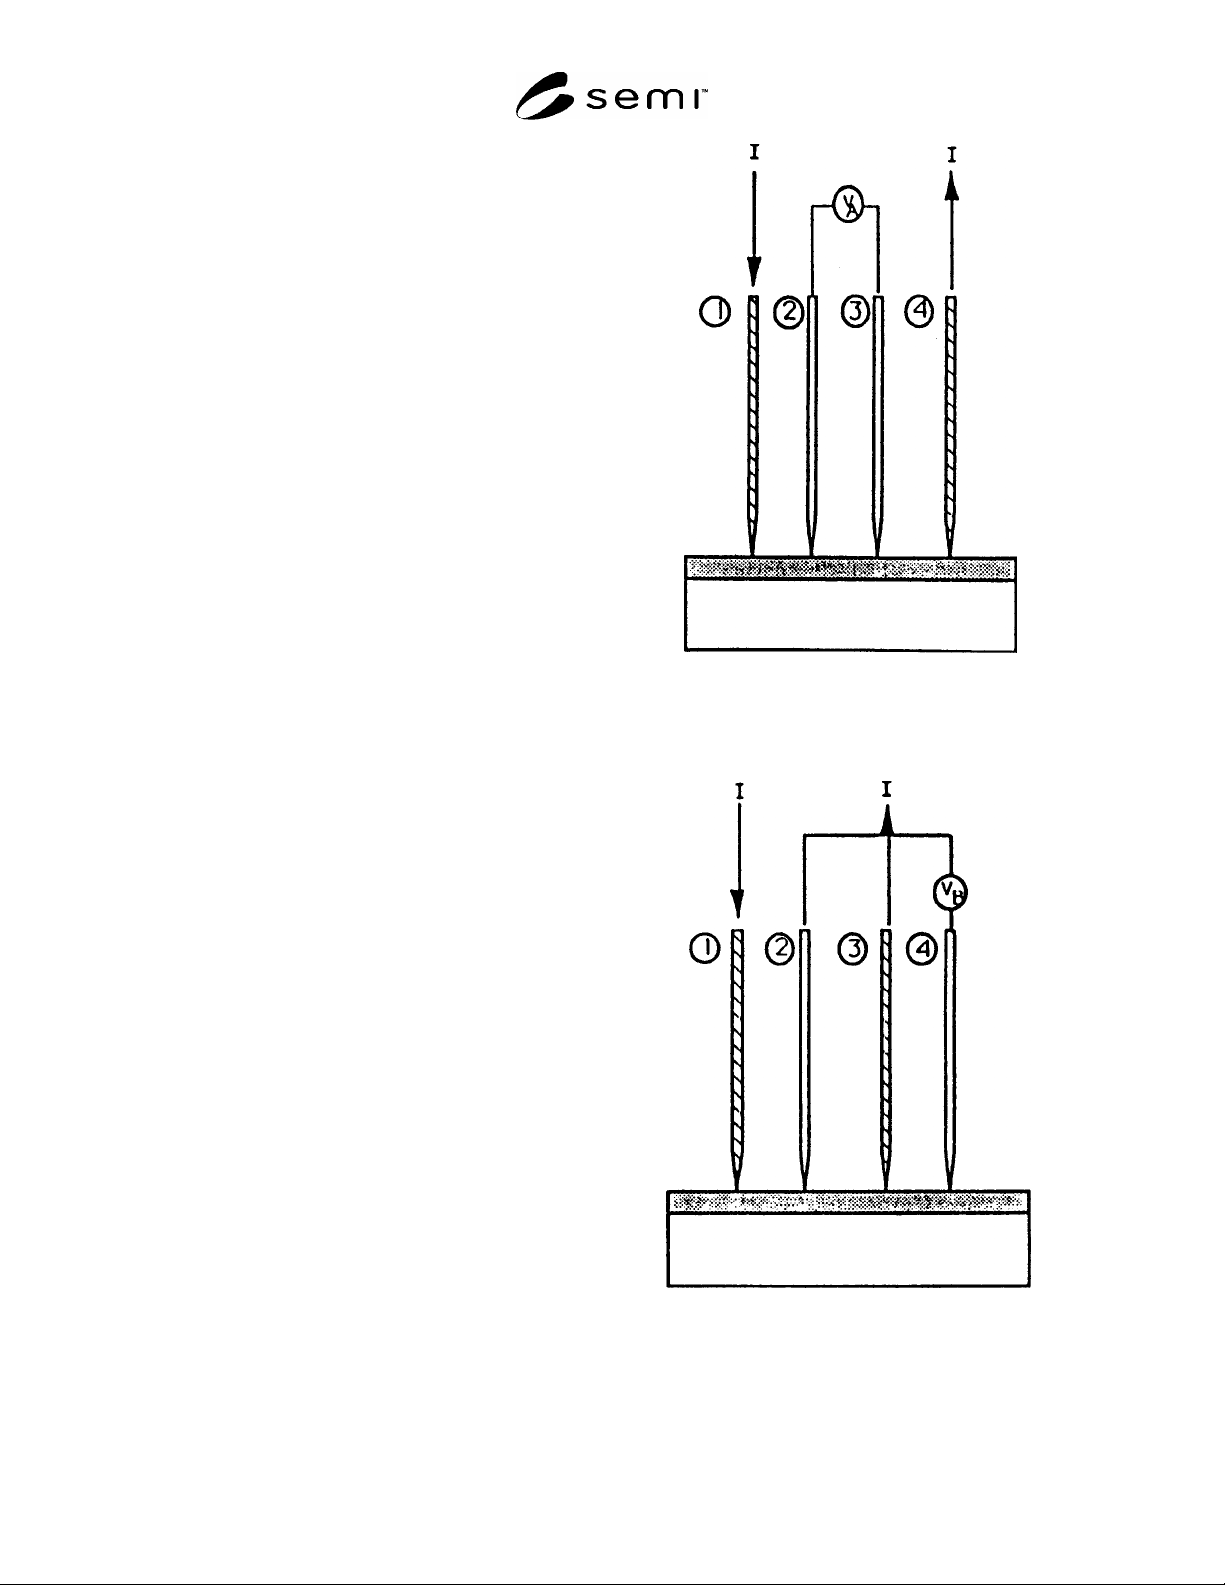
Connect the probe to the electronics so that the current
will flow through the outer pins (designated Pins 1 and
4), and that the specimen voltage will be measured by
the digital voltmeter (DVM) using the inner pins (Pins
2 and 3), Figure 4. Lower the probe into the wafer.
Start with the current in either direction (called
“forward”), and adjust the current to obtain a specimen
voltage between 7 and 12 mV, inclusive. It is
recommended that the current value be increased from
low levels until the required voltage is obtained, rather
than lowering the current from large values. Measure
the current (using the proper standard resistor, or by
monitoring the set point of a calibrated current supply),
and the specimen voltage, each to a resolution of at
least 0.01% of the value. Record the current reading as
I
f (1-4)
, and the voltage reading as V
f (2-3)
. Reverse the
direction of the current and again measure the specimen
voltage and current to the same resolution. Record the
current readings as I
r (1-4)
and the voltage reading as
V
r (2-3)
. The subscripts used for current and voltage are
those of the pins that perform the current-carrying and
voltage-measuring functions (see Caution, Note 8).
12.5 Measuring in Configuration B to Obtain R
B
—
Without raising the probe from the measurement site,
connect the probe to the current supply so the current
flows through one of the outer probes, and the
nonadjacent inner probe, Figure 5. (There are two ways
of doing this that should provide equivalent results.)
Connect the remaining two probes to the voltmeter,
making sure that the wiring polarity corresponds to that
used for the connections to the current supply. With the
current in the forward direction, measure and record the
current as I
f (1-3)
and the voltage as V
f (2-4)
), with the same
resolution as in Section 12.4. Reverse the direction of
the current; measure and record the current I
r (1-3)
and
the voltage as V
r (2-4)
.
NOTE 13: The notation in Section 12.5 assumes Pins 1 and 3
were used for current, and Pins 2 and 4 were used for
specimen voltage measurement. If the other choice of wiring
the probe for Configuration B were used, the subscript
notation in Section 12.5 (and Section 13.1.2) would be
changed accordingly.
12.6 Moving to the Next Measurement Site
12.6.1 Turn off, or short circuit, the output of the
current supply; raise the probe and move the stage to
the next measurement site. Follow the procedure of
Sections 12.4 and 12.5 at this and all other sites.
Figure 4
Schematic Wiring of Four-point Probe for
Measurement in Traditional Configuration A
Figure 5
Schematic Wiring of Four-point Probe in One of the
Two Choices for Configuration B

SEMI MF1529-1104 © SEMI 2004 11
12.6.2 The current at each measurement site may be
kept at the value used for the first site, or it may be
readjusted for each site to give a specimen voltage
across the specimen sites that is within very tight limits.
Whenever the probes are lowered or the current is
changed, make sure that there is a short pause to ensure
that the probes, the current supply, and the
measurement voltage lines have stabilized before taking
data. Depending on the wafer type and the design of
the instrumentation, this may be from a fraction of a
second to several seconds.
12.6.3 Measure and record the temperature of the stage
to the nearest 0.1°C at least at the beginning and the
end of the measurements. Actual measurement of
temperature for each measurement site is preferred if
experience indicates that noticeable drift or fluctuation
(greater than 1°C) is likely to occur during the course of
the measurements.
13 Calculations
13.1 Calculate the Resistances from Each
Configuration for Each Site
13.1.1 Calculate the average of the forward voltage-
current ratio and the reverse voltage-current ratio for
Configuration A as follows to obtain R
A
:
)41(
)32(
)41(
)32(
2
1
r
r
f
f
A
I
V
I
V
R
(5)
13.1.2 Calculate the average of the forward voltage-
current ratio and the reverse voltage-current ratio for
Configuration B as follows to obtain R
B
(see Note 15):
)31(
)42(
)31(
)42(
2
1
r
r
f
f
B
I
V
I
V
R
(6)
13.1.3 The forward and reverse voltage-current ratios
must agree within 5% of the larger of these ratios both
for R
A
and for R
B
in order to be acceptable for use in
referee measurements.
13.2 Calculate Sheet Resistance at Each Site — For
each measurement site, calculate the sheet resistance,
R
s
, as follows:
Aas
RKR (7)
where:
2
2
872.7173.25696.14
B
A
B
A
a
R
R
R
R
K (8)
13.3 Reviewing the Data — Many applications of
uniformity testing involve acquisition of large amounts
of data. It is generally beneficial to review these data
before interpreting them simply as manifestations of
sheet resistance non-uniformity. A useful technique is
to plot the values obtained for R
s
as a time sequence,
that is, in the order the data for the site were taken for
these sites. Examination of this plot may be correlated
with measurement site coordinates to reveal unexpected
edge proximity effects or regions of the wafer that have
unusual non-uniformity that may need to be re-probed
with a different site-selection plan. Examination may
also reveal one or more points that are highly
inconsistent with adjacent points, possibly indicating
problems due to vibrations or spots of surface
contamination. Note such observations, but do not
delete or edit the data, unless agreed upon by all parties
to the test.
13.4 Analysis and Summary of Data — The sheet
resistance data may be analyzed and summarized in a
number of ways as agreed upon by parties to referee
test, or as appropriate for process control or other
applications. These may include, but are not limited to:
listing of all data with site coordinates, contour plots of
the deviations from average value, and distributional
statistics of the data.
14 Report
14.1 The report shall include the following information:
14.1.1 Operator's name, date and time of
measurements,
14.1.2 Wafer identification number and description,
14.1.3 Identification of instrument used, by
manufacturer, serial number, and model number,
14.1.4 Identification of probe used, by manufacturer,
serial number and probe spacing, probe tip radius and
material, and probe force specifications,
14.1.5 Statement of site location plan used,
14.1.6 Initial and final temperature at wafer stage for
the measurement sequence,
14.1.7 Summary of sheet resistance data as chosen in
connection with Section 13.4,
14.1.8 Notations about aberrant measurement sites as
identified by any data screening procedures employed,
and
14.1.9 Data from probe qualification tests.
15 Precision and Bias
15.1 Precision — Single laboratory values for
repeatibility of the measurement of wafer uniformity
were obtained from a series of tests run in 1991. For
these tests, five types of wafers with average sheet
resistance values from about 15 to about 400 were
tested, as detailed in Related Information 1.

SEMI MF1529-1104 © SEMI 2004 12
15.1.1 The wafers in these tests were fabricated by five
different processes. The purpose of these tests is to
demonstrate the consistency of determination of sheet
resistance uniformity with dual-configuration four-
probe measurements, not to determine the uniformity
achievable by a given process. The five processes
utilized are capable of both better and poorer uniformity
than seen here.
15.1.2 The repeatability of uniformity values given here
represent good measurement practice, but the
consistency of values for each wafer might have been
even better if all measurements had been taken over a
shorter time interval.
15.1.3 A standard deviation, (in percent), was used to
represent the uniformity values obtained for each test
on each of the wafers. While it is common to give
repeatability values as a standard deviation, in order to
avoid confusion from duplication of terminology, the
repeatability of the repeated determinations of non-
uniformity for each type wafer are given in Table R1-1
as the range of standard deviation values obtained in the
original tests.
15.1.4 A straightforward propagation of errors based on
the performance specifications, in order to estimate the
precision, does not appear possible. Required
instrument resolution, power supply stability, and probe
performance qualification are designed to allow a
relative accuracy and precision of better than 0.1% for
all measurement sites on a wafer. However, for wafers
with high uniformity (for example, standard deviation
of all measurement site values on the order of 0.2%),
even these requirements may not ensure good two-
party, or multilaboratory agreement on the wafer
uniformity.
15.2 Bias — A statement of bias cannot be made
because there are no semiconductor reference artifacts
with a known level of non-uniformity.
16 Keywords
16.1 epitaxy; four-point probe; ion implant;
metallization; polysilicon; sheet resistance; silicon