4OM-1505-004_w.pdf - 第143页
4OM-1505 2-28 2. T roubleshooting on Each Section : Chap.2 0906-001 Error ID Error Name, Description, Cause, and Remedy 0804000 Stencil Rcg. Camera X Origin (-) Limit error has been detected (Cause 1) Dirt adheres to the…
4OM-1505
2-27
2. Troubleshooting on Each Section : Chap.2
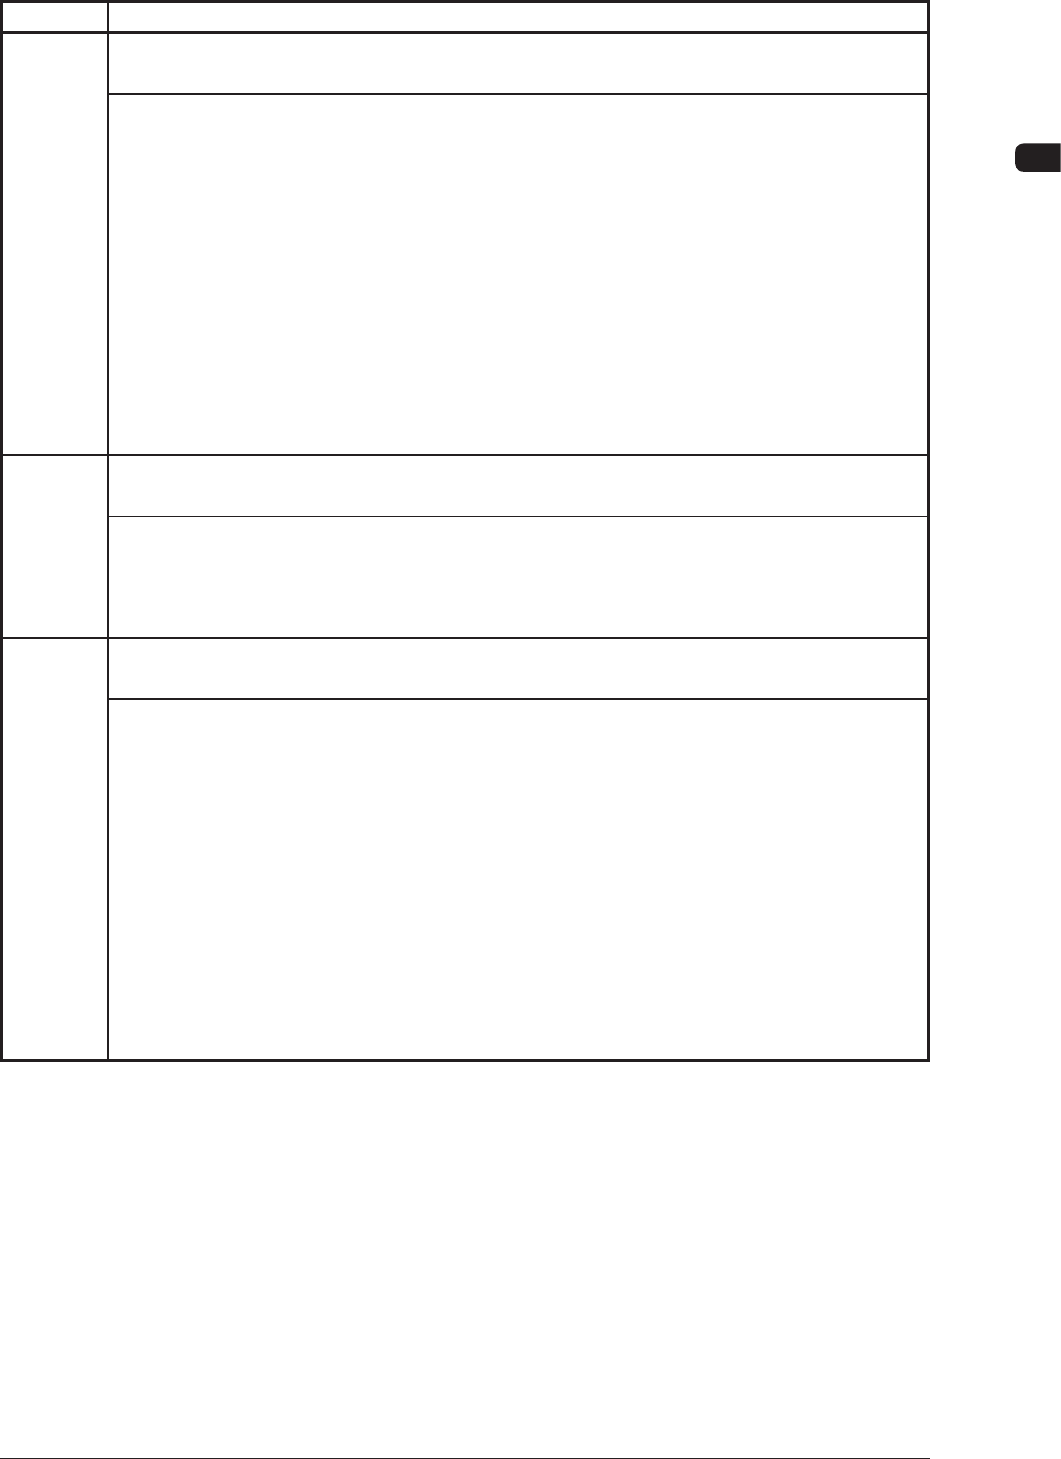
(08 Stencil Eecognition Camera X Axi)
T4B24
Error ID Error Name, Description, Cause, and Remedy
0801000 Stencil Rcg. Camera X Origin
Zeroing opn. was incompleted, within specied time.
(Cause 1) Dirt adheres to the sensor and the optical beam is shielded.
(Cause 2) The sensor (B311, B314) is defective.
(Cause 3) The
driver is malfunctioning or an error has occurred during communication with
the host CPU.
(Remedy 1) Wipe off dirt on the sensor and zero the stencil recognition camera X axis
again.
(Remedy 2) It is required to replace the sensor with a new one. Contact our service
personnel for details.
(Remedy 3) Shut down the power of the machine once and power up the machine again.
After that, zero the stencil recognition camera X axis. If this operation does
not reset the machine to its normal condition, the driver may be defective.
Contact our service personnel for details.
0802000
Stencil Rcg. Camera X Origin
Detect lost pulse error.
(Cause 1) The motor is overloaded and has a loss of synchronism.
(Remedy 1) Check for any obstacle around the stencil recognition X axis and then perform
the zeroing operation. If this operation does not reset the machine to its
normal condition, contact our service personnel for details.
0803000 Stencil Rcg. Camera X Origin
(+) Limit error has been detected
(Cause 1) Dirt adheres to the sensor and the optical beam is shielded.
(Cause 2) The sensor (B3121 to B3123) is defective.
(Cause 3) The
driver is malfunctioning or an error has occurred during communication with
the host CPU.
(Remedy 1) Wipe off dirt on the sensor and zero the stencil recognition camera X axis
again.
(Remedy 2) It is required to replace the sensor with a new one. Contact our service
personnel for details.
(Remedy 3) Shut down the power of the machine once and power up the machine again.
After that, zero the stencil recognition camera X axis. If this operation does
not reset the machine to its normal condition, the driver may be defective.
Contact our service personnel for details.
0906-001

4OM-1505
2-28
2. Troubleshooting on Each Section : Chap.2
0906-001
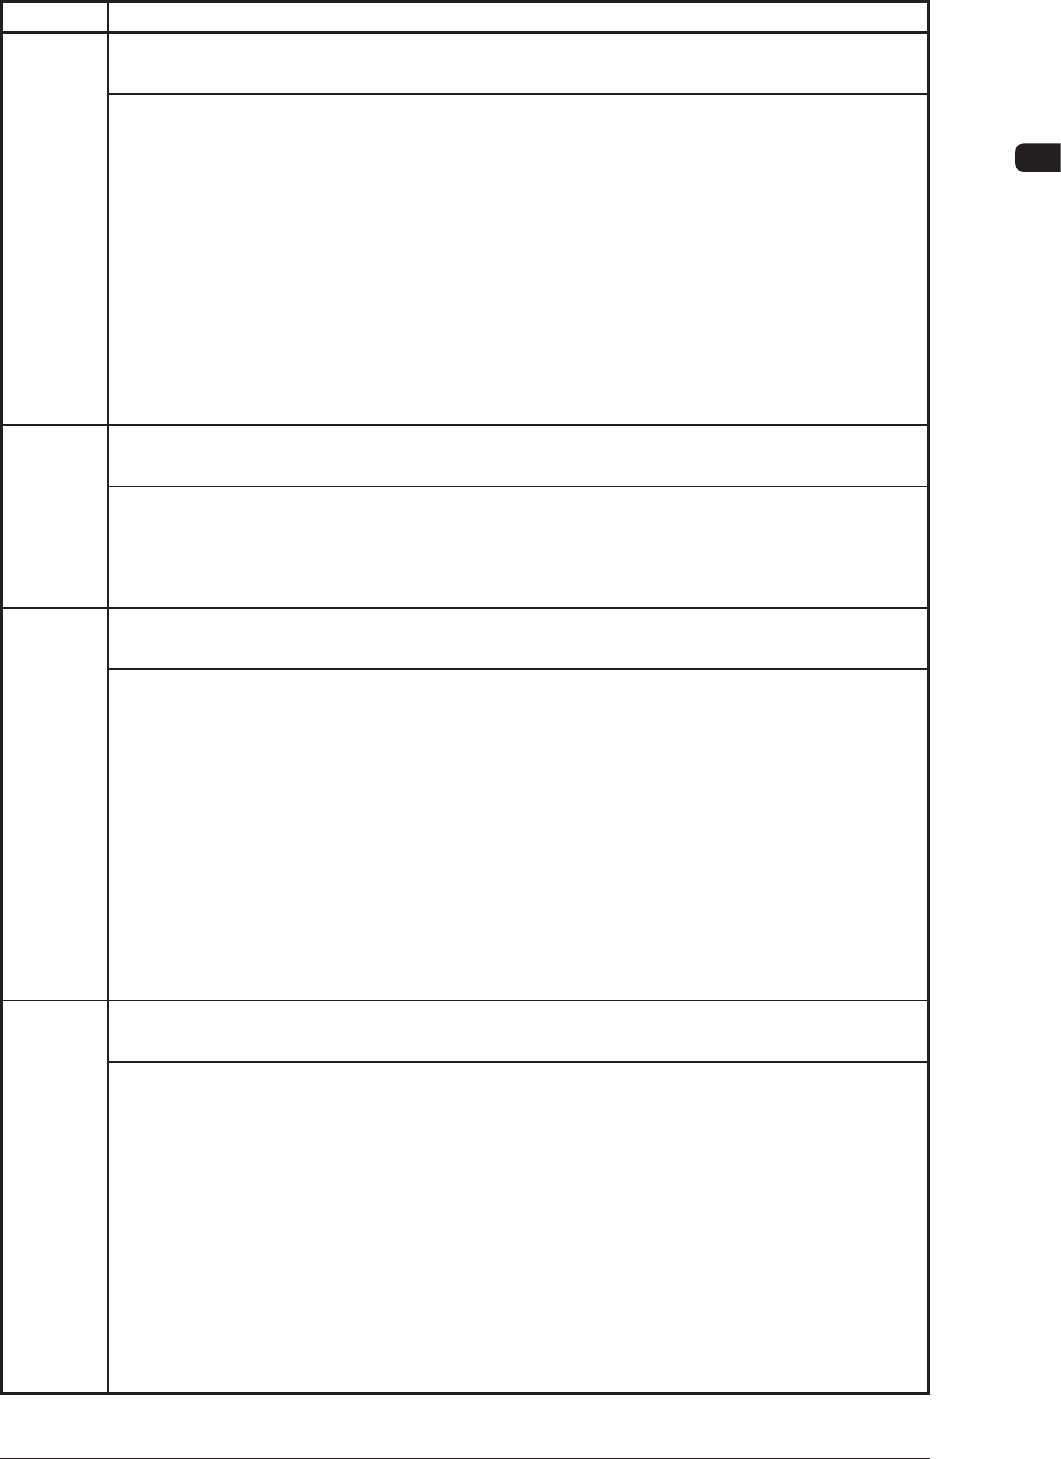
Error ID Error Name, Description, Cause, and Remedy
0804000 Stencil Rcg. Camera X Origin
(-) Limit error has been detected
(Cause 1) Dirt adheres to the sensor and the optical beam is shielded.
(Cause 2) The sensor (B3131 to B3133) is defective.
(Cause 3) The
driver is malfunctioning or an error has occurred during communication with
the host CPU.
(Remedy 1) Wipe off dirt on the sensor and zero the stencil recognition camera X axis
again.
(Remedy 2) It is required to replace the sensor with a new one. Contact our service
personnel for details.
(Remedy 3) Shut down the power of the machine once and power up the machine again.
After that, zero the stencil recognition camera X axis. If this operation does
not reset the machine to its normal condition, the driver may be defective.
Contact our service personnel for details.
0805000 Stencil Rcg. Camera X Driver
Driver alarm signal was detected.
0808000 Stencil Rcg. Camera X Driver
Driver Over-Heat
(Cause 1) Self-Diagnostics Error Message
(Remedy 1)
Zero all axes and restart the operation. If this operation does not reset the
machine to its normal condition, contact our service personnel for details.
0811000 Stencil Rcg. Camera X
Timing
Task has not been completed unable to continue.
0812000 Stencil Rcg. Camera X Data
The data was detected outside of the possible range.
(Cause 1) Self-Diagnostics Error Message
(Remedy 1) Zero all axes and restart the operation. If the machine is not reset to its
normal condition, shut down the power of the machine once and power up
the machine again. After that, restart the operation. When the same error still
occurs, contact our service personnel for details.
0814000 Stencil Rcg. Camera X Origin
Zeroing Opn. Not Complete.
(Cause 1) The motor axis was activated before the zeroing operation was completed.
(Remedy 1) Perform the zeroing operation.
T4B25
4OM-1505
2-29
2. Troubleshooting on Each Section : Chap.2
(09 PCB Backup Axis)
T4B26
Error ID Error Name, Description, Cause, and Remedy
0901000 PCB Backup Axis Origin
Zeroing opn. was incompleted, within specied time.
(Cause 1) Dirt adheres to the sensor and the optical beam is shielded.
(Cause 2) The sensor (B231) is defective.
(Cause 3) The
driver is malfunctioning or an error has occurred during communication with
the host CPU.
(Remedy 1) Wipe off dirt on the sensor and zero the PCB backup axis again.
(Remedy 2) It is required to replace the sensor with a new one. Contact our service
personnel for details.
(Remedy 3) Shut down the power of the machine once and power up the machine again.
After that, zero the PCB backup axis. If this operation does not reset the
machine to its normal condition, the driver may be defective. Contact our
service personnel for details.
0902000
PCB Backup Axis Origin
Detect lost pulse error.
(Cause 1) The motor is overloaded and has a loss of synchronism.
(Remedy 1) Check for any obstacle around the PCB backup axis and then perform the
zeroing operation. If this operation does not reset the machine to its normal
condition, contact our service personnel for details.
0903000 PCB Backup Axis Origin
(+) Limit error has been detected.
(Cause 1) Dirt adheres to the sensor and the optical beam is shielded.
(Cause 2) The sensor (B232) is defective.
(Cause 3) The
driver is malfunctioning or an error has occurred during communication with
the host CPU.
(Remedy 1) Wipe off dirt on the sensor and zero the PCB backup axis again.
(Remedy 2) It is required to replace the sensor with a new one. Contact our service
personnel for details.
(Remedy 3) Shut down the power of the machine once and power up the machine again.
After that, zero the PCB backup axis. If this operation does not reset the
machine to its normal condition, the driver may be defective. Contact our
service personnel for details.
0904000
PCB Backup Axis Origin
(-) Limit error has been detected.
(Cause 1) Dirt adheres to the sensor and the optical beam is shielded.
(Cause 2) The sensor (B233) is defective.
(Cause 3) The
driver is malfunctioning or an error has occurred during communication with
the host CPU.
(Remedy 1) Wipe off dirt on the sensor and zero the PCB backup axis again.
(Remedy 2) It is required to replace the sensor with a new one. Contact our service
personnel for details.
(Remedy 3) Shut down the power of the machine once and power up the machine again.
After that, zero the PCB backup axis. If this operation does not reset the
machine to its normal condition, the driver may be defective. Contact our
service personnel for details.
0906-001