ts9800-user-guide-7511-0360_A.pdf - 第19页
19 6 .4 Mounting & Connection ( w/ Heat er ) a St ep 1: • Slide t he heat guard over the fluid manifold. The al ignment is done by the nozzle ad ju stment nut and the fluid manifold with heating module. St e p 2: • U…

18
6. HEATING
6.1 Introduction
The TS9800 Jet Valve with heating system is available for heating high
viscosity fluid.
The heating system also helps to maintain constant temperature. Required
parts:
• TS9800 Jet Valve with heater
• Heater Cable
6.2 Safety Instructions
• Use the Jet Valve with heating system should only be done by
trained staff.
• Carefully review the material safety data from the dispensing
material.
• Wear adequate protective clothing before starting to dispense
aggressive fluid.
• Be cautious that the media you want to dispense is applicable for
use with a heating system.
Warning:
• When using the Jet Valve with heater, please consult with the
material manufacture for proper operating temperature.
• Be aware of the exposed surface and fittings on the manifold. Do
not touch the heater without protective wear. Failure to do so can
result in serious burn and/or injuries.
6.3 Function
Resistance
All hydrous solvents (Media,
organic acid and base)
*Maximum heater setting value
90 °C
Supply Voltage
24 VDC
Power consumption
15 W
*Displayed temperature may not reflect the actual dispensed temperature.
19
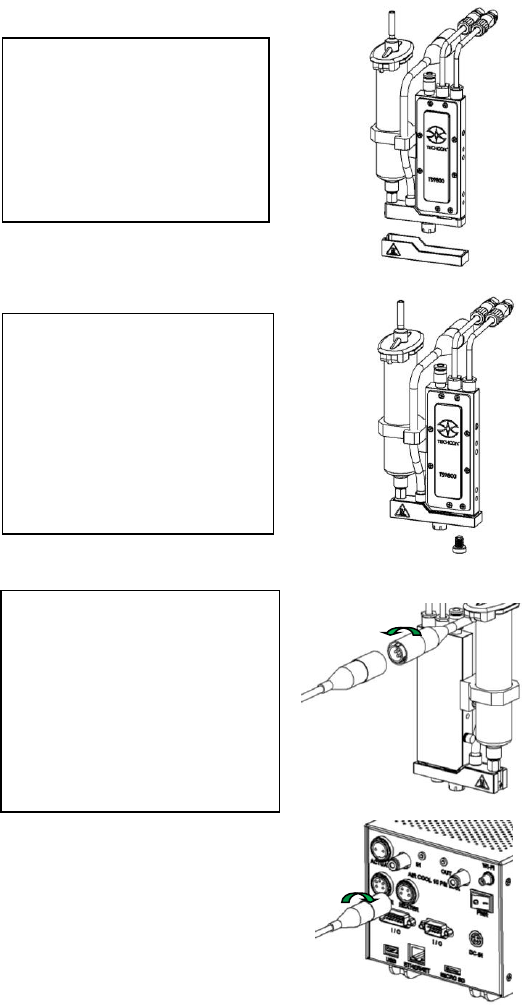
6.4 Mounting & Connection ( w/ Heater)
a
Step 1:
• Slide the heat guard over
the fluid manifold. The
alignment is done by the
nozzle adjustment nut and
the fluid manifold with
heating module.
Step 2:
• Use the 4mm hex wrench to
install the provided M6
screw from the bottom to
secure the heat guard in
place. Caution: Do not
over-tighten the screw since
it can damage the heat
guard.
Step 3:
• Connect the heater cable (4-
pins) from the valve’s
heating module to the
‘HEATER’ port of the
controller. Caution: After
connecting, tighten the
locking sleeve to secure the
connection.
20
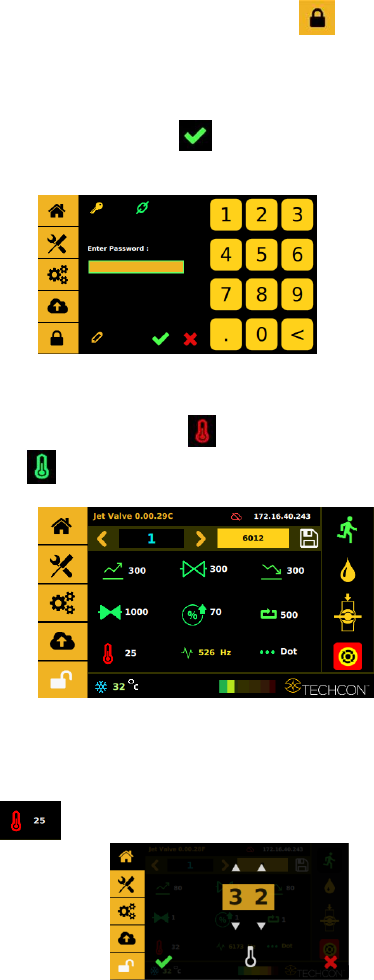
6.5 Setup
Step 1:
Touch the ‘Login’ icon to enter the login screen
Step 2:
Enter the default password ‘0000” in the password window. Then touch
‘Accept’ icon to save and exit . Attention: For changing the password,
refer to section 9.5.1.
Step 3:
Touch the “Temperature” icon to turn the heater ON and the icon will
turn green .
Step 4:
Touch the value field next to the temperature icon to enter the temperature
setting
screen .