Nordson_EFD_OptiSure_Operating_Manual - 第33页
OptiSure Automated Optical Inspection 33 www.nordsonefd.com info@nordsonefd.com +1-401-431-7000 Sales and service of Nordson EFD dispensing systems are available worldwide. # Click Step Reference Image 4 • Jog the camera…
OptiSure Automated Optical Inspection
32 www.nordsonefd.com info@nordsonefd.com +1-401-431-7000 Sales and service of Nordson EFD dispensing systems are available worldwide.
To Use Positional Checking in a Program
# Click Step Reference Image
1
>
>
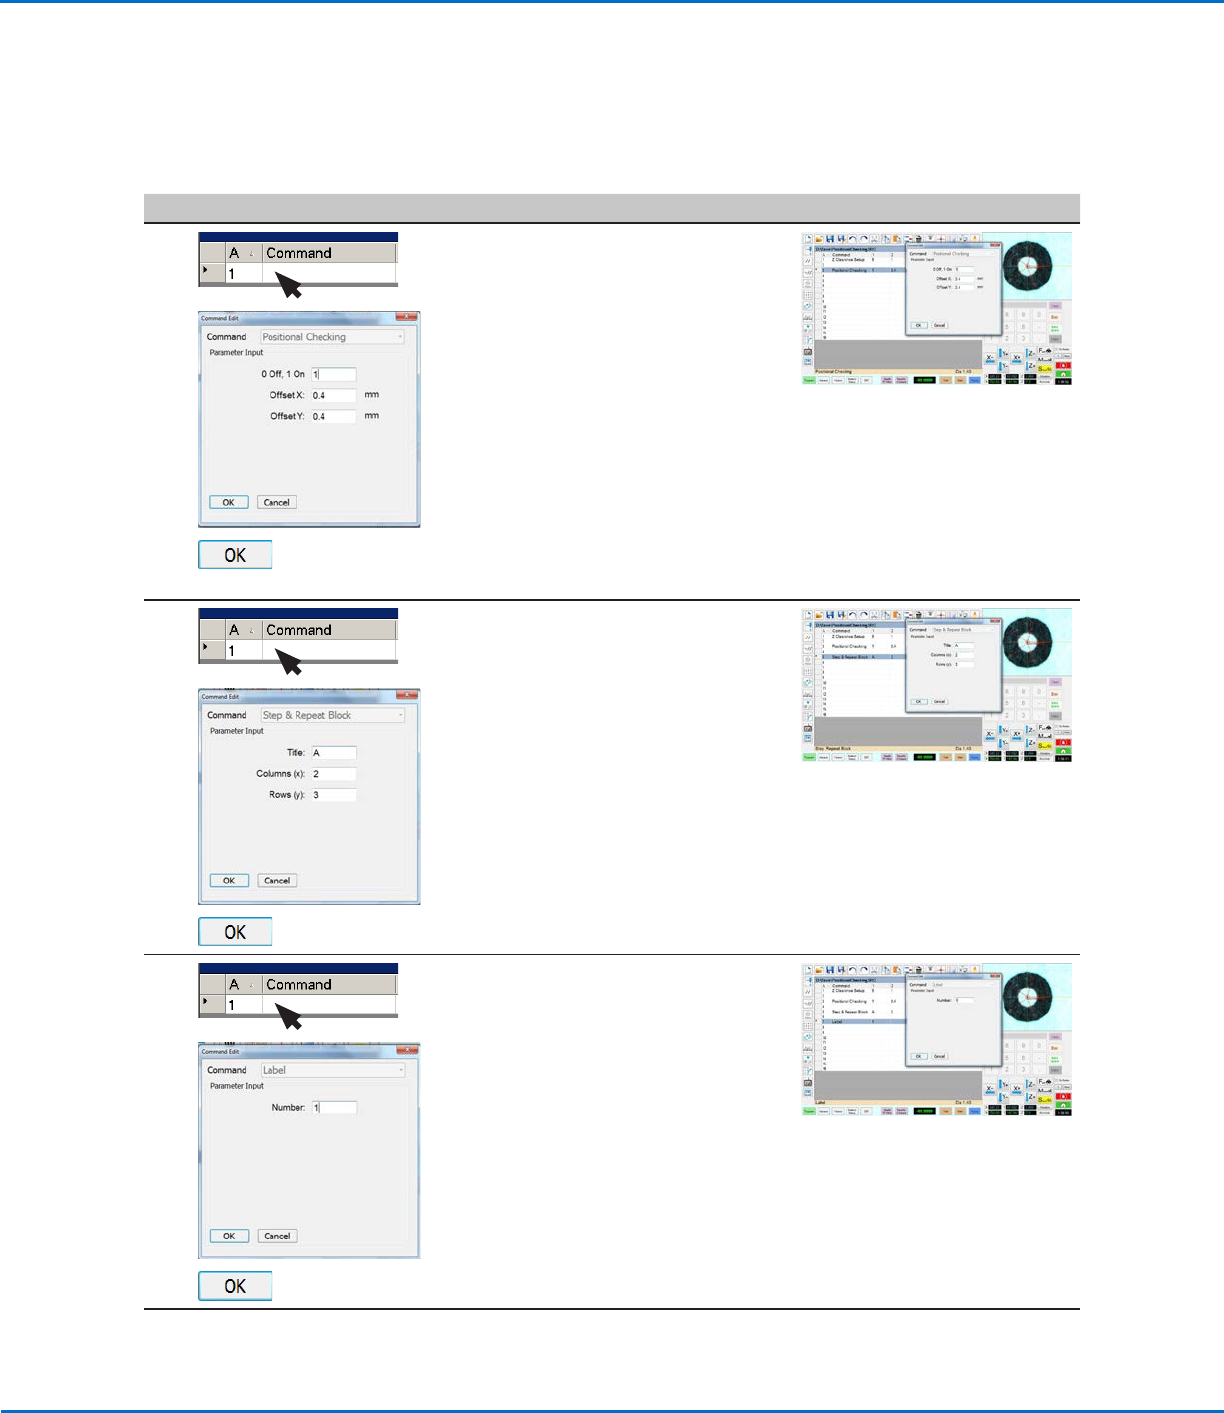
• At the beginning of the program,
insert a Positional Checking
command and enter the following:
- 1 ON
- OFFSET X: 0.4 (mm)
- OFFSET Y: 0.4 (mm)
• Click OK.
NOTES:
• The offset values are the maximum
allowable deviation of the inner dots
from the larger circle.
• This example program includes a
ZClearance Setup command, but it
is not required.
2
>
>
• Insert a Step & Repeat Block
command and enter the following:
- TITLE: A (in this example)
- COLUMNS (x): 2
- ROWS (y): 3
• Click OK.
3
>
>
• Insert a Label command and enter a
number (1, in this example).
• Click OK.
Continued on next page
Using the Arrow Types (continued)
Positional Checking Example (continued)
OptiSure Automated Optical Inspection
33www.nordsonefd.com info@nordsonefd.com +1-401-431-7000 Sales and service of Nordson EFD dispensing systems are available worldwide.
# Click Step Reference Image
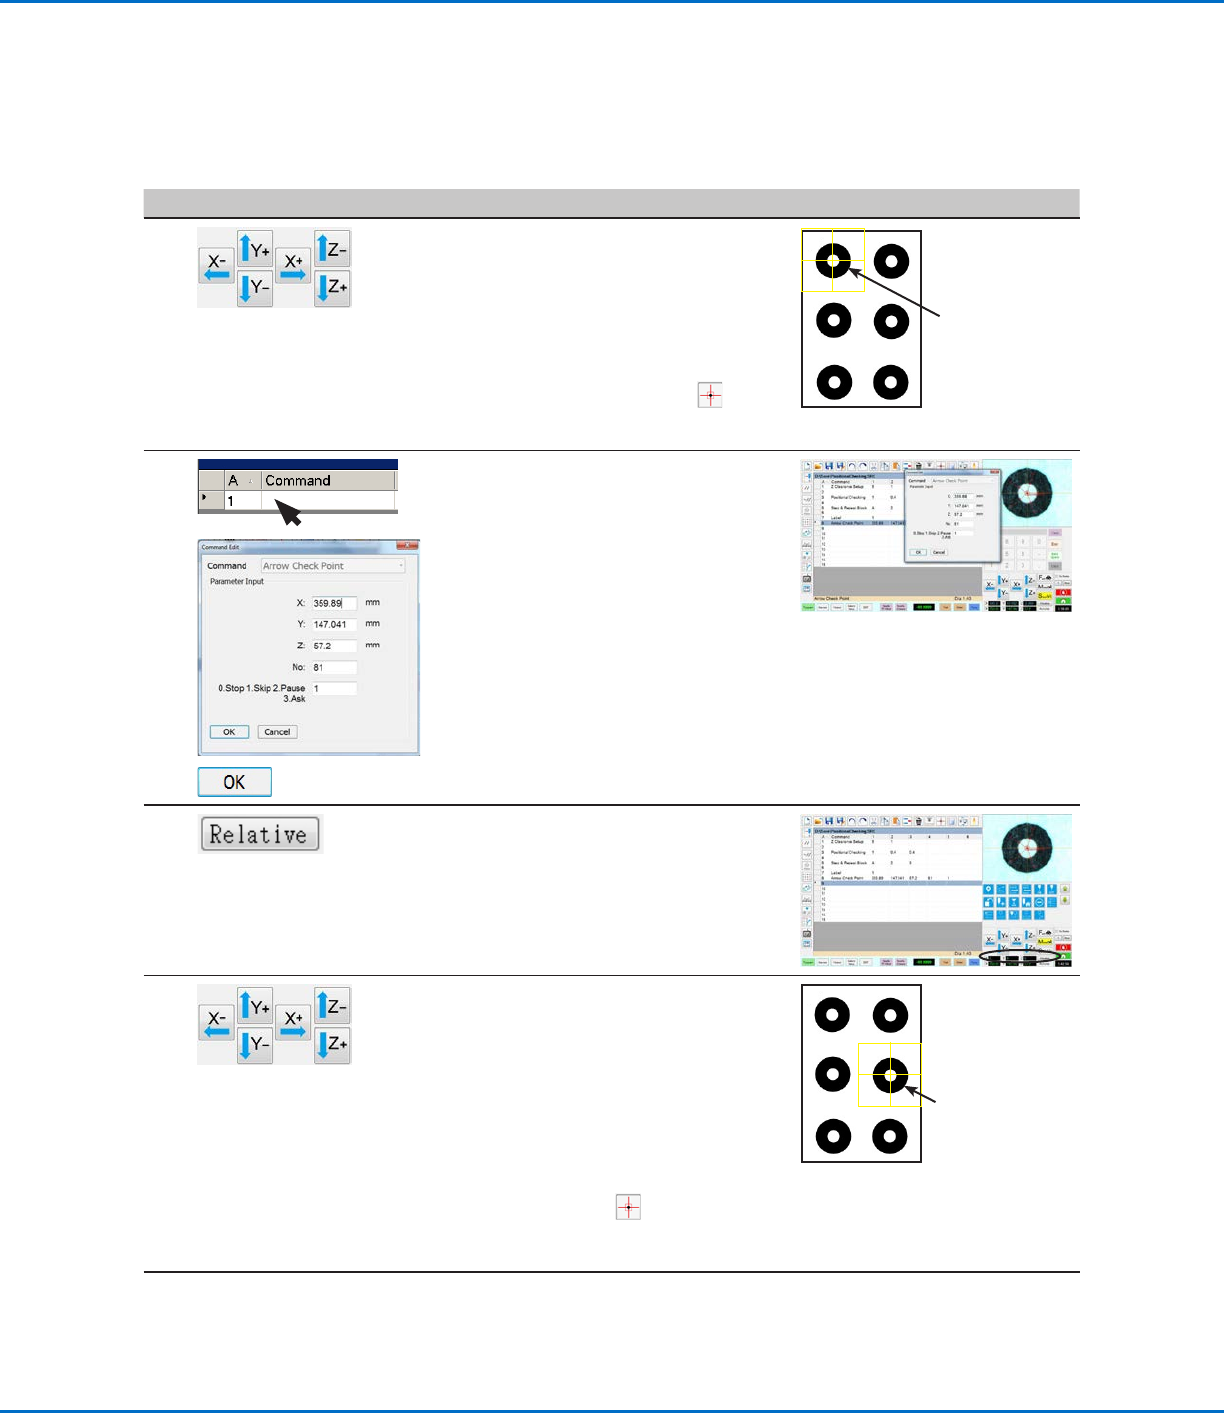
4
• Jog the camera to center it directly
over the top left dot.
NOTE: Because this dot is the one
used during setup, the camera
should already be at this location.
• Focus the camera.
Tip: Click the Match icon ( ) to
cause the camera to center over the
mark.
Center the
camera over
this dot.
5
>
>
• Insert an Arrow Check Point
command and enter the following:
- NO.: 81
NOTE: This is the number of the
Mark Image that was saved in the
Mark Library during the previous
procedure. Use the correct Mark
Image No. for your program.
- 0.STOP 1.SKIP 2.PAUSE 3.ASK:
1 (for Skip, so the system will
continue through the program
without stopping in order to
demonstrate this feature)
• Click OK.
6 • Click RELATIVE to set the
coordinates to 0, 0, 0.
7 • If you already know the X and Y
offsets of each dot (how far away
each dot is from another dot), then
skip this step.
• To determine the X and Y offsets of
each dot, jog the camera to center
it directly over the dot located in the
2nd row, 2nd column.
Tip: When at the second dot, click
the Match icon ( ) to center the
camera over the mark.
• Make a note of the offsets.
Center the
camera over
this dot.
Continued on next page
Using the Arrow Types (continued)
Positional Checking Example (continued)
To Use Positional Checking in a Program (continued)
OptiSure Automated Optical Inspection
34 www.nordsonefd.com info@nordsonefd.com +1-401-431-7000 Sales and service of Nordson EFD dispensing systems are available worldwide.
# Click Step Reference Image
8
>
>
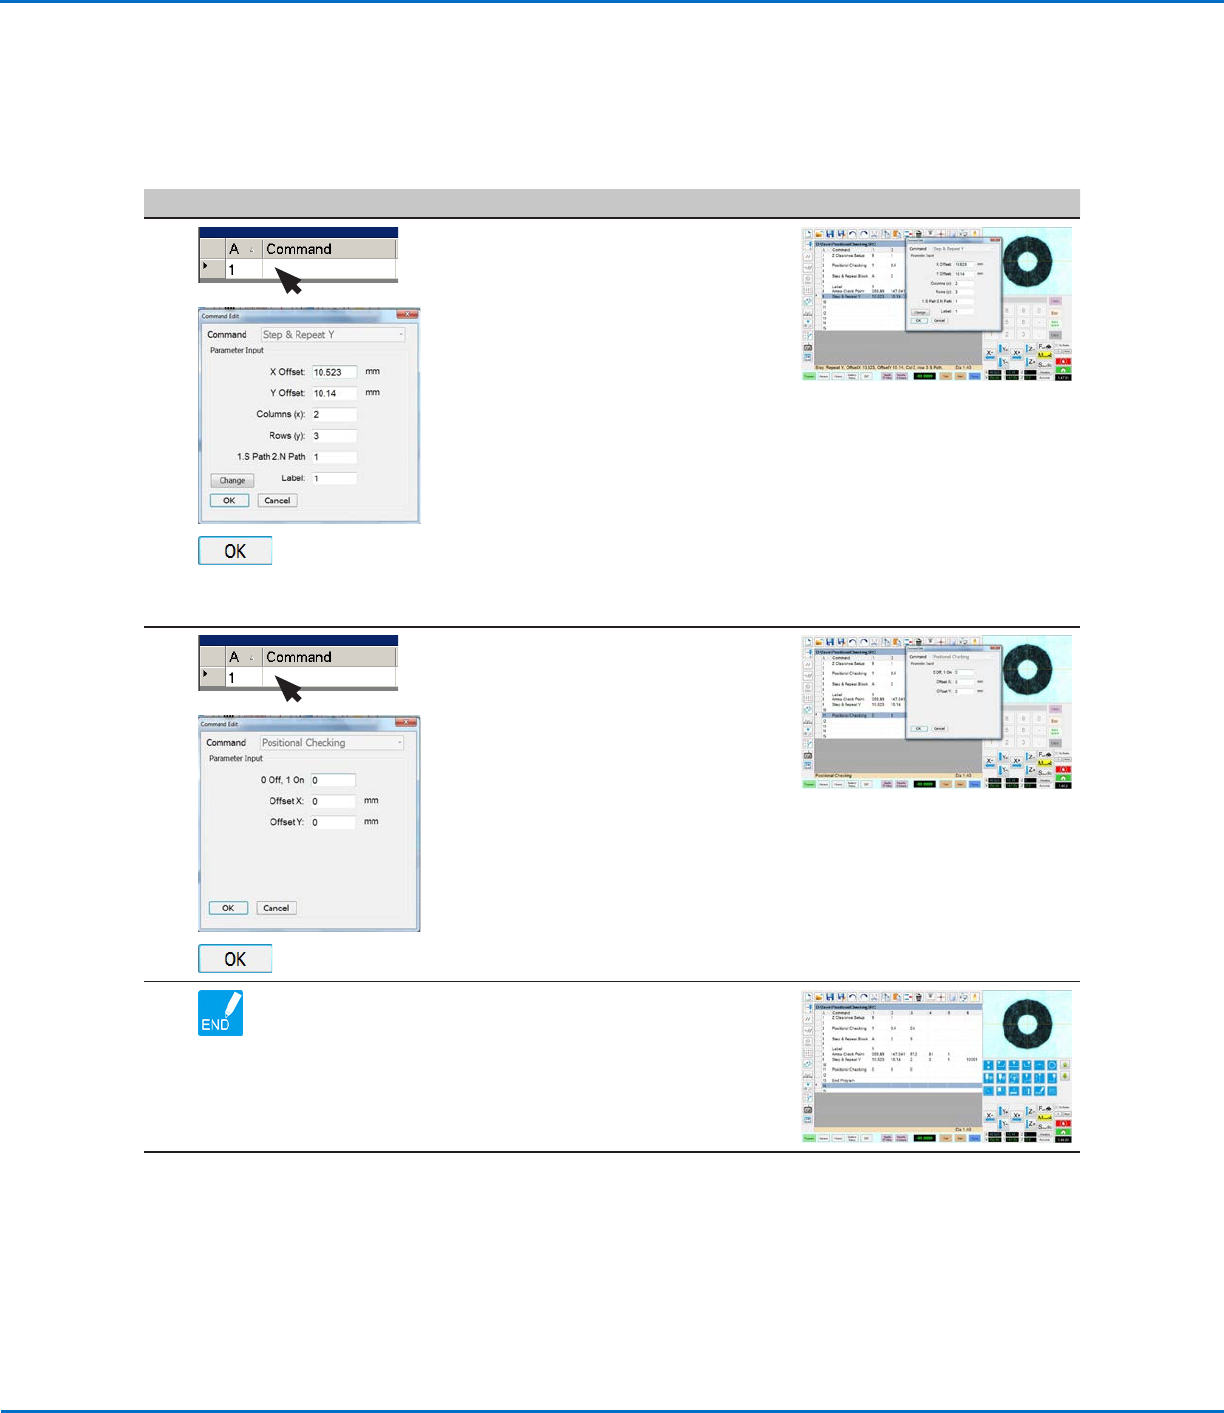
• Insert a Step & Repeat Y command
and enter the following:
- X OFFSET: Determined in step 7
on page33.
- Y OFFSET: Determined in step 7
on page33
- COLUMNS (x): 2
- ROWS (y): 3
- 1.S PATH 2.N PATH: 1
- LABEL: 1 (from step 3 on
page32)
NOTE: The Change button toggles
this parameter between Label and
Address.
• Click OK.
9
>
>
• Insert a Positional Checking
command and enter 0 to turn the
command OFF.
NOTE: Offset X and Offset Y can be
blank.
• Click OK.
10 • Insert an END PROGRAM command
to complete the program.
NOTE: The complete example
program is provided on page 36.
Continued on next page
Positional Checking Example (continued)
To Use Positional Checking in a Program (continued)
Using the Arrow Types (continued)