Nordson_EFD_OptiSure_Operating_Manual - 第6页
OptiSure Automated Optical Inspection 6 www.nordsonefd.com info@nordsonefd.com +1-401-431-7000 Sales and service of Nordson EFD dispensing systems are available worldwide. Enabling the OptiSur eAOI Featur e Two importan…
OptiSure Automated Optical Inspection
5www.nordsonefd.com info@nordsonefd.com +1-401-431-7000 Sales and service of Nordson EFD dispensing systems are available worldwide.
About OptiSureAOI
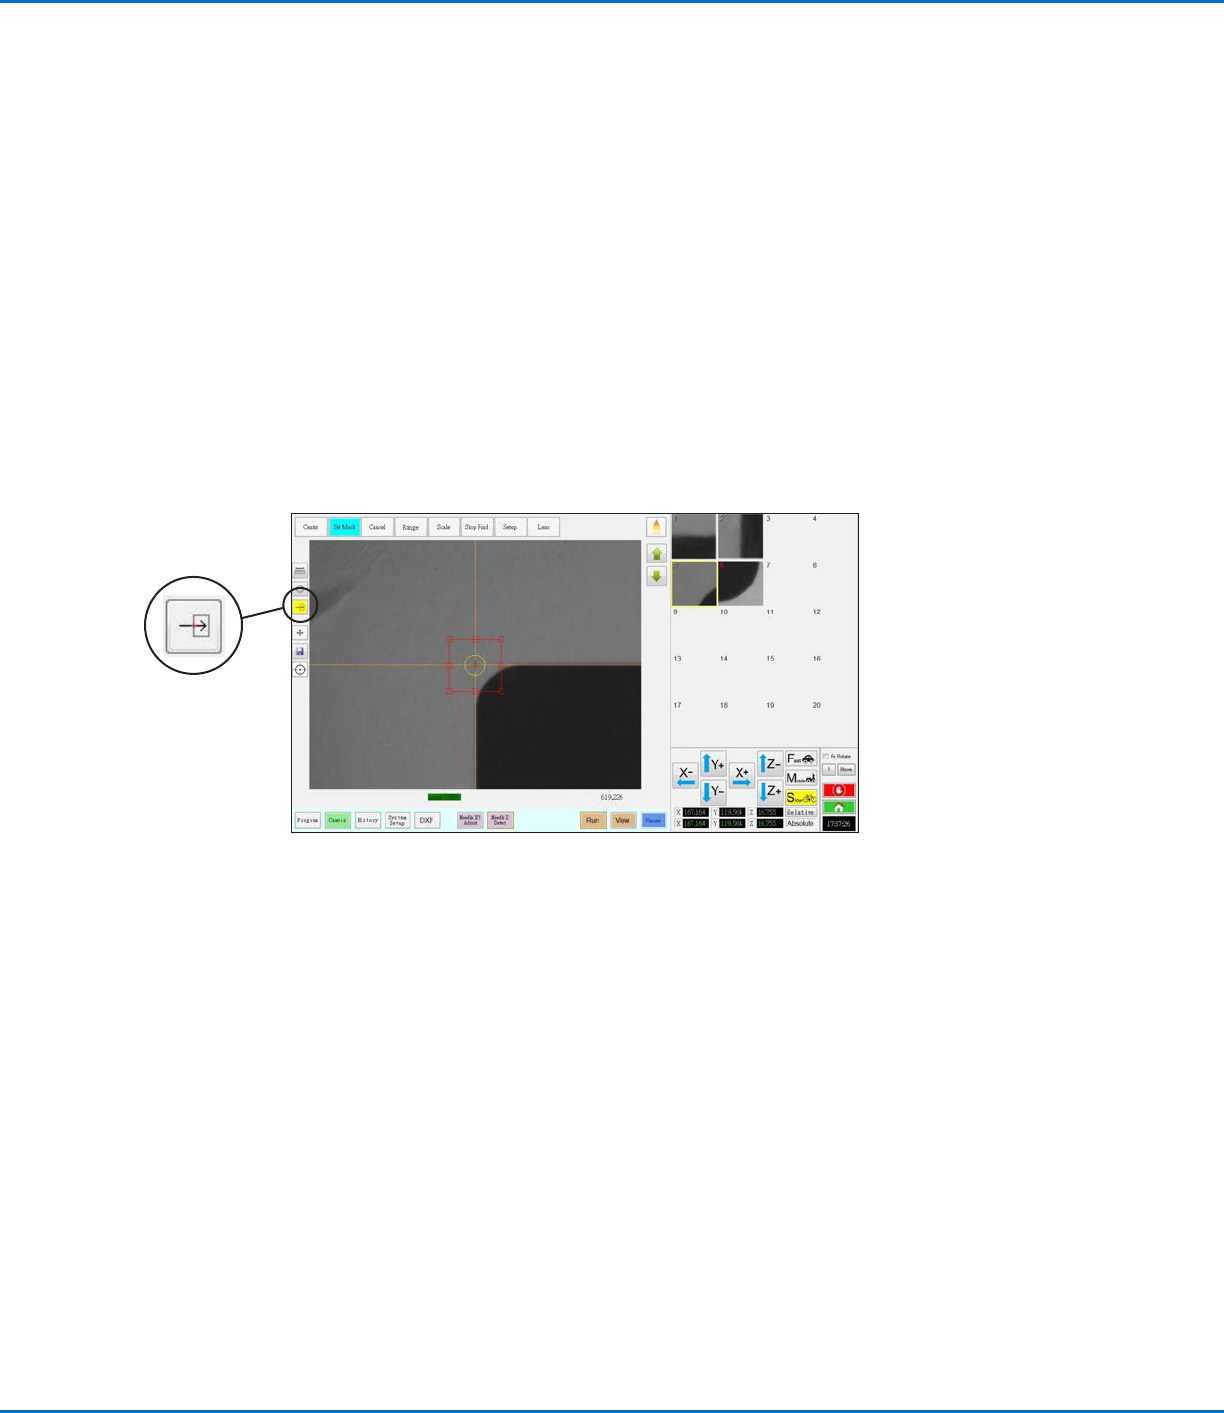
All OptiSureAOI functions are accessed by selecting the Arrow icon on the Camera screen and then by right-
clicking in the Primary View screen.
The OptiSureAOI feature includes the following capabilities:
• Optical two-dimensional (X and Y) inspection and verification of deposits to determine if the dispense
requirements are met; if they are not met, the system can automatically adjust the dispense program to correct
the inaccuracy. All vision-based automated dispensing systems can perform this verification.
• On systems with the optional confocal laser, optical three-dimensional (X, Y, and Z) inspection to determine
if the dispense requirements are met, including dispense volume; if they are not met, the system can
automatically adjust the dispense program to correct the inaccuracy.
• Advanced methods for making a mark easier for the system to find by adding details to it based on its
characteristics. These functions are similar to the Area function of the Template Match window, but are
specifically designed for workpiece surfaces that present unique challenges, such as multiple circles, unclear or
fuzzy elements, or even workpieces that have no distinguishing features.
Location of the Arrow icon on the Camera tab (turns yellow when selected)
OptiSure Automated Optical Inspection
6 www.nordsonefd.com info@nordsonefd.com +1-401-431-7000 Sales and service of Nordson EFD dispensing systems are available worldwide.
Enabling the OptiSureAOI Feature
Two important actions are required to use the full functionality of the OptiSureAOI add-on:
• An access code must be used to unlock the OptiSureAOI add-on. To obtain the access code, you must
provide the Dongle Serial No. to Nordson EFD as described in this section.
• For some OptiSureAOI features to function properly, a script file must be present on the DispenseMotion
controller. Obtain this script file from your Nordson representative.
NOTE: If you have not purchased the OptiSureAOI software key, refer to “OptiSureAOI Kit Part Numbers” on
page70 for the kit part numbers. Contact your Nordson EFD representative for assistance.
PREREQUISITES
The complete automated dispensing system is properly installed and set up in accordance with the respective
system’s operating manual.
You have purchased your OptiSureAOI kit(s).
You have obtained the main.bas file from your Nordson EFD representative.
If purchased, the optional confocal laser is installed in accordance with the installation instructions.
The DispenseMotion software is open.
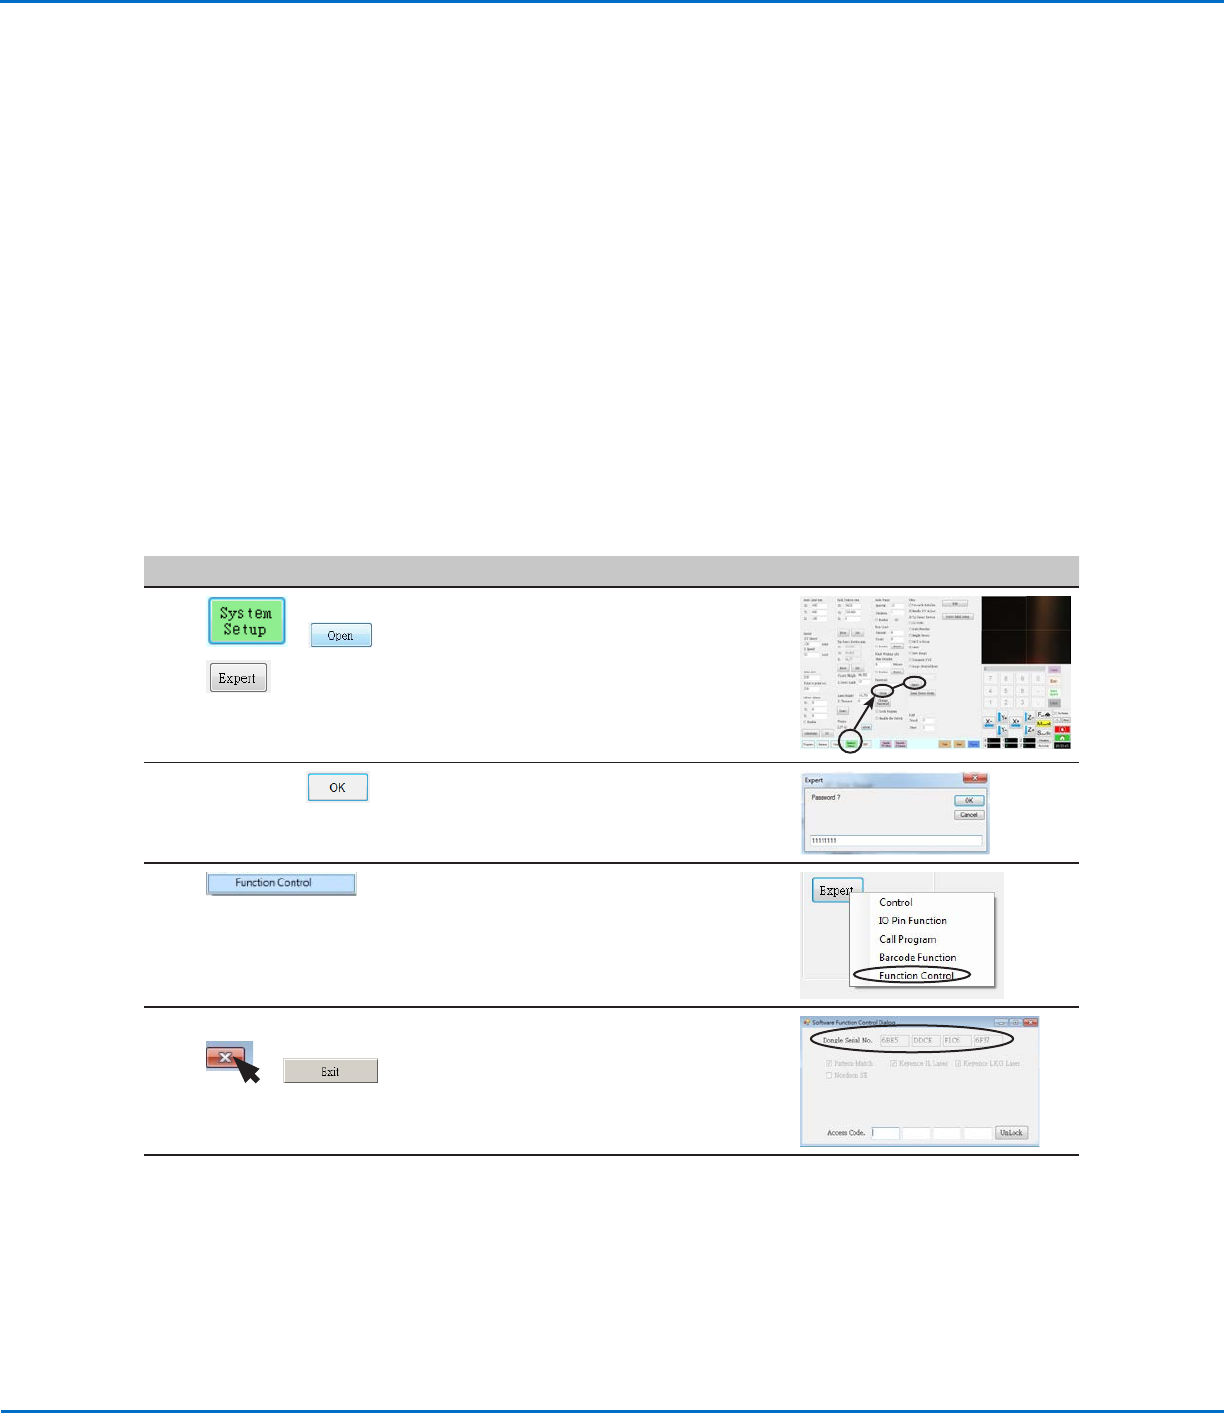
Obtain the Access Code
#
Click Step Reference Image
1
> >
• Click SYSTEM SETUP > OPEN > EXPERT.
2
11111111 >
• Enter 11111111, then click OK.
3 • Click FUNCTION CONTROL.
The Software Function Control Dialog
window opens.
4 xxxx xxxx xxxx xxxx >
>
• Make a note of the Dongle Serial No., or
obtain a screen capture of the number.
• Close the dialog box and click EXIT.
5 • Provide the Dongle Serial No. number to
your Nordson EFD representative.
Nordson EFD will provide an Access Code.
When you receive the code, continue to
“Enter the Access Code” on page7.
OptiSure Automated Optical Inspection
7www.nordsonefd.com info@nordsonefd.com +1-401-431-7000 Sales and service of Nordson EFD dispensing systems are available worldwide.
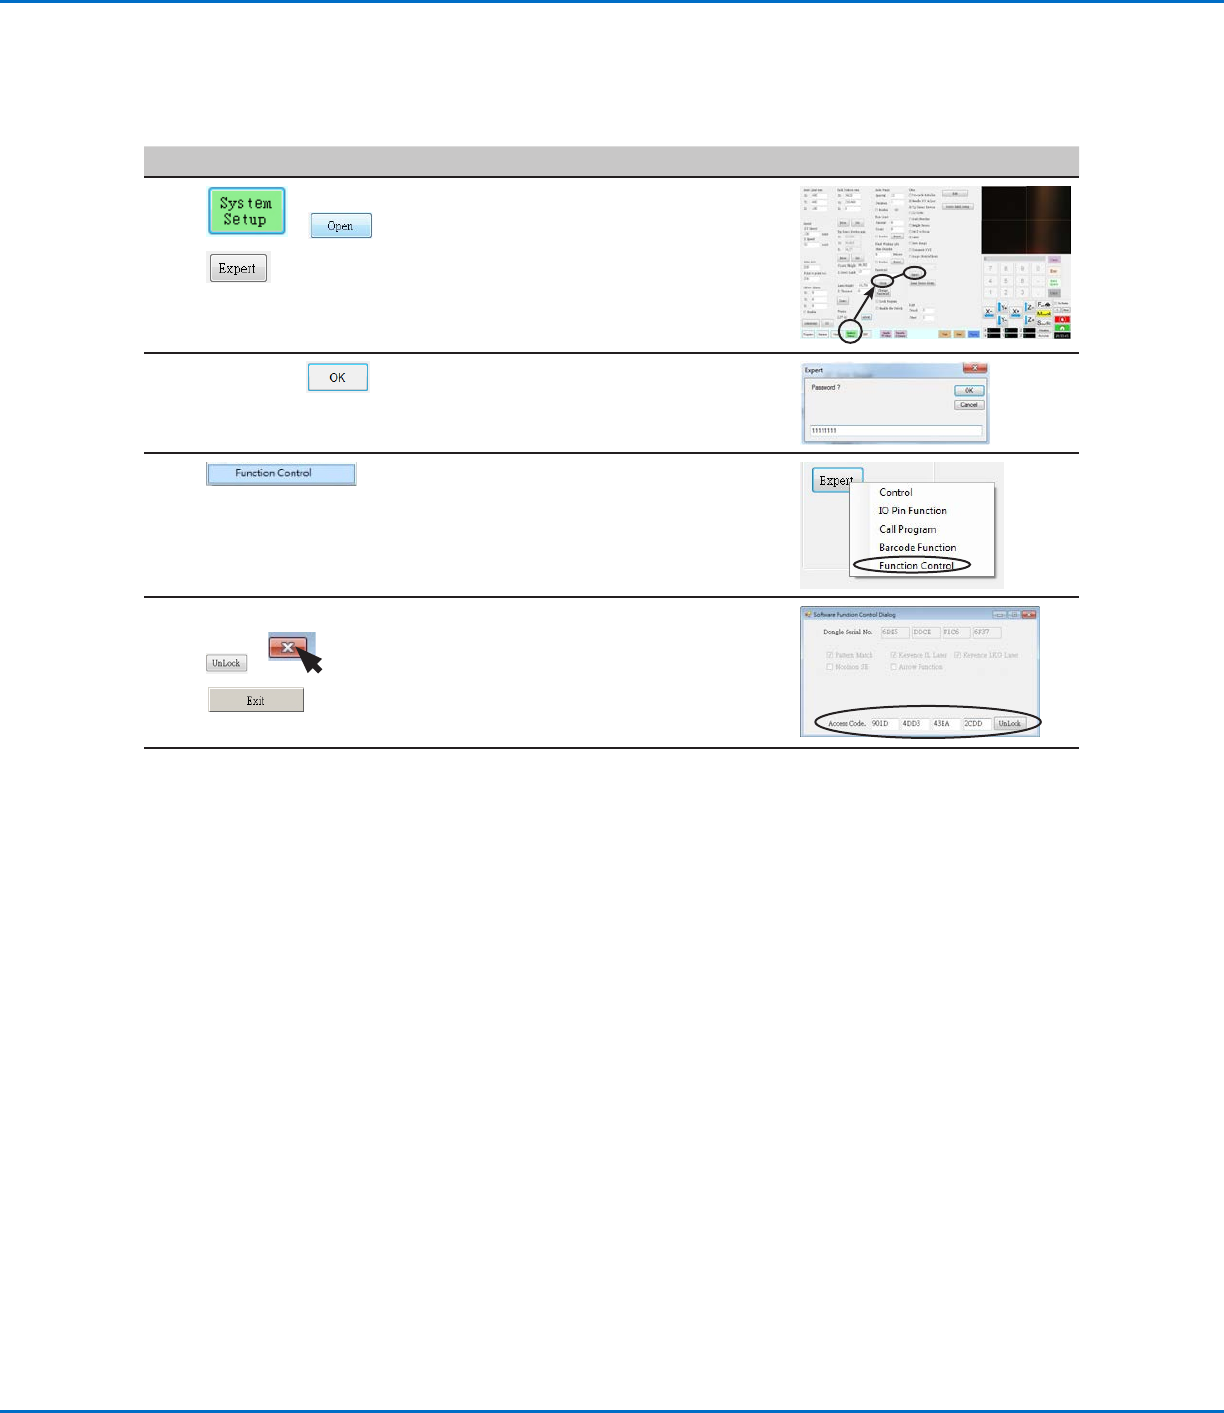
Enter the Access Code
#
Click Step Reference Image
1
> >
• Click SYSTEM SETUP > OPEN > EXPERT.
2
11111111 >
• Enter 11111111, then click OK.
3 • Click FUNCTION CONTROL.
The Software Function Control Dialog
window opens.
4 xxxx xxxx xxxx xxxx >
> >
• Enter the ACCESS CODE and click
UNLOCK.
• Close the dialog box and click EXIT.
5 • Continue to “Add the Script File to the
DispenseMotion Controller” on page8.
Enabling the OptiSureAOI Feature (continued)