00190585-04.pdf - 第50页
SIPLACE 80 F4/F5 1 Retrof itting Instructions for Coplanarity Option Edition 05/99 1.6 Mechanical and Electrical Installation 1 - 14 ● In stall the n ew copla narity sensor ( laser) on the new senso r brac ket ( three M4…

1 Retrofitting Instructions for Coplanarity Option SIPLACE 80 F4/(F4-6)/F5
1.6 Mechanical and Electrical Installation Edition 05/99
1 - 13
● Take down the right-hand component table (table 1 or 2) and disassemble the component table with the
assistance of a 2nd person, or:
If the configuration includes a component changeover table, ILUVWunplug the power connector and then
unplug the interface connector. Afterwards move the changeover table out of the machine.
● Keeping the above DANGER text in mind, dismantle the empty-tape duct and the cutter (old model) or the
“pneumatic cutter”:
Proceed exactly as described in the pertinent SIPLACE Service Manual, under “Exchanging the
Cutter.....".
-> Note in the case of the
pneumatic cutter: the retaining bracket remains mounted.
● If there is a plate cover on the flip-chip camera, remove it so that you can disconnect the cables.
● Disconnect the ribbon cable (illumination control) and the video lead from the flip-chip camera (see
Fig. 1.6.1).
● If present, run the old cable for the coplanarity option back into the machine base such that it is short-cir-
cuit proof. (
cable remains in the machine), so that it will not be in the way when running the new cables)
CAUTION O
Do not damage the cables on the control unit.
● Carefully dismantle the control unit.
1.6.3 Installing the Option
Precondition: The “Preparatory Steps” (Section 1.6.2) have been completely finished.
1.6.3.1 Running and Connecting "Sensor Cable Coplanarity",
Adapting Cable Run for Flip-Chip-Camera,
Installing the Coplanarity Sensor
CAUTION O
While assembling the sensor bracket, secure the IC camera´s ribbon cable to prevent it from getting
damaged.
● Run the "sensor cable coplanarity", Item No. 00336793-01 (see Fig. 1.5.2) from the sensor side,
through the hole in the sensor bracket (see Fig. 1.6.1 -> 2 und 6) -> continuing through the hole in the car-
rier for option for nozzle changer (-> 3 and 6) -> continuing further into the inside of the machine base (run-
ning with existing wiring harness) -> and continuing further to the back of the control unit.
● Thread the existing ribbon cable (illumination control) and the video cable through the large hole in the
Carrier for option for nozzle changers (see Fig. 1.6.1 -> 3 und 6) -> continuing from the inside out through
the hole in the side of the sensor bracket (see Fig. 1.6.1 -> 2 and 6) in the direction of the PCB output unit.

SIPLACE 80 F4/F5 1 Retrofitting Instructions for Coplanarity Option
Edition 05/99 1.6 Mechanical and Electrical Installation
1 - 14
● Install the new coplanarity sensor (laser) on the new sensor bracket (three M4 x 8 socket hex screws:
see Fig. 1.6.1 -> 8). ->
NOTE
Two cable clips must be used to attach the sensor cable to the sensor bracket on the side facing the
IC camera. This ensures that the cable will not be damaged due to the dust cover.
● Use the cable clips to fasten the sensor cable to the sensor bracket on the side facing the IC camera (see
Fig. 1.6.1 -> 9 and 10: two washers, two M4 x socket head cap screws).
● Afterwards, mount the sensor bracket on the optional carrier (four M6 x 20 screws, see Fig. 1.6.1 -> 4).
CAUTION O
In the case of SIPLACE machines with
dual conveyor (left-hand or right-hand conveyor side = stationary),
two distance washers 1 mm thick each must be placed between the optional carrier and the sensor
bracket per fastening screw (see Fig. 1.6.1 -> 5, Item No. see Section 1.4).
● Connect the existing video and the ribbon cable (= illumination control) back to the flip-chip camera.
● Re-install the cover for the flip-chip camera.
● All cables are in position and connected now.
● Using a bubble level and a metal square, level the coplanarity sensor on the left-hand perpendicular outer
edge of the sensor housing such that it is
exactly at a 90 degree angle to the IC head.
-> NEW: The screws for fastenting of the sensor ar not to
apply with Loctite !
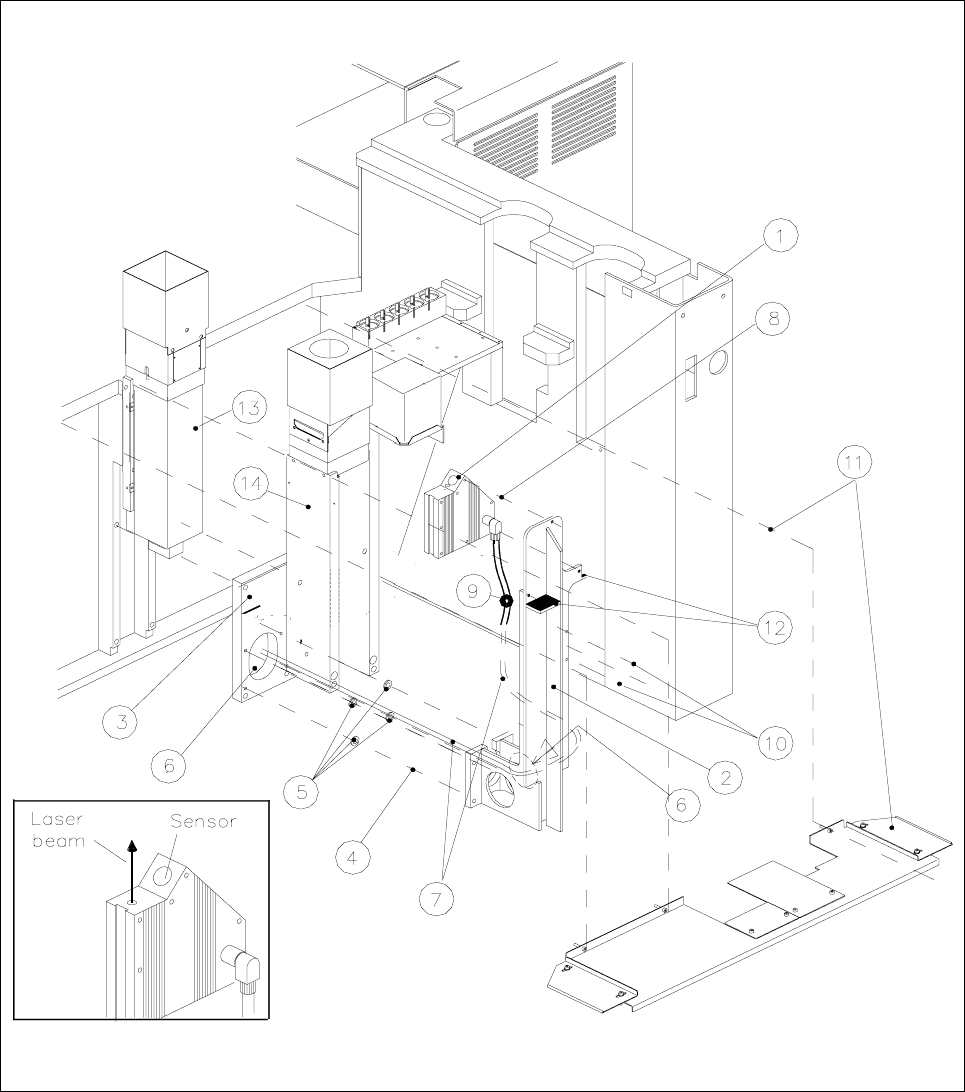
Key to Fig. 1.6.1 (figure to your right):
1) Coplanarity sensor (laser) 2) Sensor bracket
3) Optional carrier for nozzle changer / flip-chip camera 4) Fasteners for sensor bracket
/ coplanarity sensor (remains mounted) Four M 6 x 20 socket-head cap screw
5) 8 ea. distance washers 1 mm thick 6) Opening to run lines for coplanarity sensor
(two washers each of screw) and flip-chip camera
Only in case of dual conveyor,
inserted between bracket and optional carrier !
7) "Sensor cable coplanarity" 8) Fasteners for the sensor (laser)
three M 4 x
8 socket-head cap screws
9) 2 cable clips D = 6 mm 10) Fasteners for cable clips
two washers 4.3 DIN 125-A
two M 4 x 8 socket-head cap screws
11) Metal dust cover over the conveyor trench 12) Contact surfaces for dust cover
Item No. 00343700-01,
Fastening: 3 or 4 ea 4,3 DIN 9021 washers
3 or 4 ea M 4 x 10 socket-head cap screws
13) IC camera (remains mounted) 14) Flip-chip camera (remains mounted)
1 Retrofitting Instructions for Coplanarity Option SIPLACE 80 F4/(F4-6)/F5
1.6 Mechanical and Electrical Installation Edition 05/99
1 - 15
Fig. 1.6.1 Installation of the Coplanarity Sensor (Laser)