JM-10维修调整要领书.pdf - 第111页
维修调整要领书 12-15 5) BOOT 识别順序的设置 请用←→键选择“ Boot ”菜单画面,参照操作方法将“ Boot priori ty ”设置为下图所示的顺序。 。“ Boot ”菜单画面的操作方法 ( 1 ) 怎样变更“ Boot p riority ”内的順序 ① 用↑↓键将光标对准要移动的项目。 ② 可用 [ shift] + < + >< - >键使之上下移动。 ( 2 ) 怎样从“ Exc lud ed from …

维修调整要领书
12-14
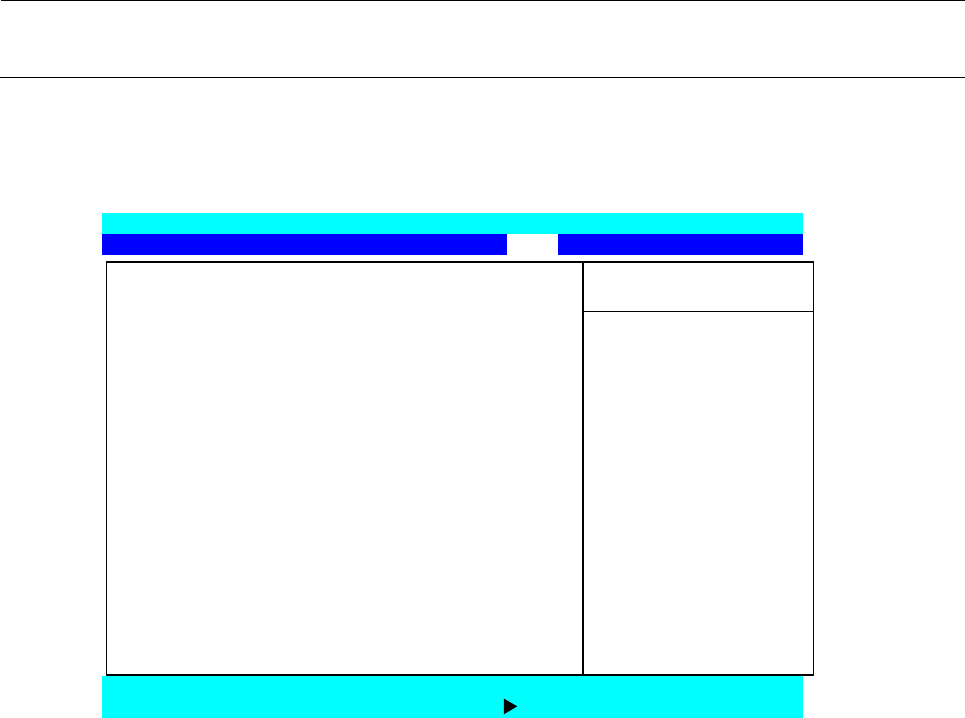
4) “PnP Configuration”的设置
出现如下所示的画面。在此进行 PCI IRQ 的设置。
按[shift] + <+><->键或<ENTER>键可改变设置。
。“PCI IRQ A:”的变更
请将光标对准“
PCI IRQ A
:”设置为“
5
”。
。“PCI IRQ B:”的变更
请将光标对准“
PCI IRQ B:
”设置为“
5
”。
。“PCI IRQ C:”的变更
请将光标对准“
PCI IRQ C:
”设置为“
5
”。
。“PCI IRQ D:”的变更
请将光标对准“
PCI IRQ D:
”设置为“
5
”。
。“PCI IRQ E:”的变更
请将光标对准“
PCI IRQ E:
”设置为“
11
”。
。“PCI IRQ F:”的变更
请将光标对准“
PCI IRQ F:
”设置为“
10
”。
。“PCI IRQ G:”的变更
请将光标对准“
PCI IRQ G:
”设置为“
9
”。
。“PCI IRQ H:”的变更
请将光标对准“
PCI IRQ H:
”设置为“
5
”。
设置结束后,请按<ESC>键,返回到可以选择 Main 画面。
Phoenix TrustedCore (tm) Setup Utility
Advanced
PnP Configuration Item Specific Help
Option ROM Scan: [Enabled] Initialize device
Latency Timer: [Default] expansion ROM
(PMC only)
PCI IRQ A: [5]
PCI IRQ B: [5]
PCI IRQ C: [5]
PCI IRQ D: [5]
PCI IRQ E: [11]
PCI IRQ F: [10]
PCI IRQ G: [9]
PCI IRQ H: [5]
F1 Help ↑↓Select Item -/+ Change Values F9 Setup Defaults
Esc Exit Select Menu Enter Select Sub-Menu F10 Save and Exit
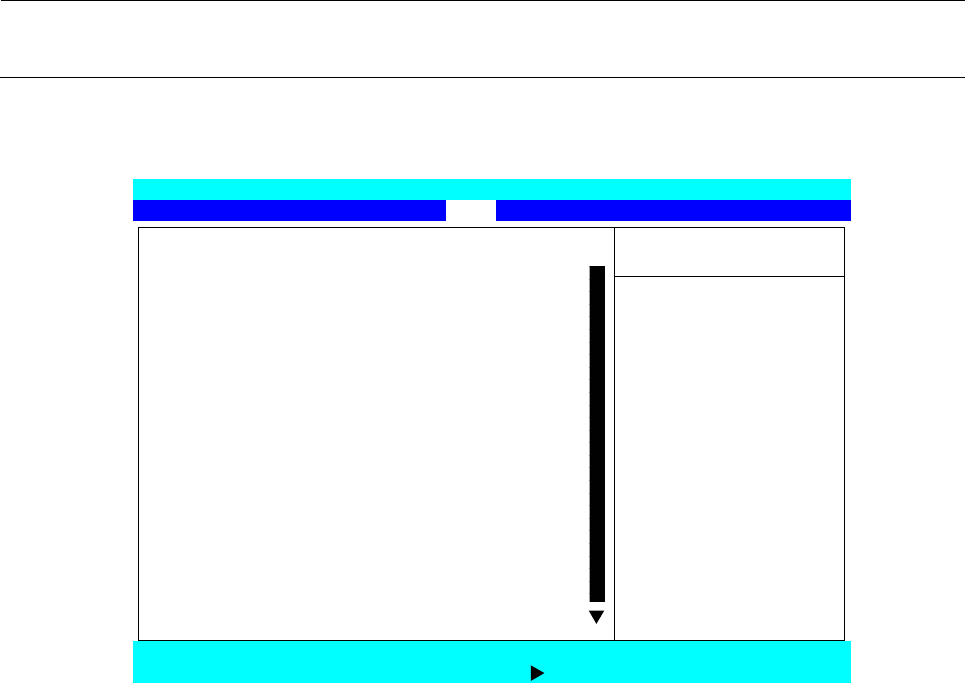
维修调整要领书
12-15
5) BOOT 识别順序的设置
请用←→键选择“Boot”菜单画面,参照操作方法将“Boot priority”设置为下图所示的顺序。
。“Boot”菜单画面的操作方法
(1) 怎样变更“Boot priority”内的順序
① 用↑↓键将光标对准要移动的项目。
② 可用[shift] + <+><->键使之上下移动。
(2) 怎样从“Excluded from boot order:”移动到“Boot priority”
① 用↑↓键将光标对准要移动的项目。
② 可用<X>键移动到“Boot priority”。
※ 从“Boot priority”移动到“Excluded from boot order:”的操作方法也相同。
Phoenix TrustedCore (tm) Setup Utility
Main Advanced Security Boot Exit
Item Specific Help
Boot priority
1: USB FDC:
2: USB CDROM: Keys used to view or
3: IDE CD: configure devices:
4: UDE HDD: MS9732FMD040AY-(PM) Un and Down arrows
5: PCI SCSI: select a device.
6: USB KEY: <+> and <-> moves
7: the device up or down.
8: <f> and <r> specifies
Excluded from boot order: the device fixed or
: Legacy Floppy Drives removable.
: USB HDD: <x> exclude or include
: USB ZIP: the device to boot.
: USB LS120: <Shift + 1> enables or
: PCI BEV: disables a device.
: Other USB: <1-4> Loads default
: PCI boot sequence.
F1 Help ↑↓Select Item -/+ Change Values F9 Setup Defaults
Esc Exit
Select Menu Enter Select Sub-Menu F10
Save and Exit
维修调整要领书
12-16
6) BIOS 设置的结束
请用←→键选择“Exit”菜单画面,用↑↓键将光标对准“Exit Saving Changes”并按<ENTER>
键,保存 BIOS 设置后结束。
Phoenix TrustedCore (tm) Setup Utility
Main Advanced Security Boot Exit
Item Specific Help
Exit Saving Changes
Exit Discarding Changes
Load Setup Defaults Exit System Setup and
Discard Changes save your change to
Save Changes CMOS.
F1 Help ↑↓Select Item -/+ Change Values F9 Setup Defaults
Esc Exit Select Menu
Enter Select Sub
-Menu F10 Save and Exit