2OM-1751-003w_G5S.pdf - 第310页
2OM-1751 6-38 [ ] Button : Image Fitting Mode (the image is displayed fully using the recognition image display domain). After changing to the image tting mode using the [ ] button (the shape of the pointer is changed t…

2OM-1751
6-37
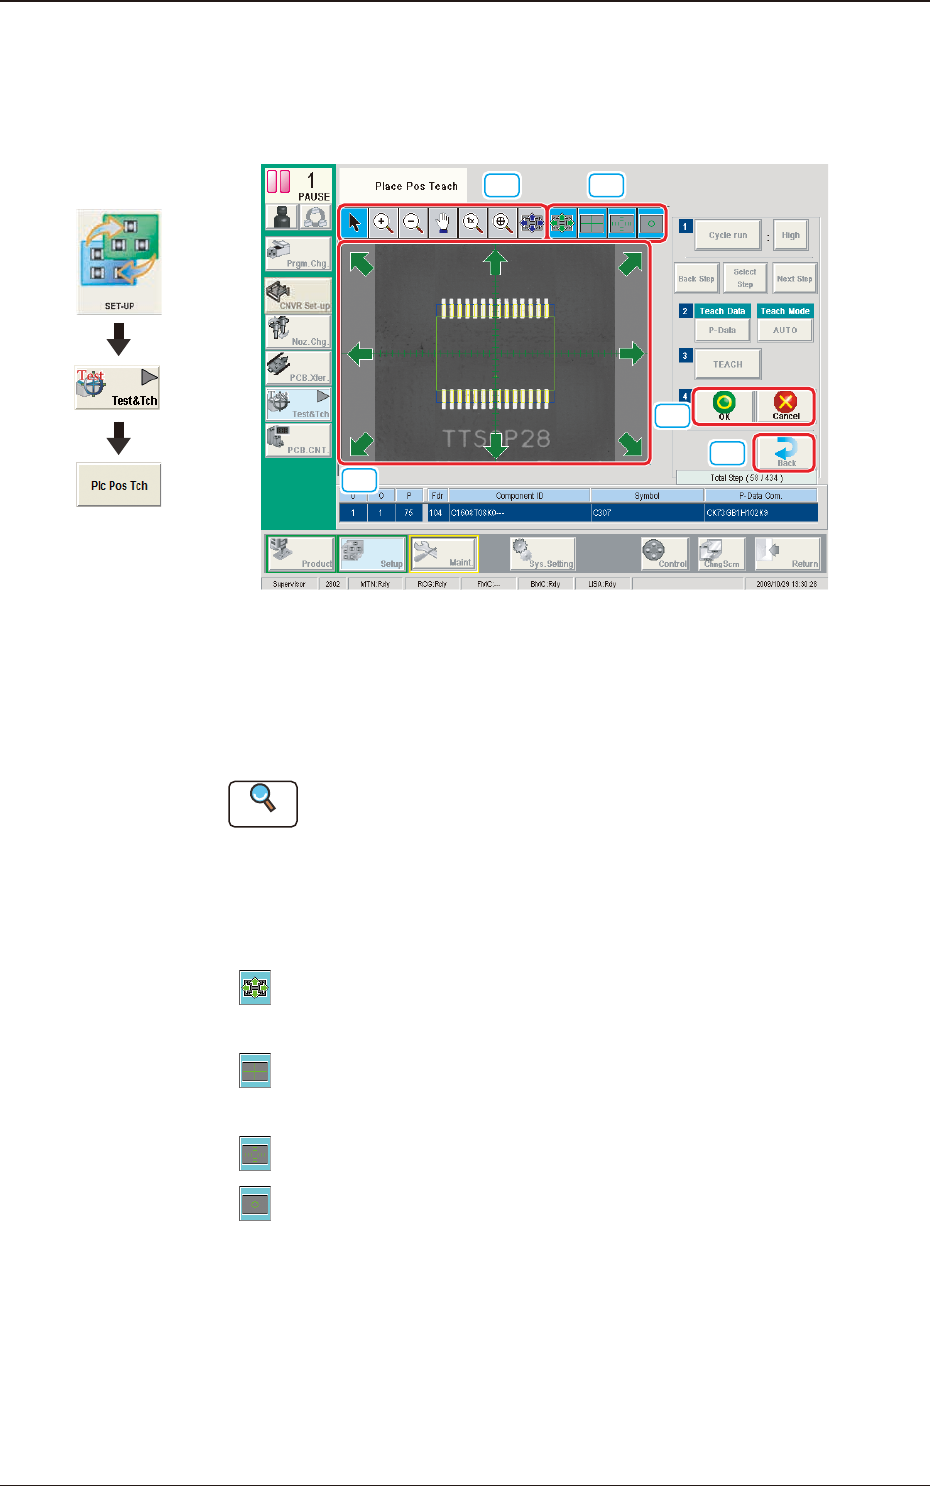
[3] Image Operation Buttons
When the machine is in the "STOP" mode, the following buttons can be used
to enlarge or move the image in the recognized image display area.
[
] Button
: Normal Operation Mode
[
] Button
: Image Movement Mode
After changing to the image movement mode using the
[
] button (the shape of the pointer is changed to
mark), drag the image to be moved (with the left button on
the mouse pressed) to move.
[
] button
: Image Enlargement Mode
After changing to the image enlargement mode using the
[
] button (the shape of the pointer is changed to ),
when the image to be enlarged is touched, or the left button
of the mouse is clicked on the image, the image is enlarged
from the pointer position as the center.
When the image is to be enlarged with its position xed,
place the pointer on the center of the image before the
enlargement operation.
[
] Button
: Image Reduction Mode
After changing to the image reduction mode using the
[
] button (the shape of the pointer is changed to )
when the image to be reduced is touched, or the left button
of the mouse is clicked on the image, the image is reduced
from the pointer position as the center.
When the image is to be reduced with its position xed,
place the pointer on the center of the image before the
reduction operation.
[
] Button
: Image Real-Size Display Mode (Captured image is
displayed in real-size).
After changing to the image real-size display mode using
the [
] button (the shape of the pointer is changed to
), when the image to be displayed in real-size is
touched, or the left button of the mouse is clicked on the
image, the image is displayed in real-size from the pointer
position as the center.
When the image is to be displayed in real-size with its
position xed, place the pointer on the center of the image
before the image real-size display operation.
1303-001
7.2 "Place Pos Teach" Window

2OM-1751
6-38
[
] Button
: Image Fitting Mode (the image is displayed fully using the
recognition image display domain).
After changing to the image tting mode using the
[
] button (the shape of the pointer is changed to
), when the image to be t is touched, or the left button
of the mouse is clicked on the image, the image is displayed
fully using the recognition image display domain, from the
pointer position as the center.
When the image is to be displayed in the image tting mode
with its position xed, place the pointer on the center of the
image before the image tting operation.
[
] Button
: Using this button, the image displayed in the display area
in the recognition window can be moved to the desired
position.
1303-001
7.2 "Place Pos Teach" Window
2OM-1751
6-39
7.2.2 "Recognition" Window in Manual Alignment Mode
When any of the [Cycle run] button, [Select Step] button or [TEACH] button is
pressed, the following window appears.
[1] [2]
[3]
[4]
[5]
F2F39
[1] Image Operation Buttons
The following buttons can be used to change the mode that enlarges or
moves the image in the recognized image display area.
Reference
Refer to "[3] Image Operation Buttons" in "4.2 "Recognition" Window for
Placement Position Teaching " for the description of each button.
[2] Graphics Selection Buttons
Use these button to select the types of a graphic to be displayed for the
manual alignment operation. (Multiple Selection Acceptable)
[
] Button
: This button is used when the displayed image position is
aligned with the graphic image position.
[
] Button
: When seleced, this button displays a crosshaire that indicates
the center of the camera.
[
] Button
: When selected, this button displays the scale lines.
[
] Button
: When selected, this button displays the outline of the object
mark for the manual alignment.
Graphic
Development
1303-001
7.2 "Place Pos Teach" Window