F5 SERVICE MAUNAL.pdf - 第454页
13 6-Segment Revolver Head (8000) SIPLACE 80S-20/F4 Service Manual 13.9 6x Nozzle Cha nger Edition 07/97 13 - 40 5HSODFLQ JWKH : D\ 9 DOY H 6SDUHS DUWV – 5/2-way valve with base p late a nd cable, item n…
SIPLACE 80S-20/F4 Service Manual 13 6-Segment Revolver Head (8000)
Edition 07/97 13.9 6x Nozzle Changer
13 - 39
6WHSVIRU,QVWDOOLQJWKH1R]]OH&KDQJHU&RQWURO%RDUG
● Introduce the control board into the nozzle changer from the reject station side.
● Screw down the board using the 4 M3x8 screws.
● Fit the connecting cable between the 5/2-way valve and plug X2 on the control board.
● Install the nozzle changer in the machine as described in section 13.9.2.
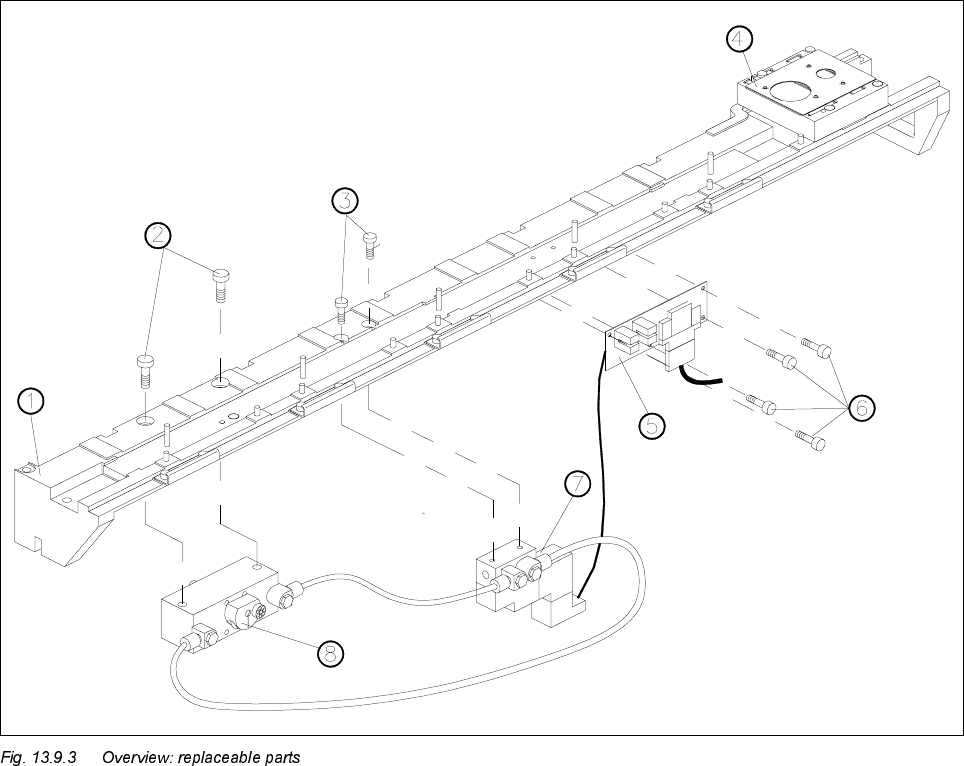
.H\WR)LJ
1Base
2 Encoder fixing screws
3 5/2-way valve fixing screws
4 Reject station
5 Nozzle changer control board
6 Control board fixing screws
75/2-way valve
8 Rotary drive
13 6-Segment Revolver Head (8000) SIPLACE 80S-20/F4 Service Manual
13.9 6x Nozzle Changer Edition 07/97
13 - 40
5HSODFLQJWKH:D\9DOYH
6SDUHSDUWV
– 5/2-way valve with base plate and cable, item no. 00317578-02
7RROV
– Hexagon socket-head spanners, size 3
6WHSVIRU5HPRYLQJWKH:D\9DOYH
● Remove the nozzle changer from the machine as described in section 13.9.1.
● Remove the connecting cable between the 5/2-way valve and plug X2 on the control board.
● Loosen the screws connecting the compressed air lines to the cylinder (see Fig. 13.9.3, item 7).
● Remove the compressed air hoses from the 5/2-way valve to the cylinder. When you do this, mark which
hose is assigned to which connection.
● Remove the middle magazine of the seven magazines as described in section 13.9.3.1.
● Loosen the 2 M4x16 screws (see Fig. 13.9.3, item 3).
● Remove the 5/2-way valve.
6WHSVIRU,QVWDOOLQJWKH:D\9DOYH
● Insert the 5/2-way valve in the nozzle changer.
● Fix the 5/2-way valve using the 2 M4x16 screws (see Fig. 13.9.3, item 3).
● Connect the compressed air hoses to the cylinder at the associated connections on the 5/2-way valve.
● Tighten the screws of the compressed air connections.
● Fit the connecting cable between the 5/2-way valve and plug X2 on the control board.
● Install the magazines you removed as described in section 13.9.3.2.
● Install the nozzle changer in the machine as described in section 13.9.2.
SIPLACE 80S-20/F4 Service Manual 13 6-Segment Revolver Head (8000)
Edition 07/97 13.9 6x Nozzle Changer
13 - 41
13.9.7 Replacing the Rotary Drive
6SDUHSDUWV
– Rotary drive, complete, from item no. 00333110-01
7RROV
– Hexagon socket-head spanners, size 3
6WHSVIRU5HPRYLQJWKH5RWDU\'ULYH
● Remove the nozzle changer from the machine as described in section 13.9.1.
● Remove the first two left-hand magazines as described in section 13.9.3.1.
● Loosen the screws on the 5/2-way valve connecting the compressed air lines to the rotary drive (see Fig.
13.9.3, item 7).
● Remove the compressed air hoses connecting the rotary drive to the 5/2-way valve. When you do this,
mark which hose is assigned to which connection.
● Loosen the 2 M4x16 fixing screws on the rotary drive (see Fig. 13.9.3, item 2).
● Remove the rotary drive.
6WHSVIRULQVWDOOLQJWKHF\OLQGHU
● Insert the rotary drive. Make sure that the drive head is positioned in the locator of the sliding plate.
● Using the 2 M4x16 screws, screw the rotary drive to the body of the nozzle changer (see Fig. 13.9.3, item
2).
● Connect the compressed air hoses to the rotary drive at the associated connections on the 5/2-way valve
(see Fig. 13.9.3, item 7).
● Tighten the screws of the compressed air connections.
● Reinstall the magazine you removed as described in section 13.9.3.2.
● Install the nozzle changer in the machine as described in section 13.9.2.
❒