YSI_Prog_E - 第56页
1-21 1 asic operation Item/button name Applicable model Description 1 Zoom YSi-X YSi-12 YSi-S + : Enlarges the image. - : Reduces the enlarged image. The image can also be enlarged and reduced by rotating the mouse whe…
1-20
1
asic operation
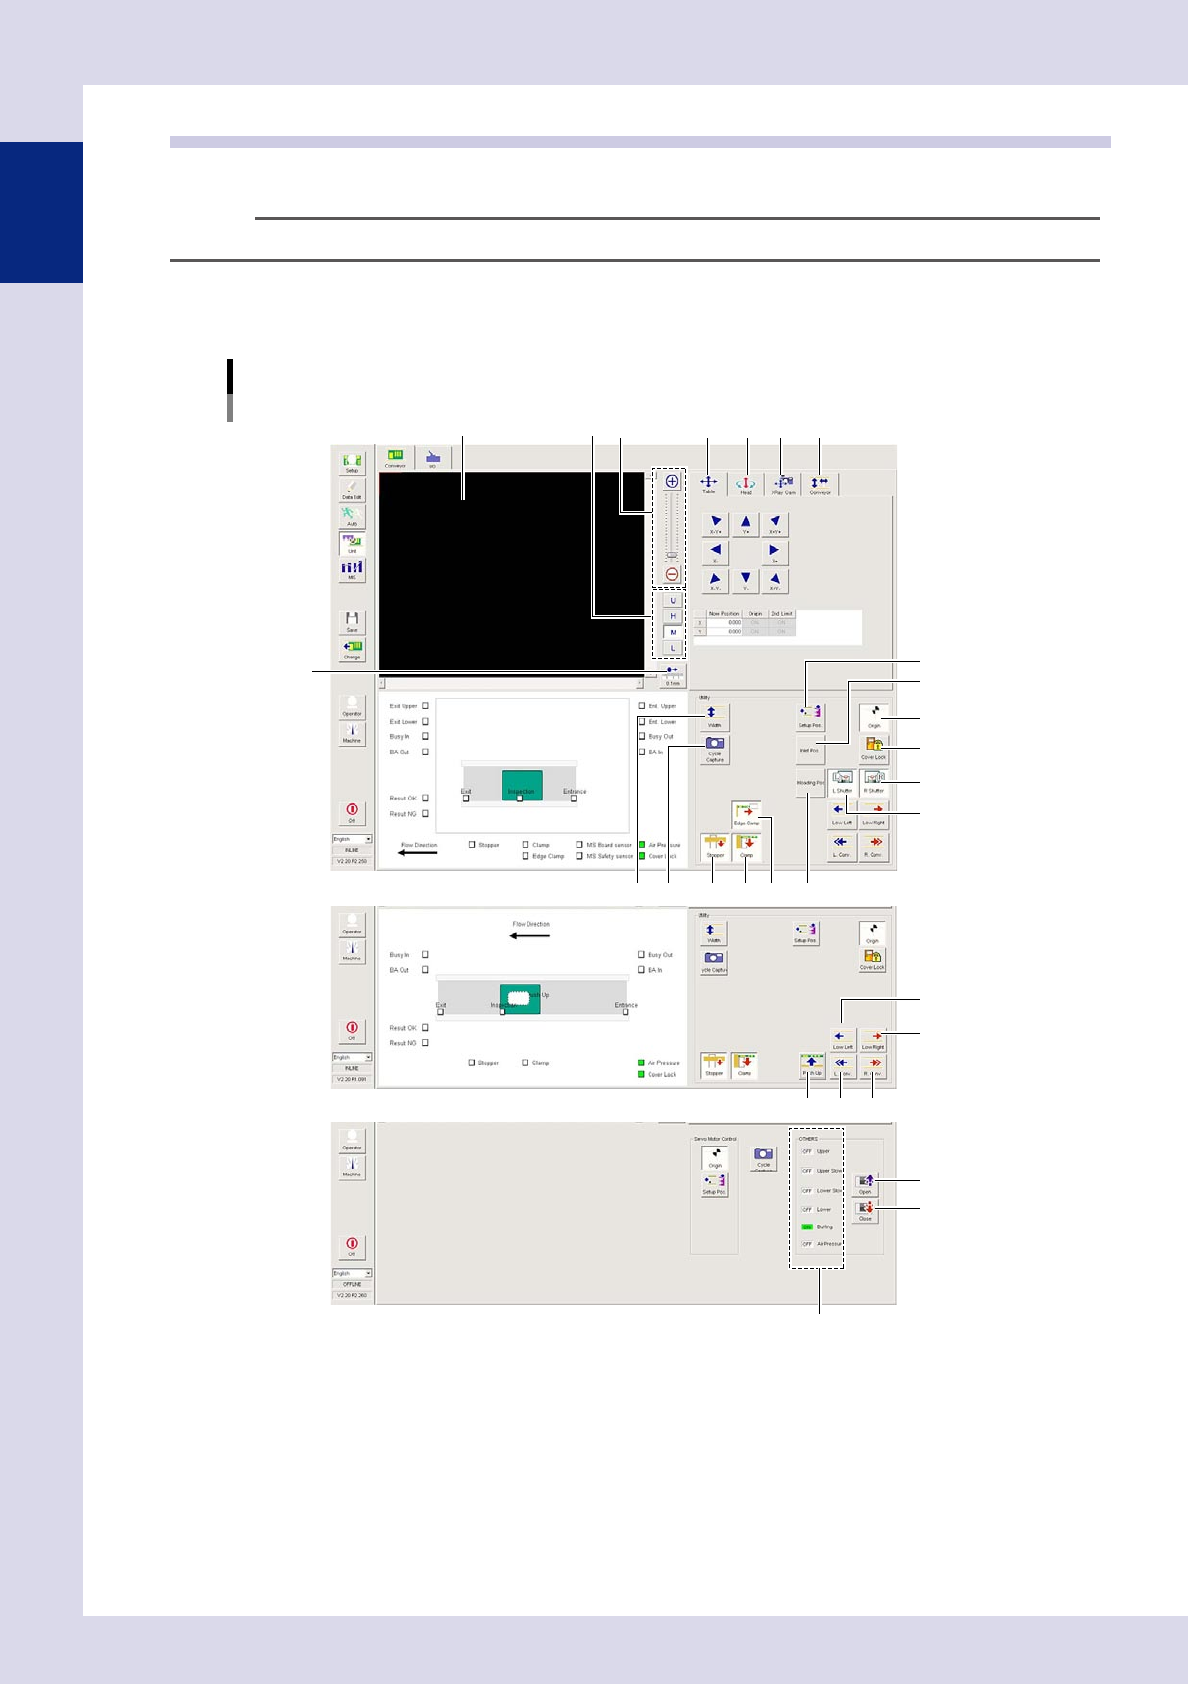
1.6 Unit (manual operation) screen
This section describes manual operation buttons on the "Unit" screen.
n
NOTE
The "Unit (manual operation)" screen does not work with the optional YSi-OS offline software. Basic operation
1.6.1 "Conveyor" screen
This screen allows you to operate the conveyor unit and so on.
[Unit] – [Conveyor] screen
1 4
3
5 6 7
13
14
15
16
19
17
18
10 11 12
20
2
8 9
24 22 23
21
25
26
27
YSi-X
Display area
YSi-12
YSi-S
24121-P6-00

1-21
1
asic operation
Item/button
name
Applicable model Description
1 Zoom YSi-X YSi-12 YSi-S
+ : Enlarges the image.
- : Reduces the enlarged image.
The image can also be enlarged and reduced by rotating the mouse wheel.
2 Change lighting YSi-X YSi-12 YSi-S
Changes the mark image lighting.
(U, H, M, L)
3 0.1mm YSi-X YSi-12 YSi-S
Pressing the button each time changes the camera movement pitch when
the scroll bar arrow is pressed. (0.01 mm, 0.100 mm, 0.500 mm, 5.000 mm)
4 Table YSi-X YSi-12 YSi-S
The image position can be moved using the arrows, or by entering values
directly in the "Now Position" fields.
YSi-X : The table moves.
YSi-12 : The camera moves.
YSi-S : The camera and table move.
5 Head YSi-X – –
The X-ray source and optical camera can be moved using the arrows, or by
entering values directly in the "Now Position" fields.
HZ button : Moves the X-ray source up and down.
HS button : Moves the optical camera left and right.
6 XRay Cam YSi-X – –
The X-ray detector can be moved using the arrows, or by entering values
directly in the "Now Position" fields.
7 Conveyor YSi-X YSi-12 –
Press the [W] button to turn the conveyor brake ON and OFF.
YSi-X : Press the [W+] button and [W-] button to move the conveyor
position.
Press the [MS+] button and [MS-] button to move the stopper
position.
YSi-12 : Press the [W+] button to widen the conveyor width.
Press the [W-] button to narrow the conveyor width.
8 Width YSi-X YSi-12 – Displays the conveyor width change screen.
9 Cycle Capture YSi-X YSi-12 YSi-S Displays the upper left display area for continuous capture.
10 Stopper YSi-X YSi-12 – Opens and closes the board stopper.
11 Edge Clamp YSi-X YSi-12 – Opens and closes the board clamp.
12 Clamp YSi-X – – Opens and closes the edge clamp.
13 Setup Pos. YSi-X YSi-12 YSi-S The conveyor moves to the setup position.
14 Inlet Pos. YSi-X – – The conveyor moves to the loading position.
15 Inloading Pos. YSi-X – – The conveyor moves to the unloading position.
16 Origin YSi-X YSi-12 YSi-S The head, conveyor, and laser unit move to their respective origin positions.
17 Cover Lock YSi-X YSi-12 – Opens and closes the safety cover lock.
18 L Shutter YSi-X – – Opens and closes the right side shutter.
19 R Shutter YSi-X – – Opens and closes the left side shutter.
20 Low Left YSi-X YSi-12 –
Rotates the conveyor to the left at low speed.
Press the button once more to stop.
21 Low Right YSi-X YSi-12 –
Rotates the conveyor to the right at low speed.
Press the button once more to stop.
22 L.Conv. YSi-X YSi-12 –
Rotates the conveyor to the left.
Press the button once more to stop.
23 R.Conv. YSi-X YSi-12 –
Rotates the conveyor to the right.
Press the button once more to stop.
24 Push Up – YSi-12 – Raises and lowers the push up plate.
25 Open – – YSi-S Opens the motorized cover.
26 Close – – YSi-S Closes the motorized cover.
27 OTHERS – – YSi-S Displays the current status of each parts.
1-22
1
asic operation
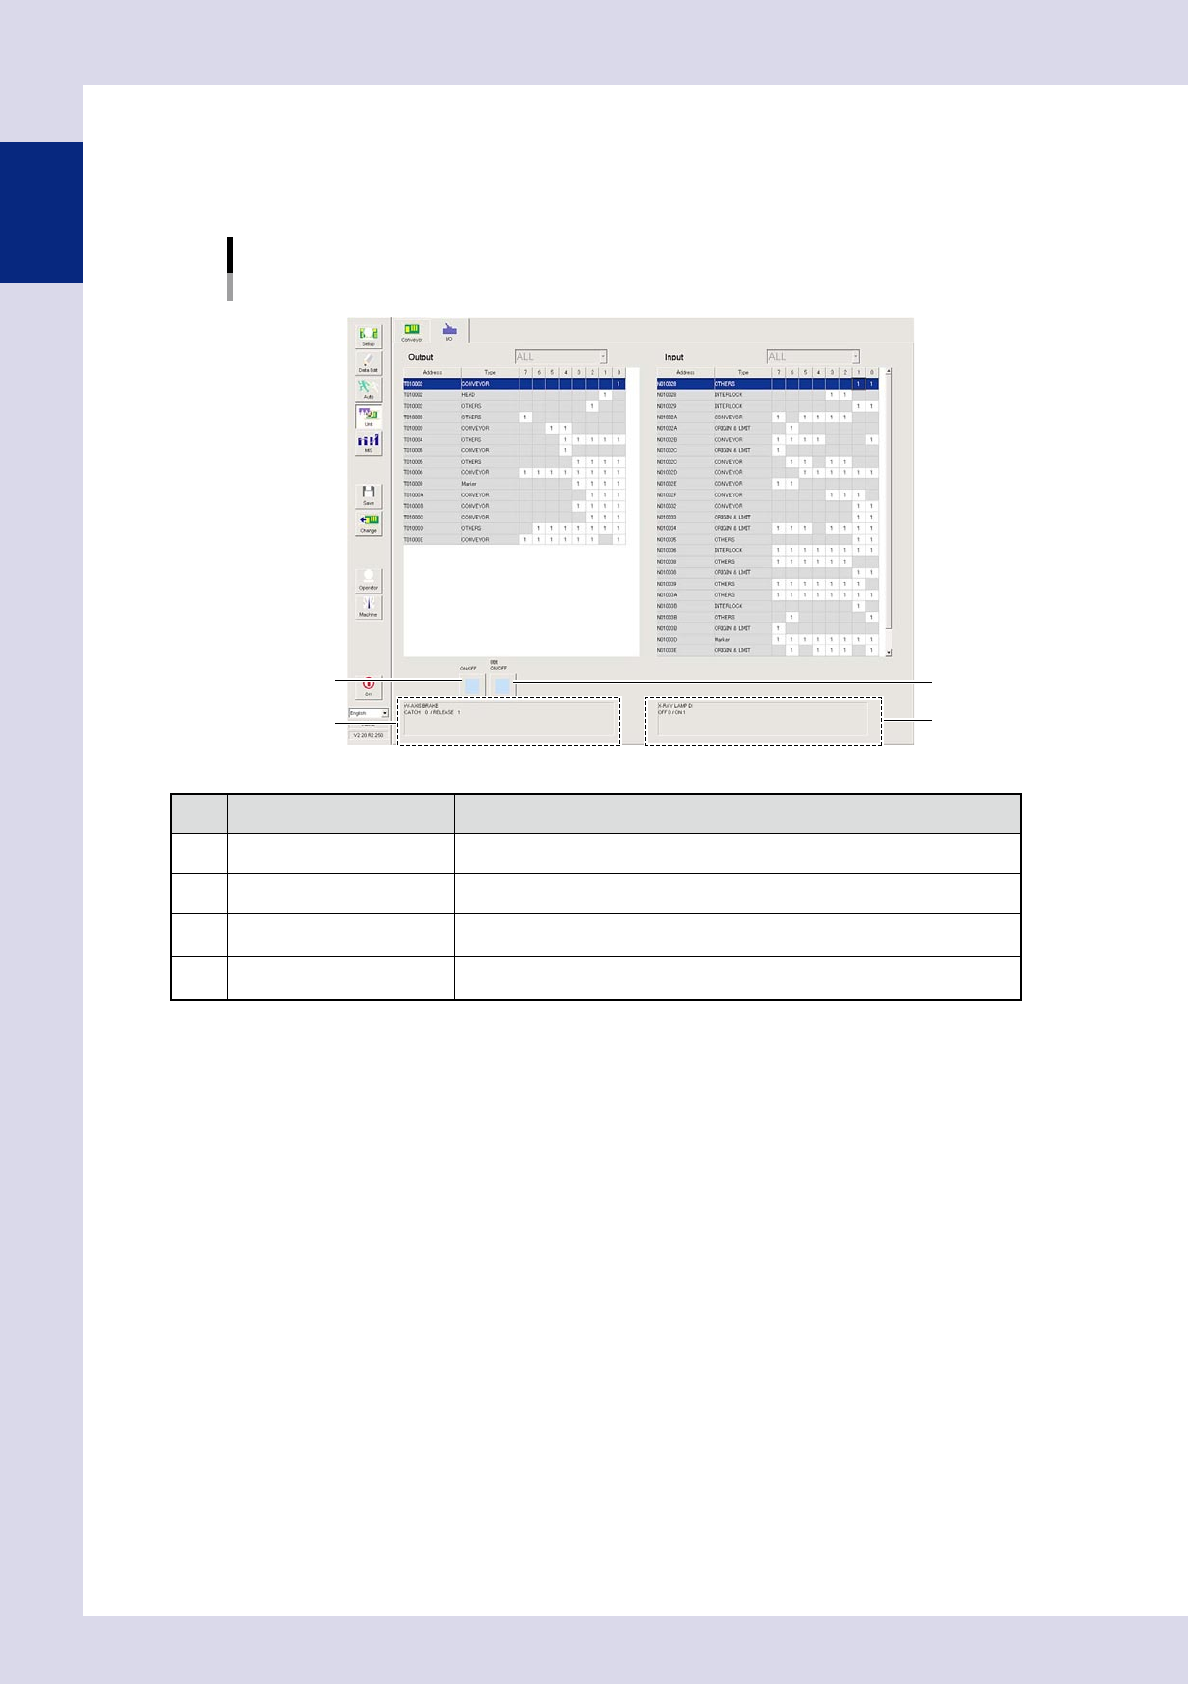
1.6.2 "I/O" screen
This screen allows you to perform I/O signal status checks and turn outputs ON and OFF.
n
YSi-S, YSi-X
[Unit] – [I/O] screen
YSi-S, YSi-X
1
3
2
4
24122-P6-00
Item/button name Description
1 ON/OFF switch (individual) Turns the output signal for the location selected with the cursor ON and OFF.
2 ON/OFF switch (line) Turns the output signals for the line selected with the cursor ON and OFF.
3 Output signal description
Displays the output signal name selected with the cursor, and the meaning of "0"
and "1".
4 Input signal description
Displays the input signal name selected with the cursor, and the meaning of "0"
and "1".