YSI_Prog_E - 第89页
2-18 2 Creating inspection pr ograms 2.4.2 Fiducial mark settings 1 Pr ess the [Data Edit] button and open the "Fiducial" tab. 2 Set fiducial marks Open the tab for which fiducials are to be s et, and set the f…
2-17
2
Creating inspection programs
M. Shape Type
A selection can be made from the following three shapes. Select from the drop-down list based on the mark being used.
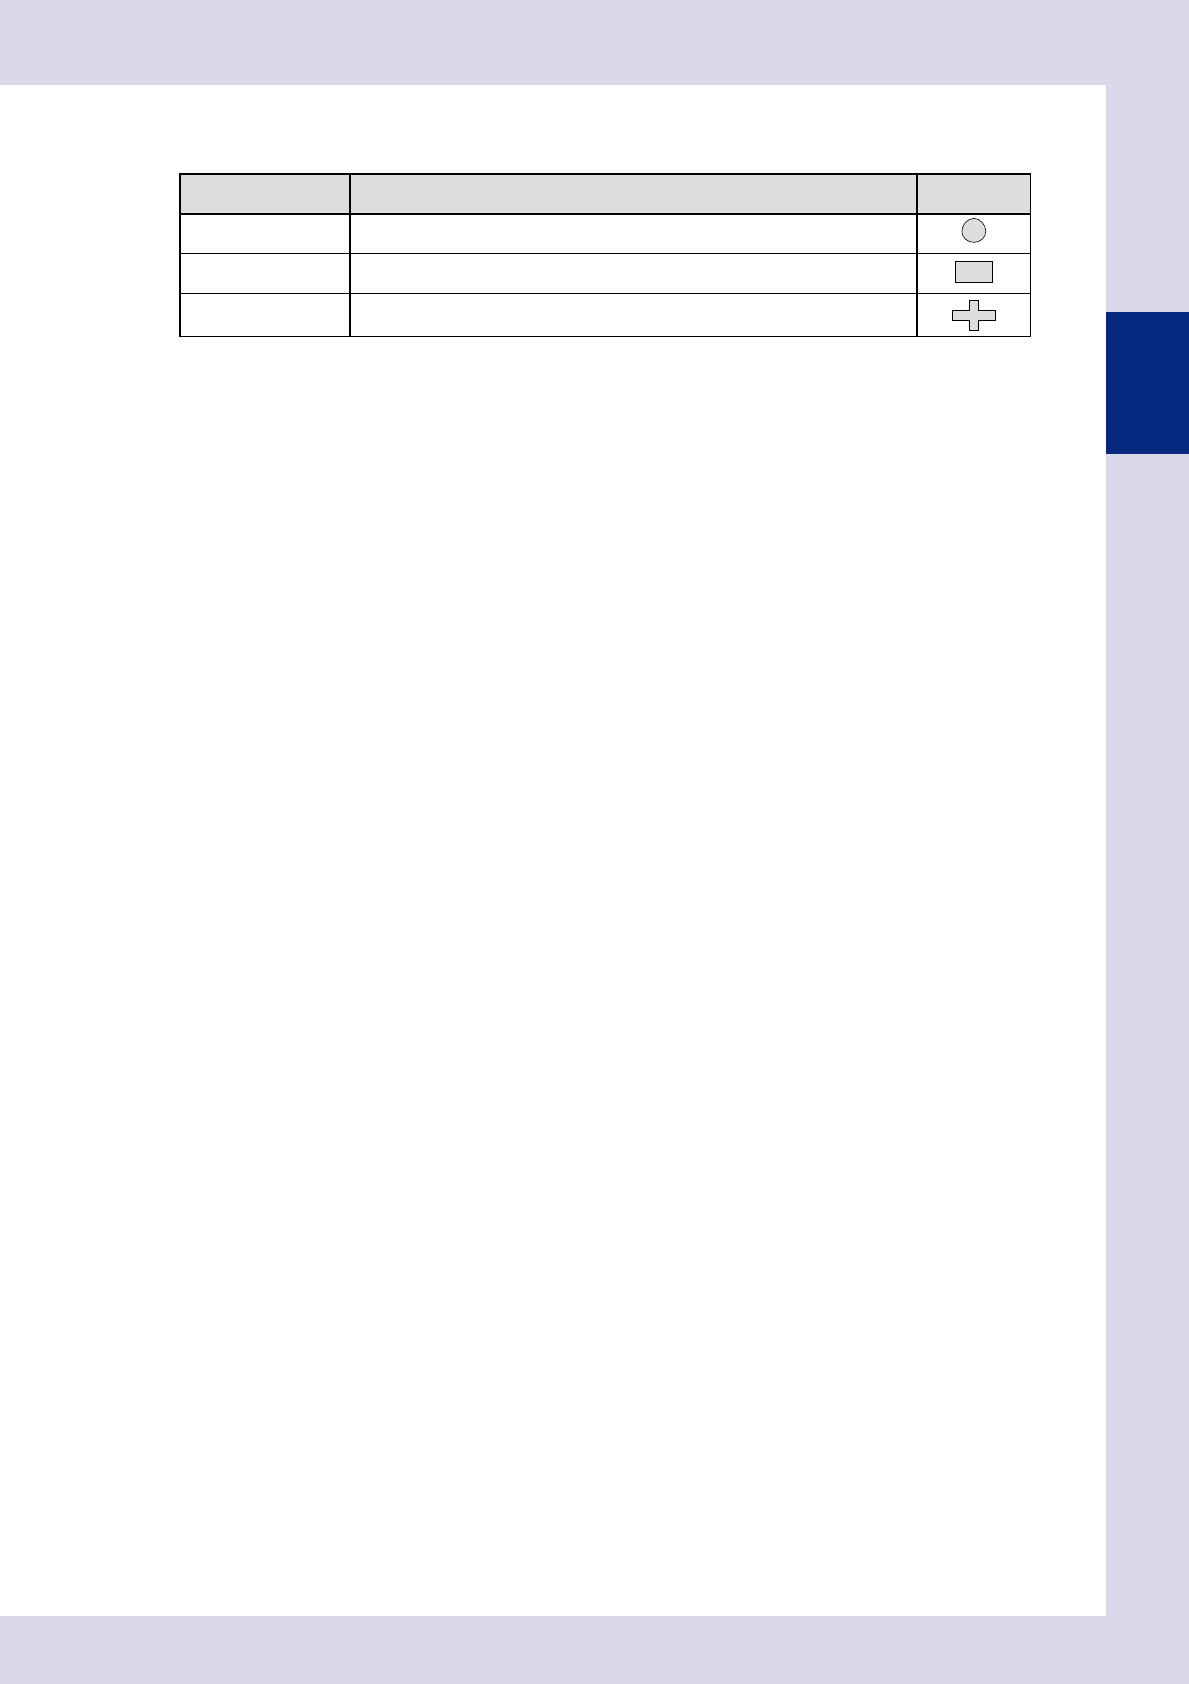
Shape type Description Example
Circle Select if the mark shape is round.
Square/Rectangle Select if the mark shape is square or rectangular.
Special
Select if the mark is made up from a single object, and the mark shape is other
than a circle, square, rectangle, or equilateral triangle.
N. Mark Size (mm)
Enter the mark outline dimensions. The dimensions can be entered automatically if unknown. Press the [Measure] button
and enclose the mark by dragging the mouse. The recognized outline dimensions are set and a test is performed.
R. Circularity
Enter the mark circularity.
The circularity can be entered automatically if unknown.
Press the [Measure] button and enclose the mark by dragging the mouse. The recognized circularity is set and a test is
performed.
T. Tolerance (%)
Sets the extent to which the the margin of error for the set mark setting value and actually recognized value is to be
allowed as a percentage.
Reference value: 20%
2-18
2
Creating inspection programs
2.4.2 Fiducial mark settings
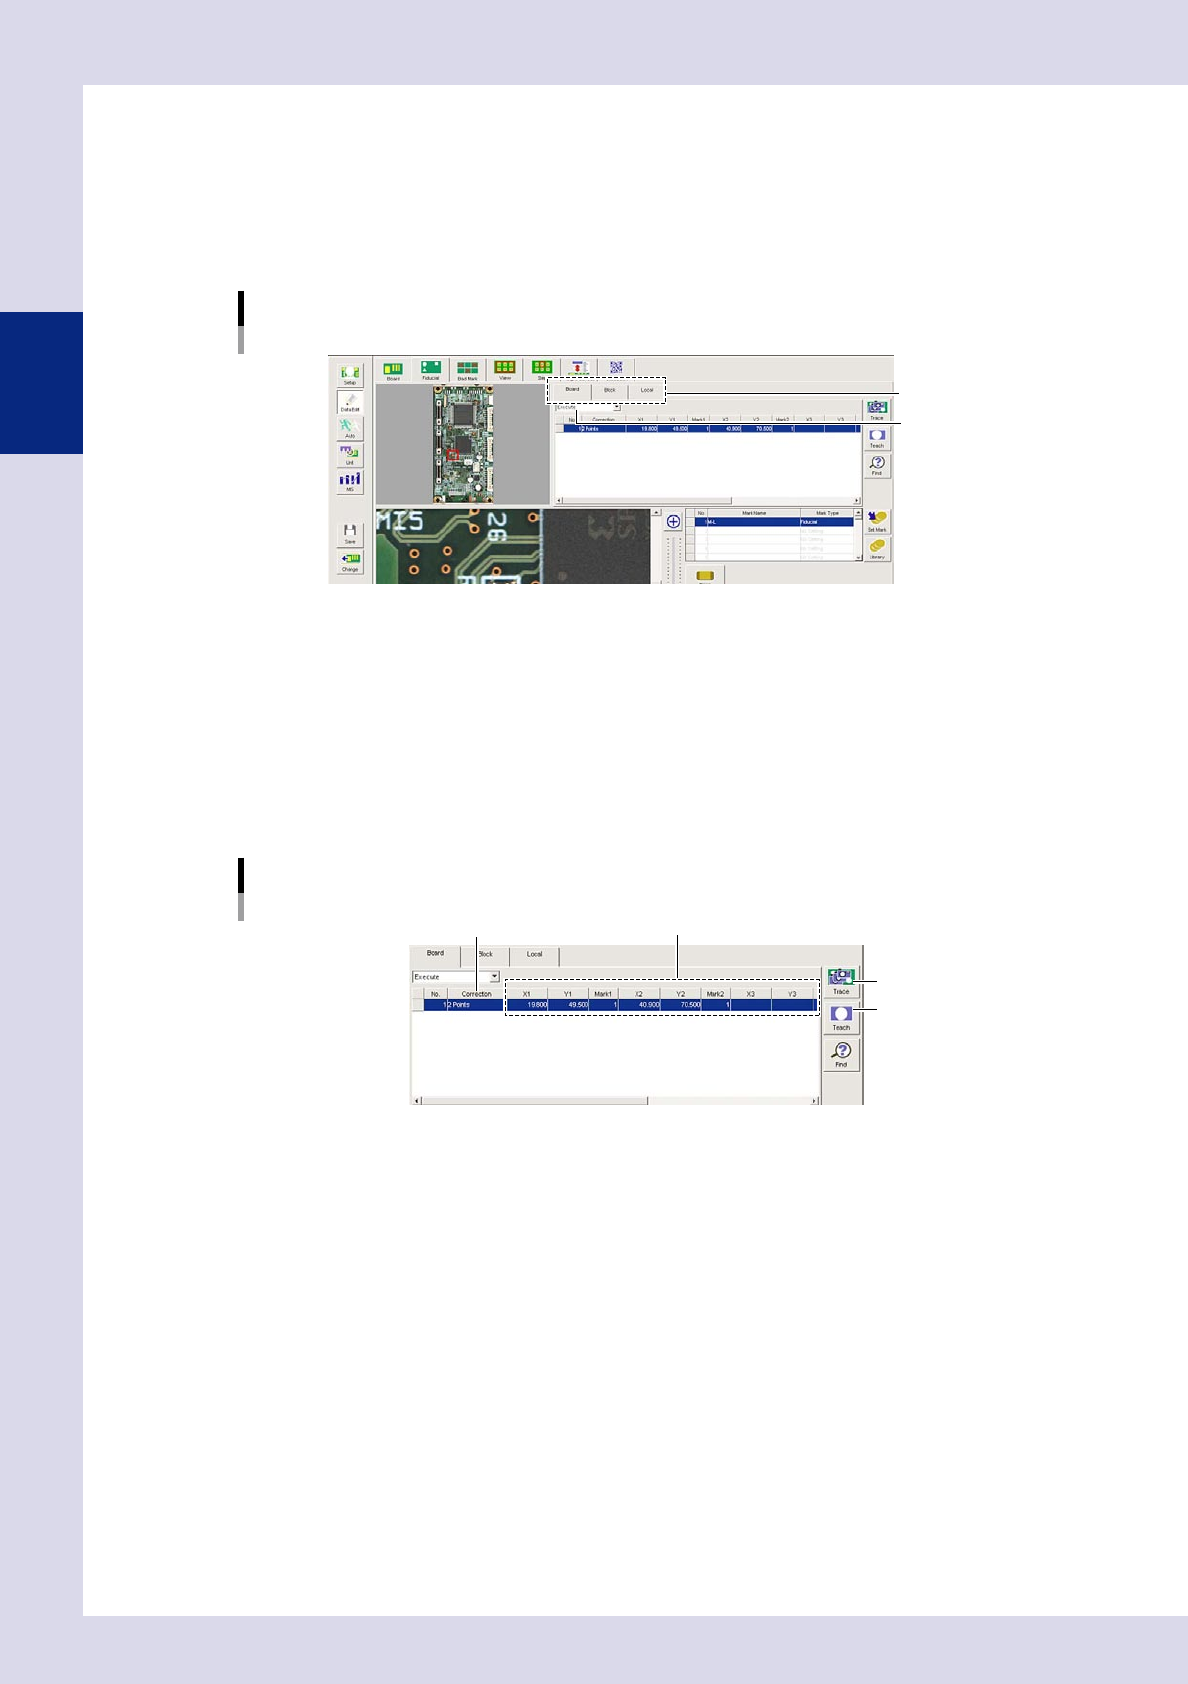
1
Press the [Data Edit] button and open the "Fiducial" tab.
2
Set fiducial marks
Open the tab for which fiducials are to be set, and set the fiducial function to "Execute".
Fiducial mark settings
Select a tab.
Set to "Execute".
24212-P6-00
"Board" tab (board fiducials)
Performs positional correction in board units.
"Block" tab (block fiducials)
Performs positional correction in units of individual boards within multi-board panels.
"Local" tab (local fiducials)
Performs positional correction of arbitrary steps such as for each parts and so on.
3
Set the mark list.
Mark list settings
[Teach] button
Correction method XY coordinates, mark Nos.
[Trace] button
24213-P6-00
Correction
Select from the drop-down list.
Do not correct:
Fiducial positional correction is not performed.
1 Point:
Performs positional correction with one fiducial mark point. Board X and Y direction displacements
are corrected.
2 Points:
Performs positional correction with two fiducial mark points. Board X and Y direction displacements
and tilt are corrected.
3 Points:
Performs positional correction with three fiducial mark points. Board X and Y direction displacements
and tilt are corrected. Used for boards of material (paper phenol, paper) easily subject to expansion
and contraction or warp such as large boards or flexible boards.

2-19
2
Creating inspection programs
X, Y
Enter the fiducial mark coordinates. If "2 Points" is selected for the correction method, enter coordinates
for X1, Y1, X2, and Y2. If "3 Points" is selected for the correction method, enter coordinates for X1, Y1, X2,
Y2, X3, and Y3.
• Ifcoordinateshavealreadybeenenteredinsuchcasesaswithprogramsconvertedfrommount
data, use the coordinates as they are. (Recommended)
• Iffiducialmarkcoordinatesareunknown,coordinatescanbeenteredbyteaching.Afterclicking
the fiducial mark on the board image, click the center of the fiducial mark in the field-of-view image
in the lower left of the screen. After setting the mark parameters, press the [Teach] button when the
test result is "OK". The recognized center coordinates are entered.
Mark
Enter the mark No. This number corresponds to the number in the mark data list.
If "2 Points" is selected for the correction method, enter a number for Mark 1 and Mark 2.
If "3 Points" is selected, enter a number for Mark 1, Mark 2, and Mark 3.
n
NOTE
• Ifsettingblockducials,settheducialmarkinthelineforeachblockNo.
• Ifsettinglocalducials,settherespectivelocalducialmarks.
Set the mark list number for the "Local Fid. No." optional parameter in the "Step" screen for the relevant step.
TIP
If fiducial marks are unclear, use the U, H, M, or L lighting buttons to change the lighting so that the mark becomes
clearer.
4
Move the camera to the fiducial mark position.
Select a mark from the mark list and press the [Trace] button. The camera moves to the fiducial mark
position.
5
Set the mark data list.
Set for the mark Nos. set in marks 1, 2, and 3 in the mark list.
Mark data list settings
Select fiducial.
24214-P6-00
No.
These numbers correspond to the mark Nos. set in marks 1, 2, and 3 in the mark list.
Mark Name
Enter an easily distinguishable name up to nineteen single-byte alphanumeric characters for each mark.
Spaces cannot be entered.
Mark Type
Select "Fiducial" from the drop-down list.