00194994_01.pdf - 第31页
SIPLACE Software Guide Version 408.xx 3 Graphical user interface Issue 03/06 EN 3.3 User interface - vie ws and menus 31 Æ Click the checkboxes correspondin g to the machine options which you want to ac tivate or de- act…

3 Graphical user interface SIPLACE Software Guide Version 408.xx
3.3 User interface - views and menus Issue 03/06 EN
30
3.3.2.3 "Options" menu
The "Options" menu is only available in the main view. This menu contains all the supplementary
functions. 3
Æ Click the required menu item and then make the appropriate settings or selections in the cor-
responding windows or dialog boxes.
Machine options... 3
Depending on access level, you can obtain information about the station configuration ("Opera-
tor") or activate or deactivate the displayed machine options ("Line engineer", "Service"). 3
Æ Click the Machine options... menu item (or the appropriate button in the working area of the
main view). The following window is displayed.
3
Fig. 3.3 - 3 "Machine options" dialog box (example: SIPLACE CF)
NOTE
Only those machine options are displayed which are configured at the current station.
This dialog box may contain different information and check boxes depending on the type of
SIPLACE machine being used. 3
SIPLACE Software Guide Version 408.xx 3 Graphical user interface
Issue 03/06 EN 3.3 User interface - views and menus
31
Æ Click the checkboxes corresponding to the machine options which you want to activate or de-
activate.
NOTE
At "Operator" access level, it is only possible to activate and deactivate the conveyor interface op-
tions. 3
Æ Click Accept to save the settings.
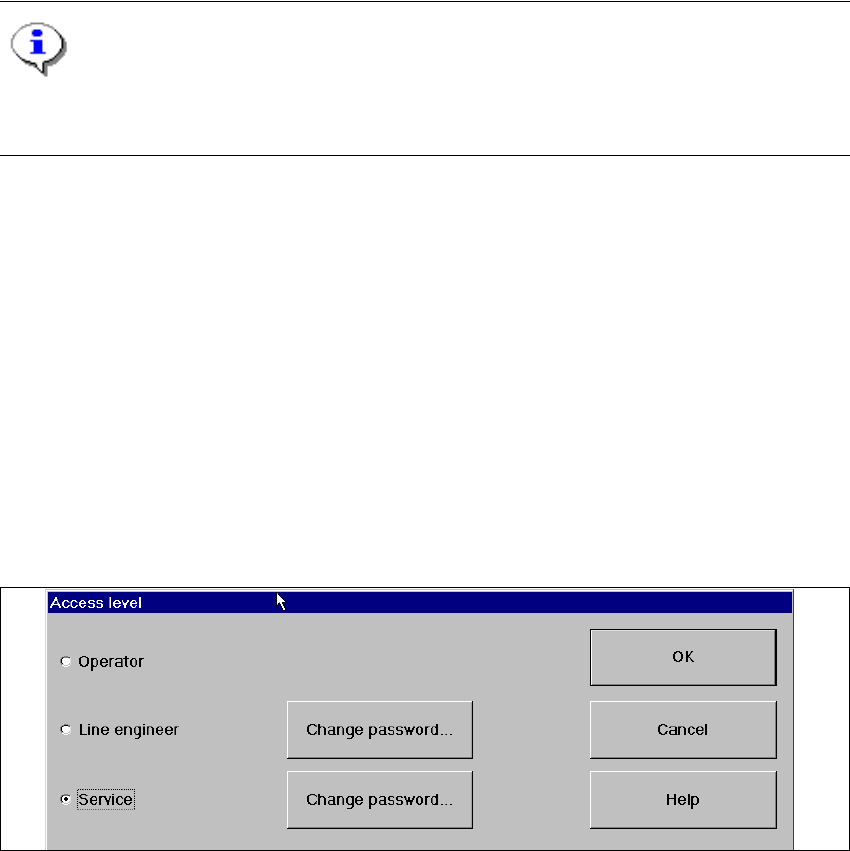
Access level... 3
It is possible to protect some of the functions of the user interface against unauthorized use by
setting an access level and allocating a password. Functions which are not accessible from a
given access level cannot be executed since the associated push buttons, radio buttons and
menu commands are either inactive or not displayed. 3
You can choose between the access levels "Operator", "Line engineer" and "Service". Passwords
can be allocated for the access levels "Line engineer" and "Service". 3
Æ Click the Access level... menu item.
The "Access level" dialog box is displayed.
3
Fig. 3.3 - 4 "Access level" dialog box
Æ Click the radio button for the required access level.
Æ Click the "Change password" button to the right of the access level if you want to allocate a
password or change an existing password.
The dialog box for password entry is now displayed.
3 Graphical user interface SIPLACE Software Guide Version 408.xx
3.3 User interface - views and menus Issue 03/06 EN
32
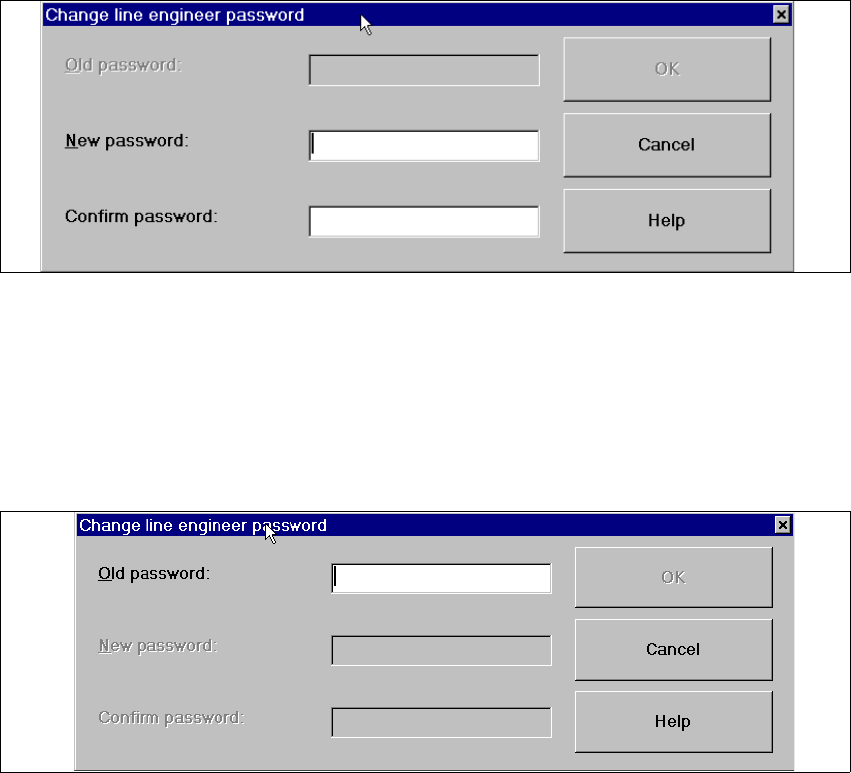
Example of initial password allocation 3
3
Fig. 3.3 - 5 "Change line engineer password - initial allocation" dialog box
Æ Click the "New password" text box and enter the required password.
Æ Click the "Confirm password" text box and re-enter the password.
Æ Click the OK button to confirm the password.
Example for the modification of an existing password 3
3
Fig. 3.3 - 6 "Change line engineer password - change an existing password" dialog box
Æ Click the "Old password" text box and enter the current password.
The other two text boxes now become active.
Æ Click the "New password" text box and enter the new password.
Æ Click the "Confirm password" text box and enter the new password for a second time.
Æ Click the OK button to confirm the password.
Æ Click OK to close the "Access level" dialog box.
Control mode... 3
The control mode determines how the station is supplied with the necessary placement data. 3
Æ Click the Control mode... menu item.
The "Control mode" dialog box is displayed.