00196683-01 - IM Installation Manual Siplace Pro 8.0_en.pdf - 第37页
4 Installation of SIPLACE Pro and possible Setup Types Installation Manual Edition 03/2010 US SIPLACE Pro 8.0 35 Ste p 2 – Y ou are prompted to enter the names of the co mputer s which are running Line Control Server and…
Installation Manual 4 Installation of SIPLACE Pro and possible Setup Types
SIPLACE Pro 8.0 Edition 03/2010 US
34
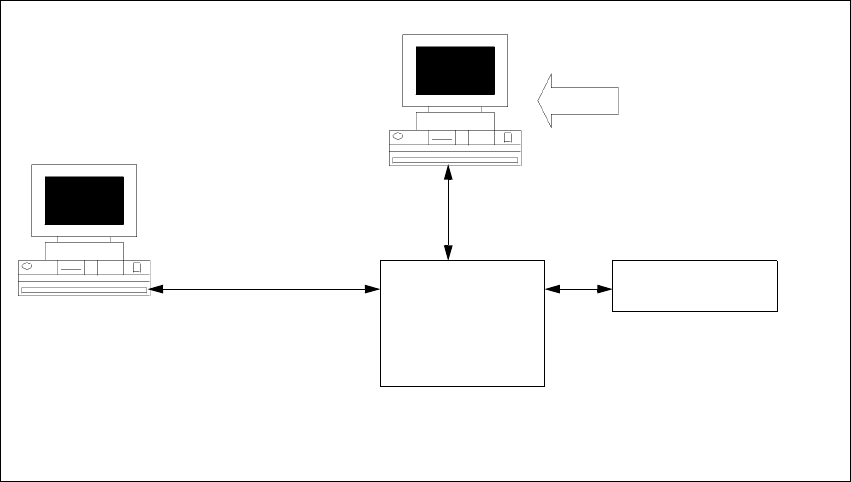
4.2.4 Setup Type – SIPLACE Pro Line Control GUI
This setup type is used for computers dedicated to perform download of production data to the
line. Computers with the "SIPLACE Pro Line Control GUI" setup should be located close to the
line. 4
4
Fig. 4 - 19 Components – SIPLACE Line Control GUI
Step 1
Æ Run through the steps in ”Starting installation – first steps” from page 15.
Æ Select the SIPLACE Pro Line Control GUI setup type.
Æ Click Next.
Line Control
GUI
SIPLACE Pro
Interface
MS SQL Server with
SIPLACE Pro Server,
Line Control Server, and
Database pre-installed
Setup
COM
MSMQ
Resource
Manager
4 Installation of SIPLACE Pro and possible Setup Types Installation Manual
Edition 03/2010 US SIPLACE Pro 8.0
35
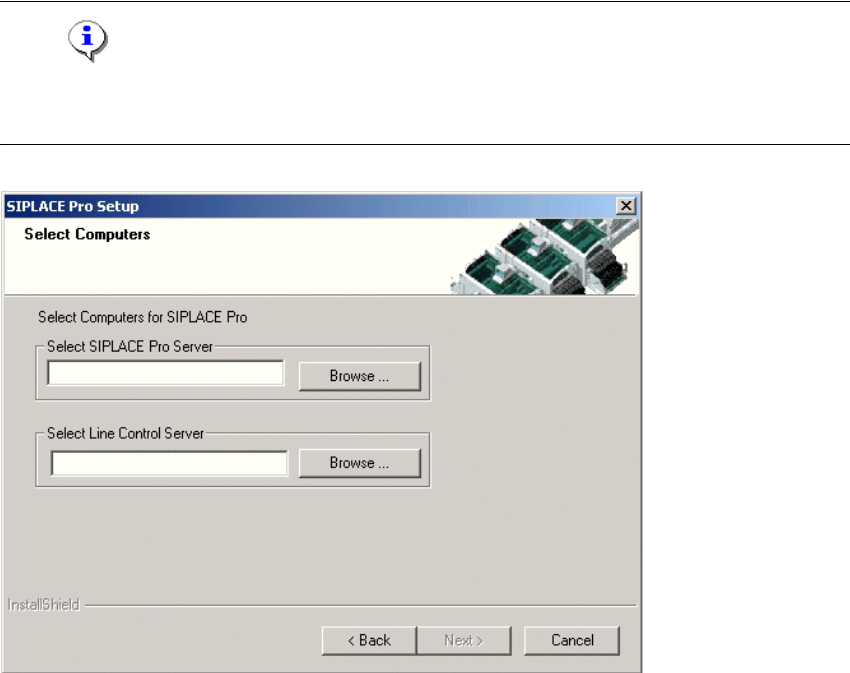
Step 2
– You are prompted to enter the names of the computers which are running Line Control Server
and SIPLACE Pro Server.
Æ You can type in the names or click the Browse button to open a dialog box in which you can
select another computer name.
Note
SIPLACE Pro Server and Line Control Server must already be installed on the remote remote
computer. 4
4
Fig. 4 - 20 "Select Computers" dialog box
Installation Manual 4 Installation of SIPLACE Pro and possible Setup Types
SIPLACE Pro 8.0 Edition 03/2010 US
36
Step 3
The "Start Copying Files" dialog box gives you a last chance to check the information you have
entered during the previous steps. 4
Æ Click Next if you accept all the information entered so far.
Æ If you want to alter one or more details, click the Back button until you get to the dialog box in
question.
Æ There, input your changes and click Next to continue as usual.
– The installation routine is now started.
– The "Setup Complete" window confirms that the installation has been completed successfully.