wire-bonder.pdf - 第37页
WEST•BOND MODEL 454647E SER IES INSTRUCTION MANUAL 31 OPERATION Half-Auto Bonding 1. Search After First Bond The tool will stop here if the G key is presse d and h eld. This allows the movement of the X-Y manipulator. Th…
WEST•BOND MODEL 454647E SERIES INSTRUCTION MANUAL
30
OPERATION
Half-Auto Bonding
The operator is required to press the G key, or the GO BUTTON, each time the machine approaches the
work to make a bond. This mode allows the operator to manually select a bonding point by using the
micromanipulator to position the tool prior to contact. The bonding sequence of this mode is described as
follows: At first bond, the tool will stop at search if the G key is pressed and held, allowing X-Y movement,
and the bonding sequence will continue upon release of the G key. Without holding the G key, the tool will
not stop at search height. At the second bond, the tool will automatically stop at Loop Height, allowing X-
Y movement. Pressing and holding the G key at this point will bring the tool down to search elevation for
final X-Y adjustments. If the G key is not held the tool will approach the work until a bond is made. This
sequence will repeat until the completion of that wire.
HALF-AUTO BONDING (G was pressed in the Align or “Home” menu, or from Manual Bonding)
At Search: Pressing and holding “G” key will stop the tool at search elevation (allowing XY Movement).
At Loop Height: The tool will automatically stop at Loop Height (allowing XY Movement).
ϑ To change from “Full-Auto” Mode to “Half-Auto” Mode:
From the H
OME menu press the 8 key twice.
Bond 1 of 2 Look in microscope.
Force: High Power: 240 Time: 20ms
Tool is at Search. Use manipulator to
move and release G when ready to bond.
If G is pressed and held this menu is displayed.
Otherwise first bond is automatically completed and
the machine pauses at the next menu, Loop Height.
At Loop Height: Bond 2 of 2
Force: High Power: 240 Time: 20ms
7=Lock X
0=Manual bond G=Half-Auto
From this menu if G is pressed and held then the
machine will stop at Search and the next menu is
displayed before the last bond is completed.
Bond 2 of 2 Look in microscope.
Force: High Power: 240 Time: 20ms
Tool is at Search. Use manipulator to
move and release G when ready to bond.
Pressing (or releasing if held) G one more time will
complete the last bond.
WEST•BOND MODEL 454647E SERIES INSTRUCTION MANUAL
31
OPERATION
Half-Auto Bonding
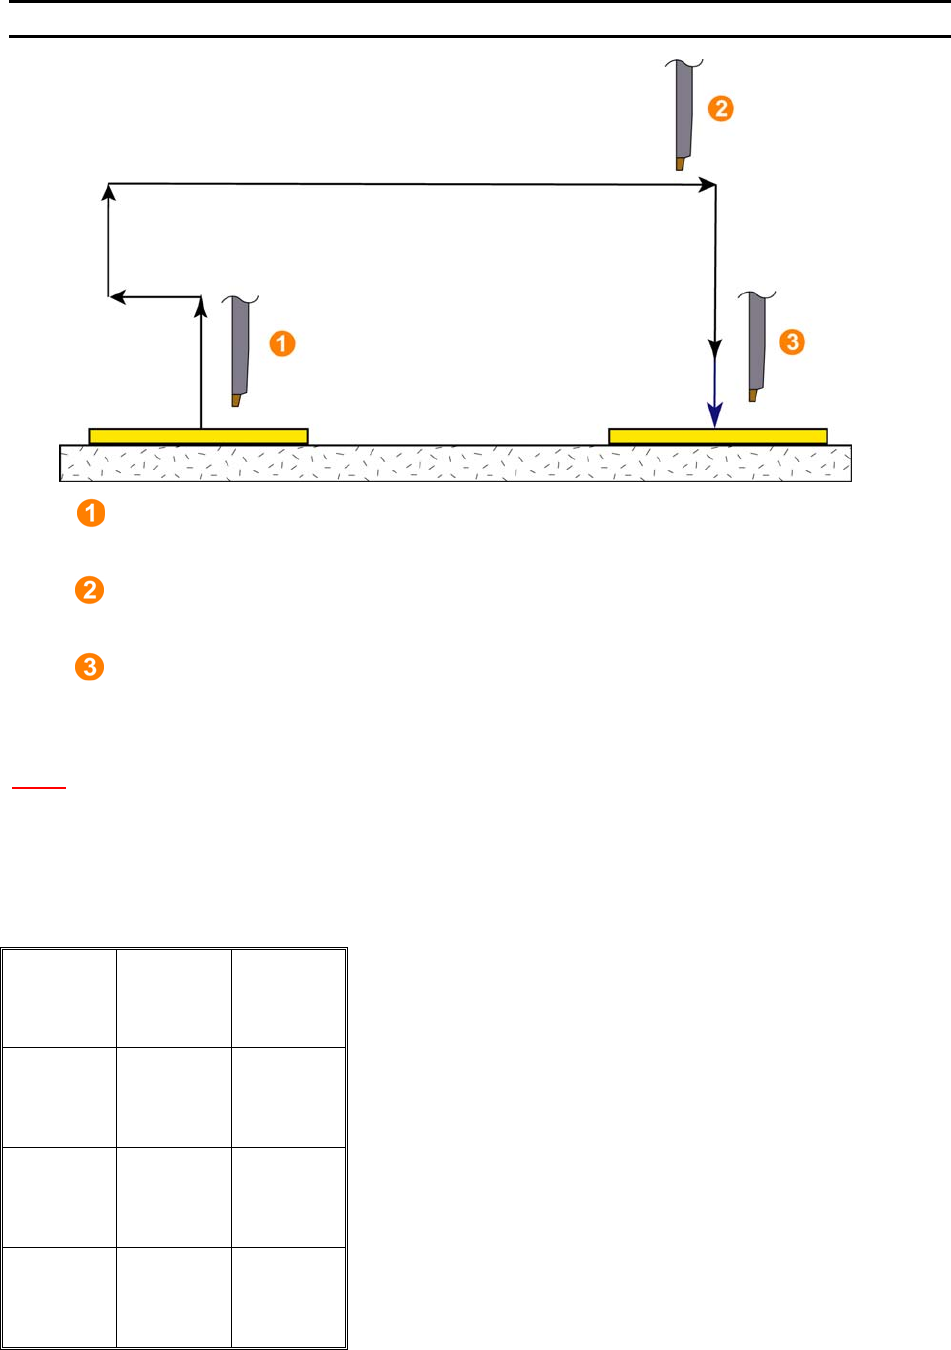
1. Search After First Bond
The tool will stop here if the G key is pressed and held. This allows the movement of the
X-Y manipulator. The bonding sequence will continue once the G key is released.
2. Loop Height
When in H
ALF-AUTO mode the tool will automatically stop here to allow movement of the
X-Y manipulator for targeting. Press the G key to complete the bonding sequence.
3. Search Before Second Bond
The tool will stop here if the G key is pressed and held after loop height. This allows the
movement of the X-Y manipulator for final targeting. The bonding sequence will continue
once the G key is released.
N
OTE! This process is also allowed in Full-Auto mode if the first bond is inhibited.
Key Format:
1
2
3
4
5
6
7
8
9
A
0
Manual
Bond
G

WEST•BOND MODEL 454647E SERIES INSTRUCTION MANUAL
32
OPERATION
Manual Bonding
This mode allows the operator to slowly lower the Tooling Head by pressing the 0 key until the Bonding
Tool gently touches the bond surface. At anytime the operator can manually select a bonding point by
using the micromanipulator to position the tool prior to contact. If it is necessary to raise the already
lowered bond tool, the operator can press the 5 key to raise the Tooling Head. Depending on whether the
machine is set-up in half-auto or full-auto mode, the bond to will proceed to the loop height or the search
height of the second bond.
ϑ To call “Manual Bonding”
From the H
OME menu press 0 (MANUAL BOND MODE). Or press and release any key while
auto bonding.
Key Format:
1
Go To
Device/Type
2
Home
3
4
↑ inch
up
5
Open Clamp
6
Inch tail
Forward
7
8
Inch tail
Backward
9
Feed
A
↓ inch
down
0
Half-
or
Full-Auto G
Bond 1 of 5 -->Look in microscope
5=inch up 6=Open clamp
7=Inch Tail (+) 9=Inch Tail (-)
A=Feed 0=inch down G=Full-Auto
6 = Close clamp (If the clamps are open.)
A = Feed (Only available at first bond)
2 = Go To Device/Type
3 = Exit to Align