wire-bonder.pdf - 第93页
WEST•BOND MODEL 454647E SER IES INSTRUCTION MANUAL 87 ADVANCED PROGRAMMING Edit Number of Bonds This option allow the operat or to specify the number of bonds for the specified wire type. (Maximum of 5) NUMBER OF BON DS …
WEST•BOND MODEL 454647E SERIES INSTRUCTION MANUAL
86
ADVANCED PROGRAMMING
Edit Pre-Bond Delay
Directly after the tool contacts the work surface and counts a specified number of Z-steps into the work, it
has a small pre-bond delay before the ultrasonics are fired. This is done to cancel any remaining motor or
motion vibrations in the machine, and to allow it to make a good solid bond. This option enables the
operator to increase the delay time before the ultrasonic power is used. The default value for this function
is 5 msecs.
PRE-BOND DELAY
DELAY before Bond #5: 5 msecs
4=Key in 5=Increase 6=Copy
7=Prev bond 8=Suggest 9=Next bond
A=Prev option 0=Decrease G=OK
Minimum Pre-Bond Delay = 0 msecs.
Maximum Pre-Bond Delay = 25 msecs.
To edit “Bond Delay”
From the H
OME menu press 4 (EDIT), A (BOND EDIT), 4 (EDIT BOND), and then 0 (BOND DELAY)
Key Format:
Previous
Menu
1
Go To
Device/Type
2
Home
3
Key in
4
↑
Increase
5
Copy
6
Previous
bond
7
Suggest
8
Next bond
9
Previous
Option
A
↓
Decrease
0
OK
G
WEST•BOND MODEL 454647E SERIES INSTRUCTION MANUAL
87
ADVANCED PROGRAMMING
Edit Number of Bonds
This option allow the operator to specify the number of bonds for the specified wire type. (Maximum of 5)
NUMBER OF BONDS
Device 2 Type 3: Edit # of Bonds: 5
4=Key in 5=Increase
7=Prev type 8=Suggest 9=Next type
A=Prev menu 0=Decrease G=Next option
To edit “# of Bonds”:
From the H
OME menu press 4 (EDIT), A (BOND EDIT), and then 5 (# OF BONDS)
Key Format:
Previous
Menu
1
Go To
Device/Type
2
Home
3
Key in
4
↑
Increase
5
6
Previous
bond
7
Suggest
8
Next bond
9
Previous
Menu
A
↓
Decrease
0
Next option
G
WEST•BOND MODEL 454647E SERIES INSTRUCTION MANUAL
88
ADVANCED PROGRAMMING
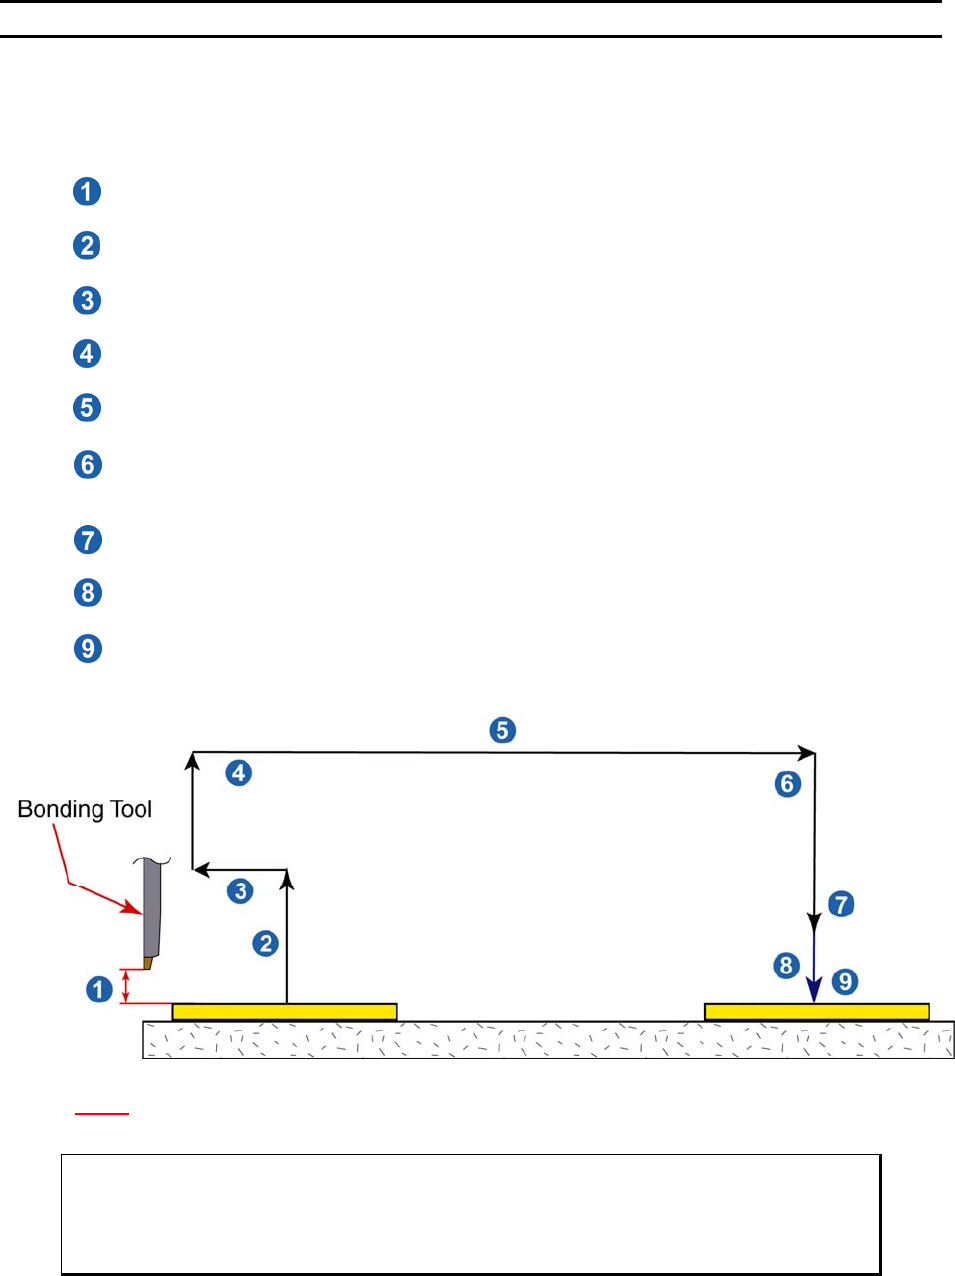
Edit Loop Motion
The most effective way to evaluate the necessary changes required for proper looping, or bond position,
of the bonding programs wire structure is to actually begin bonding with the 454647E’s default values.
Bond only one wire at a time; if the loop shape is not as desired, edit one or more of the following data:
4. Edit S
EARCH ELEVATION for top (Bond 1 Only)
An elevation at which the operation can visually place the bond.
5. Edit Z-B
EFORE-Y (Before bond 2)
An elevation used prior to backbend to aid in creating proper loop shape.
6. Edit B
ACKBEND (Before bond 2)
A step backward to aid in loop shape.
7. Edit L
OOP ELEVATION (Before bond 2)
The maximum elevation at which the tool rise to create loop.
8. Edit Y-O
FFSET for Bond 2 (1
st
Adjustment)
The distance from 1
st
to 2
nd
bond in Y motor steps.
9. Edit C
LOSE CLAMP AT LOOP HEIGHT (Before bond 2) 4500E ONLY
Option as to whether the clamps are to stay open or close prior to 2
nd
search elevation.
This will also help determine loop shape.
10. Edit S
EARCH ELEVATION Before bond 2 (below loop)
An elevation at which the operation can visually place the bond.
11. Edit Y-O
FFSET for Bond 2 (Final Adjustment)
The distance from 1
st
to 2
nd
bond in Y motor steps. Final placement.
12. Edit C
LOSE CLAMP AT SEARCH (Before bond 2) 4500E ONLY
Option as to whether the clamps are to stay open or close prior to 2
nd
bond. This will also
help determine loop shape.
N
OTE! 1 Z Micro-Step = 0.000208 inch = 0.208 mil = 5.2832 microns.
1 Y Micro-Step = 0.000208 inch = 0.208 mil = 5.2832 microns.
ϑ To call “Edit Loop Motion”
From the H
OME menu press 4 (EDIT), 0 (LOOP MOTION) and then G to step Tool
Head through the bonding motion or press 4 to E
DIT individual looping parameters.