00195170-01 SA trailing cable.pdf - 第23页
Replacing the Trailing Cable Unit (IGU S) on X-Series Machines from B-079 [03021065-xx] onwards Service Manual Exchange of the trailing cable SIPLACE HF and X-Series 23 Shorten the X hoses at the X tailing cable clamp (t…
Replacing the Trailing Cable Unit (IGUS) on X-Series Machines from B-079 [03021065-xx] onwards
Preparing the Trailing Cable Unit
22 Service Manual Exchange of the trailing cable SIPLACE HF and X-Series
4.2 Preparing the Trailing Cable Unit
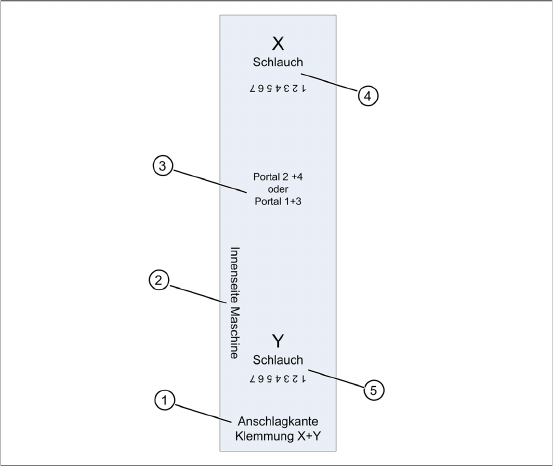
Overview of Gauge/Handling the Gauge
The trailing cable is supplied as a complete as-
sembly.
With the help of the gauge, shorten the compres-
sed air hoses to the pneumatic distributor on the
head mount and in the machine. The existing com-
pressed air hoses which are run inside the machi-
ne, need to be cut and then connected with the
cable ties (03049770-01) to the trailing cable unit,
at the correct position.
There are two different gauges available. The gau-
ge used depends on your gantry arrangement.
Gauge for trailing cable units for gantries 1+3
of X-series machines [00383029-01]
Gauge for trailing cable units for gantries 2+4
of X-series machines [00383057-01]
Instructions for correct handling of the gauges can
be found on the gauges.
Stop edge for clamp X + Y: Place this side of the
gauge against the clamp of the trailing cable unit.
1. Inside the machine: Place this side of the gau-
ge so that is faces towards the inside of the
machine (Nur bei Y-Schlauch??)
2. Gauge designation
3. Y hose: this has 7 drillings for the marked
points on the Y hoses.
4. X hose: this has 7 drillings for the marked
points on the X hoses.
Replacing the Trailing Cable Unit (IGUS) on X-Series Machines from B-079
[03021065-xx] onwards
Service Manual Exchange of the trailing cable SIPLACE HF and X-Series
23
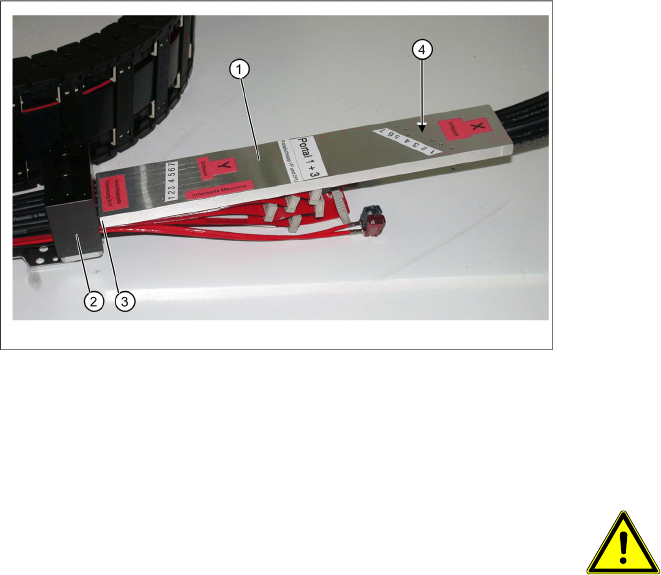
Shorten the X hoses at the X tailing cable
clamp (to the pneumatic distributor at the
head mount)
1. Gauge for shortening the hoses
2. X trailing cable clamp
3. Stop edge (gauge at clamp)
4. Hose markings
X The gauges (1) are labeled for the appropriate
gantries (gantries 1+3 or 2+4). Select the cor-
rect gauge.
X Place the edge (3) of the gauge (see the An-
schlagkante Klemmung X+Y marking on the
gauge) against the edge of the X trailing cable
clamping plate (2).
X Mark the compressed air hoses through the
drillings (4) in the gauge. See the X-Schlauch
marking on the gauge.
ATTENTION:
Mark the correct position!
X See the X-Schlauch marking on the
gauge.
X See the Innenseite Maschine
marking on the gauge.
X The compressed air hoses need to
be cut through at the markings la-
beled as „X-Schlauch“, to ensure
that they are the correct length. If
the hoses are cut too short, the
entire trailing cable will need to be
discarded.
X Use the hose nippers to cut the compressed
air hoses at the points marked. The hoses can
now be inserted into the pneumatic distributor
with the optimum curvature.
Replacing the Trailing Cable Unit (IGUS) on X-Series Machines from B-079 [03021065-xx] onwards
Overview
24 Service Manual Exchange of the trailing cable SIPLACE HF and X-Series
4.3 Overview
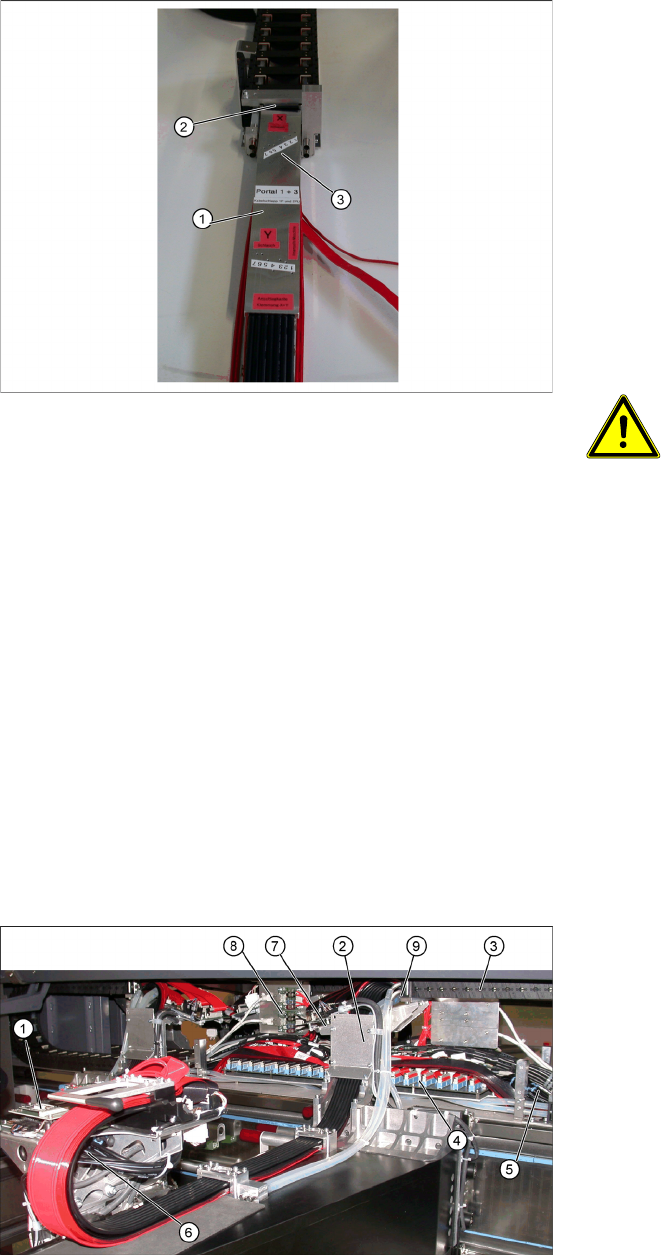
Shortening the Y hoses to the pneumatic
distributor in the machine base
1. Gauge for shortening the hoses
2. Clamp stop edge on the machine base
3. Hose markings
X The gauges (1) are labeled for the appropriate
gantries (gantries 1+3 or 2+4). Select the cor-
rect gauge.
X Place the edge (2) of the gauge (see the An-
schlagkante Klemmung X+Y marking on the
gauge) against the edge of the Y-axis clamp.
X Mark the compressed air hoses through the
drillings (3) in the gauge.
ATTENTION:
Mark the correct position!
X See the Y-Schlauch marking on
the gauge.
X The compressed air hoses need to
be cut through at the markings la-
beled as „Y-Schlauch“, to ensure
that they are the correct length. If
the hoses are cut too short, the
entire trailing cable will need to be
discarded.
X Use the hose nippers to cut the compressed
air hoses at the points marked. The hoses can
now be connected to the separated compres-
sed air hoses in the machine base, with the op-
timum length.
1. Head board
2. Trailing cable console
3. Power track chain
4. Trailing cable interface
5. Compressed air hoses to the pneumatic distri-
butor (in the machine base)
6. Gantry distributor
7. Gantry interface
8. Hotlink card
9. Connection piece for cooling tubes to Y-axis
motor