00198654-01_UM_Nozzle_Cleaning_Station_EN - 第49页
5 Tasks at the nozzle cleaning station 5.1 Filling and draining the Container User Manual SIPLACE Nozzle Cleaning Station 09/2019 49 5.1.2 Tip and shaft cleaning container The tip and the shaft cleaning container are in …
5 Tasks at the nozzle cleaning station
5.1 Filling and draining the Container
48 User Manual SIPLACE Nozzle Cleaning Station 09/2019
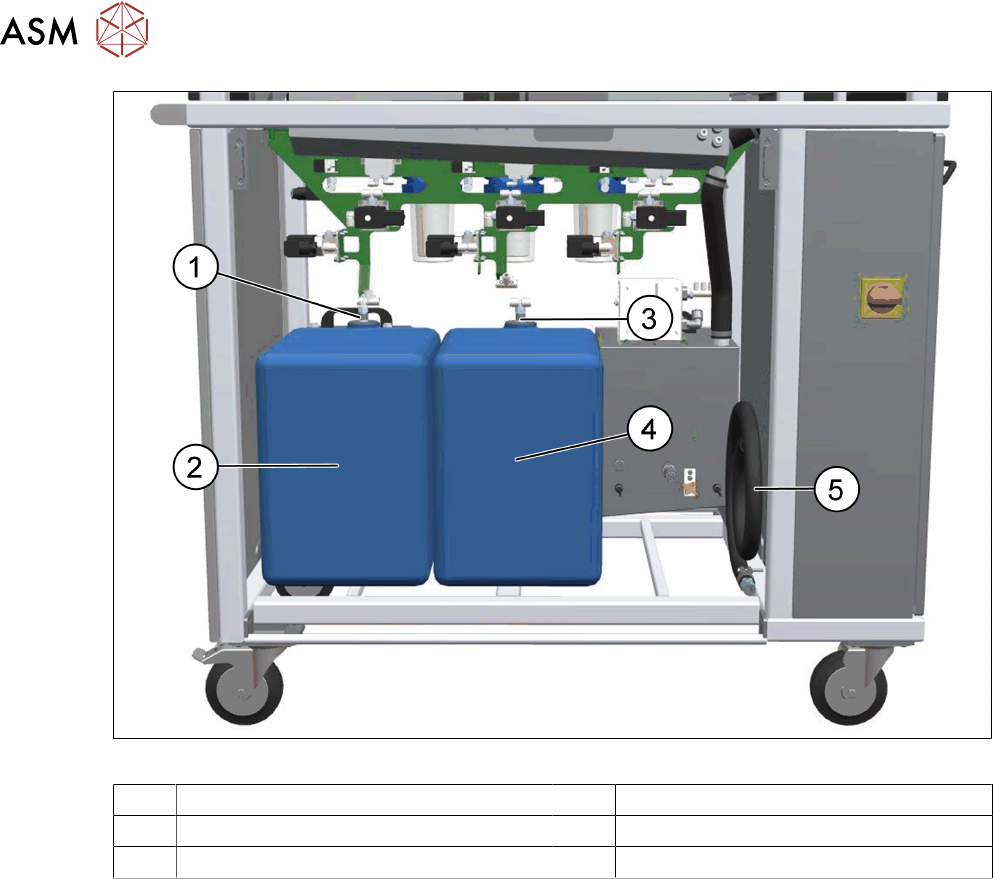
Fig.34: NCS - container located at the back
1 Screw cap wastewater container 2 Wastewater container (30l)
3 Screw cap demi container 4 Demi container
5 Drain hose for front container
Filling the demi container
► Remove the back cover.
► Open the screw cap at the demi container (1).
► Remove the container (2).
► Remove any liquid residues.
► Fill the container (2) with demi and put it back to the NCS.
► Connect the demi container (1).
► Close the back cover.
Draining the demi container
► Remove the back cover.
► Open the Screw cap to the wastewater container (3).
► Remove the container (4) and clean up any liquid residues.
► Empty the container (4) and put it back to the NCS.
► Connect the wastewater container (1).
► Close the back cover.
5 Tasks at the nozzle cleaning station
5.1 Filling and draining the Container
User Manual SIPLACE Nozzle Cleaning Station 09/2019 49
5.1.2 Tip and shaft cleaning container
The tip and the shaft cleaning container are in the lower part at the front of the NCS.
DANGER
Risk of damage / life!
Before changing the cleaning modules, stop the machine operation and disconnect it from
the power supply with the main power switch.
CAUTION
Hazardous material
The tip cleaning agent (KG15+) can contain residues of solder paste and metal particles.
► Observe the applicable safety data sheet and consider existing local regulation for dis-
posing of hazardous materials.
NOTICE
Level control
The level in the tip cleaning and shaft cleaning container is sensor controlled. If the level
drops below the sensor the NCS stops operation.
Make sure that there is enough liquid in the container.
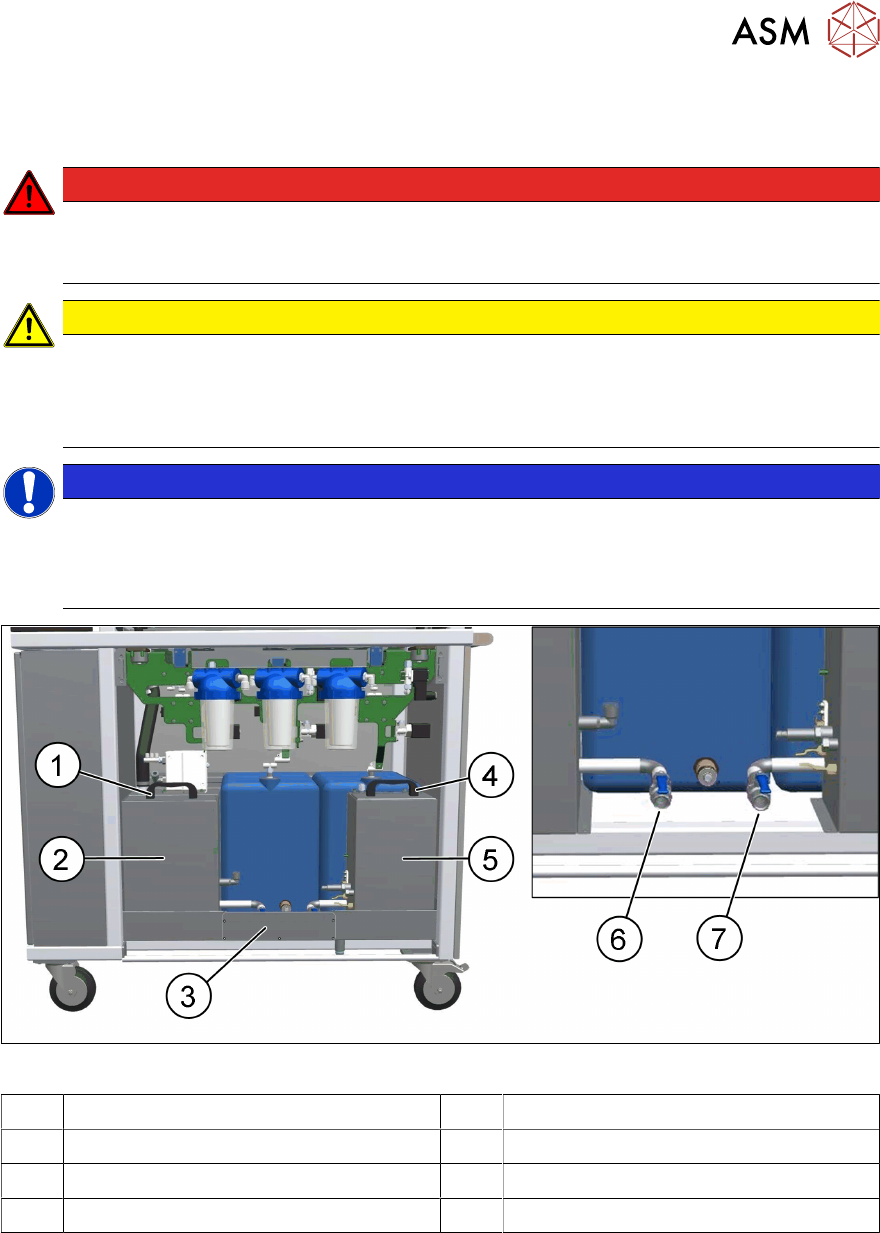
Fig.35: NCS – container located at the front
1 Cover shaft cleaning container 2 Shaft cleaning container (15 l)
3 Cover plate for draining 4 Cover tip cleaning container
5 Tip cleaning container (10 l) 6 Drain valve shaft cleaning container
7 Drain valve tip cleaning container
Filling the tip cleaning container
► Remove the front cover.
► Open the cover plate (4).
► Fill up the tip cleaning container (5) with "NCS additive KG15 nozzle tip cleaner" until the
sensor to check the water level is well covered.
► Close the cover plate (4) and the front cover.

5 Tasks at the nozzle cleaning station
5.1 Filling and draining the Container
50 User Manual SIPLACE Nozzle Cleaning Station 09/2019
Draining the tip cleaning container
► Open the front and the back cover.
► Remove the cover plate for draining (3).
► Take the drain hose and connect it to the drain valve (7) of the tip cleaning container.
► Put the open end of the drain hose into a sufficiently large and suitable waste container and
ensure that no liquid can escape.
► Open the drain valve (7) to empty the tip cleaning container (5).
► Close the drain valve (7) when ready.
► Remove the drain hose, empty it into the waste container and put it back.
► Remove any liquid residues and install the cover plate for draining (3).
► Close the front and the back cover.
Filling the shaft cleaning container
► Remove the front cover.
► Open the cover plate (1).
► Fill up the shaft cleaning container (2) with "Zestron Vigon SC" until the sensor to check the
water level is well covered.
► Close the cover plate (1) and the front cover.
Draining the shaft cleaning container
► Open the front and the back cover.
► Remove the cover plate for draining (3).
► Take the drain hose and connect it to the drain valve (6) of the shaft cleaning container.
► Put the open end of the drain hose into a sufficiently large and suitable waste container and
ensure that no liquid can escape.
► Open the drain valve (6) to empty the shaft cleaning container (2).
► Close the drain valve (6) when ready.
► Remove the drain hose, empty it into the waste container and put it back.
► Remove any liquid residues and install the cover plate for draining (3).
► Close the front and the back cover.